| :
| |||||
Curricular Materials to Accompany the McIntosh Apple Development Poster Distributed by the Education Committee of the Botanical Society of America Posted March 2001
Grade Levels: 6-8; 9-12
| : Plants respond behaviorally to changes in their environment by changing patterns of growth. The purpose of this lab is to explore how environmental features like light and volume of air influence growth in mung bean sprouts. Students will make predictions about the relationship between growth and environment, and test their predictions by growing sprouts in various sized plastic soda bottles. |
- Create a hypothesis about the effects of light and volume on the growth of mung bean sprouts.
- Observe, describe, and measure growth in mung bean sprouts.
- Record seedling growth in tabular form.
- Analyze data by calculating and graphing average seedling growth rates.
- Draw conclusions from results about the relationships between environment and growth in mung bean sprouts.
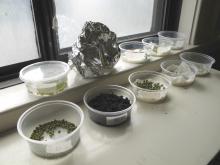
Background : A seed contains its own life support system. When stimulated to germinate, seeds use stored food reserves to grow into sprouts. A sprout is a tender, often edible, seedling that is produced following seed germination. As the sprout begins to develop and use up its stored reserves, the seedling needs light and carbon dioxide to continue growth. In this experiment, students will examine how the amount of carbon dioxide and light changes the growth of a mung bean's sprout. The equation of photosynthesis shows the relationships among carbon dioxide, light, and growth:
6 CO 2 + 12 H 2 O --- light ----> C 6 H 12 O 6 + 6 O 2 + 6 H 2 O .
In this expression, C 6 H 12 O 6 represents simple sugars that are used by the plant for energy and structural materials like wood. In other words, they are required for growth. Carbon dioxide ( CO 2 ) is necessary for plants to form those simple sugars. Plants have the capacity to use CO 2 from the atmosphere for this purpose. If students experimentally vary the amount of available carbon dioxide or light, they can observe their effects on plant growth. In this exercise, seedlings are grown in plastic soda bottles. The amount of CO 2 varies with the volume of the bottle and light is manipulated using aluminum foil. Additional volume will allow the seedlings to grow to a greater size. Light will have different effects depending on how long the sprouts are allowed to grow. In all cases, sprouts grown in low light will be longer than sprouts grown in more intense light. However, after the food reserves available in the seed are used up, a plant grown in the dark will cease to grow and will be outgrown by the plants grown in the light. In addition to reinforcing plant science content, this lab expects students to apply the scientific method. After learning basic information about growth and photosynthesis, students formulate a hypothesis about the growth of their mung bean sprouts in different treatments. After they have gathered and compiled the data, students will compare their experimental results to their original hypothesis and draw appropriate conclusions.
- Several 0.5, 1, and 2 Liter empty, clean, and clear plastic soda bottles. Rinse the bottles, but do not wash them in detergent which may inhibit seed germination or growth
- 10 mung bean seeds per student (Mung beans are available in most large grocery stores. However, if they are not, other peas or beans will work fine)
- paper towels
- aluminum foil
- metric rulers
- After giving the students information about plant growth, have them write a hypothesis about the relationship between the experimental variables and plant growth.
- Assign students to a soda bottle size (0.5, 1, or 2 Liter). There should be equal numbers of each size soda bottle distributed among the class.
- Have students place 10 mung beans in their soda bottle.
- Each student should rip one paper towel into several pieces (approximately 1 inch by 1 inch) and place them in their soda bottle.
- Students should fill the cap of their soda bottle with water and pour the water into the soda bottle. No more than this amount of water is required.
- Securely tighten the cap and do not reopened during the experiment.
- Assign the students to light and dark treatments. Each size bottle should have at least two light and two dark treatments.
- Record the treatments.
- Cover dark treatment soda bottles with aluminum foil.
- Place all bottles near the windowsill so the light treatments will receive sunlight. Keep both light and dark treatments to maintain as equal environments within them as possible. However, note that light treatments will be exposed to higher temperatures.
- Each day, have the students measure and record the length of the sprouts to the nearest mm using a metric ruler. Record the length of five sprouts and calculate the average. Record this information. Students will record data for 10 days.
- At the end of each recording for the day, have the students calculate averages for each treatment.
- After 10 days, create a line graph with the x-axis representing time in days and the y-axis growth in length. Use a different line showing averages for each of the treatments. There should be a total of 6 lines.
- Have students draw conclusions from their data and results. They should compare their experimental results to their original hypothesis. If their hypotheses are not supported by their results, encourage students to explore reasons for the lack of support. Do the results lead to new hypotheses? Students (and scientists) learn from experiments that seem to have failed because hypotheses are not supported. Hypothesis testing involves an evaluation of the causes of patterns and observations. One is not always correct about those causes at the outset.
References :
Introductory plant biology books will discuss germination and growth of seedlings. Several are listed below.
Raven, P.H., R.F. Evert, S.E. Eichhorn. 1998. Biology of Plants . Worth Publishers Inc., New York. Stern, Kingsley R. 2000. Introductory Plant Biology , 8th ed. McGraw Hill, Dubuque, IA. Uno, Gordon, R. Storey, and R. Moore 2001. Principles of Botany , 1st ed. McGraw Hill, Dubuque, IA. Burnie, David. 2000. Plant. Dorling Kindersley Eyewitness Books, New York.
For more information about sprouts see the International Sprout Growers Association
This activity is based on an exercise presented by Ken Blom, Niskayuna School District, Niskayuna, NY and was developed and edited by Amy Russel and Steven Rice, Department of Biological Sciences, Union College, Schenectady, NY.

Using Mung Beans in the Lab
- Share to Facebook
- Share to Twitter
- Share via Email
Age Ranges:
Mung beans are cheap, reliable and easy to germinate, and offer a useful way to look at the germination process.
- Plant growth : Using hydroponics to explore what plants need to grow. Resource: What do plants need to grow?
- Enzymes : Resource: Phosphatase enzymes in plants
- Idea : Explore whether bean roots always grow downwards
- Idea : Investigate the effect of light on growing seedlings
- Idea : Investigate the effect of water on growing seeedlings
- Idea : Observing sprouting mung bean root hair cells
Teaching Topics
- Plant Growth
- Plant Nutrition
- Hydroponics
Description
Mung Beans, Vigna radiata
Mung beans are legumes (members of the Fabaceae family), and are most commonly used in the UK for growing nutritious bean sprouts. Mung beans are annuals, growing up to about 1m in height. The first flowers appear seven to eight weeks after planting and the crop reaches maturity in 12 to 14 weeks. The mung bean plant comes originally from India, but is now widespread throughout the tropics.
Growing and sourcing
Obtaining : Buy fresh seeds from suppliers including Blades Biological. Seeds must be fresh to germinate.
Propagating : Germinate from seeds. This video demonstrates the germination of mung beans with both cotyledons and roots visible. As demonstrated in the film, mung beans can be planted in a clear tank using a seed compost to observe root formation.
Compost : Use a seed compost for germinating these seeds.
Light : Light is needed only once the cotyledons are ready to open. A windowsill is suitable.
Water : Keep damp without soaking.
Temperature : A warm room is suitable.
Feeding : There’s no need to feed these seedlings.
Notes : Look out for signs of ‘Damping-off” in your seedlings.

- Agriculture and farming
- Cells and tissues
- Nutrient cycles
- Photosynthesis
- Plant growth
- Plant nutrition
- Plant reproduction
- Plant responses
- Respiration
- Plants in the Science Curriculum
Related content
Teaching resources.
- Student Sheet 5 - Investigating Seed Germination
- How Science Works - What do plants need to grow?
- Using Broad Beans in the Lab
- Engage your students with enzymes
Seed germination requirements
- Mung bean seeds, 15-20 per tub. Optional: soak in water a couple of hours before the activity to speed up germination without changing the appearance of the seeds.
- Tub for each condition at each table group (I use cream cheese/deli tubs - they are shallow and stable).
- Paper towels.
- Water to wet towels.
- Masking tape to label tubs
Plants come from seeds. Why don’t these seeds turn into plants? They need certain conditions to germinate. We’ll test what seeds need to grow into plants.
Work in table groups to set up 3 experiments: 1. seeds on wet paper towel (get water and air and light) - crunch up a paper towel in the bottom of the tub, wet it, then lay over a folded paper towel to make a damp, flat surface for the seeds. Layer some saran wrap over the top with small holes punched in it, to let in the light, but keep water from evaporating away as fast. 2. dry seeds in tub (get air and light, no water) 3. seeds under water (get water and light, no air) - put seeds in a tub filled with water. 4. seeds on wet paper towel wrapped in foil (get water and air, no light) - set up as 1 then wrap in foil to keep the light out. Open each day briefly to let plenty of oxygen in. 5+ Add other variables that students come up with that are dooable e.g. adding soil (the seeds have water and air, but no light if they are buried in the soil). e.g. keeping the seeds cold e.g. damaging the seeds (mimic damage by pests by puncturing or cutting the seeds)
Optional: make predictions about what will happen. Doesn’t matter whether you are right or wrong. It just gets you thinking about it.
Leave tubs in a warm spot for a week. Make sure the wet conditions stay wet - check at least once a day. The seeds under water will need to have their water changed, so that mould growth does not take over.
One week to 10 days later: Did you have a look during the week at your seeds? What did you notice? Look at all your experiment dishes. What do you see? The long white thing coming out of the seed is the root, and comes first. Then the shoot, which is green, and might have distinct leaves. Record average root and shoot length for each of the tubs. Combine results into a class chart.
Expected results: The seeds in the dark with water and oxygen grew the most in a week - they had long roots and many had shoots too. The seeds with water in the light grew the next best. They had roots, but they had turned brown at the ends and very few had shoots. The seeds with water but no oxygen grew the next best. They had split open and had sent out a root, but it stopped growing pretty quickly. The seeds with no water did not grow at all. Conclude as a class what seeds need to germinate (water, air, darkness).
Possible additional variables and results: Seeds with soil grow well (they have darkness, wet, oxygen and also nutrients from the soil). Seeds in the cold do not grow well (discuss: seed germination is triggered by the warmth of spring). Seeds that are damaged sometimes germinate (discuss: probably depending on whether the embryo is been damaged or just the cotyledons).
Optional continuation of experiment: Continue the experiment with the plants that are growing OK (should be the seeds in the darkness either on the wet paper towels or in soil), to find out what the plants need once they have germinated. Results should show that plants need light when the leaves appear. With no light, the leaves are present but pale green.
Mung bean seeds need darkness to germinate well. But this is apparently not always the case. Other plants need light, or are not affected by light conditions for germination to happen.
With a grade 3 class, I suspected that some of the students took away that plants need darkness, missing the subtlety that they need darkness for germination, then light for growth once the leaves are formed. If the plants are allowed to grow more once the leaves are formed, distinguish between germination, and subsequent plant growth after leaf formation.
If seeds are soaked beforehand, do not do for so long that they are already making roots. (Overnight soaking is too long). Giving the students dry seeds to start takes a little longer to get going, and gives slightly more variable results.
- PRO Courses Guides New Tech Help Pro Expert Videos About wikiHow Pro Upgrade Sign In
- EDIT Edit this Article
- EXPLORE Tech Help Pro About Us Random Article Quizzes Request a New Article Community Dashboard This Or That Game Happiness Hub Popular Categories Arts and Entertainment Artwork Books Movies Computers and Electronics Computers Phone Skills Technology Hacks Health Men's Health Mental Health Women's Health Relationships Dating Love Relationship Issues Hobbies and Crafts Crafts Drawing Games Education & Communication Communication Skills Personal Development Studying Personal Care and Style Fashion Hair Care Personal Hygiene Youth Personal Care School Stuff Dating All Categories Arts and Entertainment Finance and Business Home and Garden Relationship Quizzes Cars & Other Vehicles Food and Entertaining Personal Care and Style Sports and Fitness Computers and Electronics Health Pets and Animals Travel Education & Communication Hobbies and Crafts Philosophy and Religion Work World Family Life Holidays and Traditions Relationships Youth
- Browse Articles
- Learn Something New
- Quizzes Hot
- Happiness Hub
- This Or That Game
- Train Your Brain
- Explore More
- Support wikiHow
- About wikiHow
- Log in / Sign up
- Food and Entertaining
- Rice and Beans
How to Sprout Mung Beans
Last Updated: June 12, 2024 Approved
This article was reviewed by Erin Hostetler . Erin Hostetler is an Edible Gardening Expert and the Owner & Farmer of The Patio Farmer, a small business based in Charlotte, North Carolina. With over 10 years of experience working on farms and growing food, Erin specializes in providing consultations, installations, and custom maintenance plans for people wanting to grow food in small (or large) spaces at their homes and businesses. Erin loves teaching other people the magic of growing your own food. She's a firm believer that there is a green thumb in everyone! Erin has degrees from Appalachian State University and King's College London, both of which guided her to start her business. There are 8 references cited in this article, which can be found at the bottom of the page. wikiHow marks an article as reader-approved once it receives enough positive feedback. This article received 27 testimonials and 100% of readers who voted found it helpful, earning it our reader-approved status. This article has been viewed 634,841 times.
Mung bean sprouts are a common ingredient in Asian stir frys and provide a crisp, healthy addition to any meal. In the supermarket, you'll often find them labeled more generally as “bean sprouts.” There’s no need to buy them pre-sprouted and you can save money by sprouting them at home in as little as 2 days. Soak your mung beans overnight, then rinse and drain the growing sprouts every 12 hours until the sprouts have reached your desired length.
Preparing and Soaking the Beans
- Find mung beans at health food stores or online catalogues like Sproutpeople (sproutpeople.org) and Sproutman (sproutman.com).
- The yield for sprouting mung beans is about 2 to 1, meaning if you use 1 pound of seeds you’ll end up with 2 pounds of sprouts. [3] X Research source
- This will help protect you from anything which might have been in the soil, like metals and toxins.
- It will also wash away things like mites that may have made their way into the dried beans.
- For a homemade option, you can use a piece of cheesecloth secured with rubber band. You could also punch holes into an existing metal or glass lid.
- You could also purchase a specialized sprouting jar, which is sold with a pre-made strainer lid.
- If you don’t have cheesecloth or a mesh lid, you can also soak your beans uncovered in a bowl or jar.
- The beans should be soaking at room temperature, not in the fridge.
Draining and Rinsing the Beans
- If you don’t have a mesh lid or cheesecloth, you can also hold a strainer against the opening of your jar to drain the water.
- Although the beans should not be exposed to direct sunlight, there’s no need for the storage location to be completely dark. A shadowy corner of your countertop would work well.
- The beans should continue to grow in size and sprout thin white tails.
- The green shells may have started to come off the white bean sprouts at this point. You can remove some of these empty shells from the mix with your hands if you like. [12] X Research source
- Pick out any unsprouted beans and throw them away.
- To dry the beans even more thoroughly, cover them with another paper towel and press gently.
- Mung bean sprouts are a great base for a chilled salad, or a classic addition to a stir-fry.
Things You'll Need
- Mesh sprouting lid or cheesecloth and rubber band
- Strainer or colander
- Paper towels
- Baking sheet
- Dried mung beans
You Might Also Like

- ↑ https://www.seriouseats.com/2011/04/how-to-grow-bean-sprouts-in-a-jar-slideshow.html
- ↑ http://chefinyou.com/articles/sprouting-mung-beans/
- ↑ https://youtu.be/tuDZQslRt8A?t=66
- ↑ http://chefinyou.com/2010/06/sprouting-mung-beans/
- ↑ https://youtu.be/tuDZQslRt8A?t=140
- ↑ https://youtu.be/tuDZQslRt8A?t=334
- ↑ https://youtu.be/tuDZQslRt8A?t=374
- ↑ https://youtu.be/tuDZQslRt8A?t=458
About This Article

To sprout mung beans, start by rinsing them off and putting them in a clear jar. Then, fill the jar partway with cool water so the beans are covered. Let the beans soak at room temperature for 8 to 12 hours until they swell up, and then drain and rinse them. Once you've drained all the water, put the jar in a cool, dark place for 12 hours. Finally, rinse and drain the beans again, and repeat the process every 12 hours for a few days until the sprouts reach your desired length. To learn how to store sprouted mung beans, scroll down! Did this summary help you? Yes No
- Send fan mail to authors
Reader Success Stories
Aug 12, 2016
Did this article help you?
Beth Kearns
Mar 8, 2022
Jul 24, 2019
Apr 12, 2022
Denise Gaffney
Oct 26, 2016

Featured Articles

Trending Articles

Watch Articles

- Terms of Use
- Privacy Policy
- Do Not Sell or Share My Info
- Not Selling Info
Don’t miss out! Sign up for
wikiHow’s newsletter
Mung Beans Information – Learn How To Grow Mung Beans
- Sign up to our newsletter Newsletter

Most of us have probably eaten some form of Americanized Chinese take-out. One of the most common ingredients is bean sprouts. Did you know that what we know as bean sprouts are more than likely mung bean sprouts? What are mung beans and what other mung bean information can we dig up? Let’s find out!
What are Mung Beans?
Mung bean seeds are sprouted for use either fresh or canned. These high protein, 21-28% beans are also rich sources of calcium, phosphorus, and other vitamins. For people in regions where animal protein is scarce, mung beans are an important source of protein.
Mung beans are members of the Legume family and related to adzuki and cowpea. These warm-season annuals may be either upright or vine types. Pale yellow blossoms are borne in clusters of 12-15 at the top.
At maturity, pods are fuzzy, about 5 inches (12.5 cm.) long, containing 10-15 seeds and varying in color from yellowish-brown to black. Seeds also vary in coloration and may be yellow, brown, mottled black, or even green. Mung beans self-pollinate.
Mung Bean Information
Mung beans ( Vigna radiata ) have been grown in India since ancient times and are still grown in Southeast Asia, Africa, South America, and Australia. The bean may go by a variety of names such as:
- golden gram
- moyashimamae
- chop suey bean
In the United States, growing mung beans were called Chickasaw peas. Today, 15-20 million pounds of mung beans are consumed per year in the United States and almost 75% of this is imported.
Mung beans can be used sprouted, either fresh or canned, or as a dry bean and can be used as a green manure crop and as cattle forage. Beans selected for sprouting must be of high quality.
Gardening tips, videos, info and more delivered right to your inbox!
Sign up for the Gardening Know How newsletter today and receive a free download of our DIY eBook "Bring Your Garden Indoors: 13 DIY Projects For Fall And Winter".
Generally, larger seeds with a shiny, green color are selected. Those seeds that do not meet sprouting standards are used for livestock. Intrigued? Keep reading to find out how to grow mung beans.
How to Grow Mung Beans in the Garden
When growing mung beans, the home gardener should use the same cultural practices used for green bush beans , except that the pods will be left on the bush longer to allow the beans to dry.
Mung beans are a warm-season crop and take between 90-120 days to mature. Mung beans can be grown outside or inside. Prior to sowing seed, prepare the bed. Mung beans like fertile, sandy, loam soil with excellent drainage and a pH of 6.2 to 7.2. Till the soil to remove weeds, large rocks, and clods and amend the soil with a couple of inches of compost worked in.
Plant the seed when the soil has warmed to 65 degrees F. (18 C.). Sow seed one inch (2.5 cm.) deep and two inches (5 cm.) apart in rows that are 30-36 inches (76 to 91.5 cm.) apart. Keep the area free of weeds but take care not to disturb the roots. Fertilize with a low nitrogen food, such as 5-10-10, at the rate of 2 pounds (1 kg) per 100 square feet (9.5 square m.).
Beans begin to form when the plant is 15-18 inches (38-45.5 cm.) tall and the pods continue to darken as they mature. Once mature (about 100 days from sowing), pull up the entire plant and hang the plant overhead in a garage or shed. Place clean paper or fabric below the plants to catch any dried pods that may fall.
The pods do not mature all at the same time, so harvest the plant when at least 60% of the pods are mature. Dry the seeds completely on some newspaper. If there is any moisture left when storing, the beans will go bad.
You can store completely dried beans in a tight-fitting glass canister for several years. Freezing the seed is also an excellent storage option and reduces the possibility of insect infestation.
Growing Mung Beans Indoors
If you don’t have garden space, try sprouting the mung beans in a jar. Just take dried mung beans, rinse them thoroughly in cold running water then transfer them to a large plastic bowl.
Cover the beans with lukewarm water – 3 cups (710 mL) of water for each cup of beans. Why? The beans double in size as they soak up the water. Cover the bowl with a lid of plastic wrap and leave overnight at room temp. The next day, skim the surface for any floaters then pour out the water through a sieve.
Transfer the beans to a large, sterilized glass jar with a perforated lid or cheesecloth secured with a rubber band. Lay the jar on its side and leave it in a cool, dark place for 3-5 days. At this point, the sprouts should be about ½ inch (1.5 cm.) long. Rinse and drain them in cold, running water up to four times per day during this sprouting phase and remove any beans that have not sprouted.
Drain them well after each rinsing and return them to their cool, dark place. Once the beans are fully sprouted, give them a final rinse and drain and then store them in the refrigerator.
Amy Grant has been gardening for 30 years and writing for 15. A professional chef and caterer, Amy's area of expertise is culinary gardening.

Transition your houseplants to being indoors seamlessly with these expert tips to prevent shock, treat pests, and promote healthy growth.
By Bonnie L. Grant

Peat moss isn’t suitable for every garden, so it’s good to know what vegetables do not like peat moss and whether peat moss is good for vegetable gardens.
By Amy Grant
Useful links
Stay in touch.
- Job Opportunities
- Contact Future's experts
- Terms and Conditions
- Privacy Policy
- Cookie Policy
Gardening Know How is part of Future plc, an international media group and leading digital publisher. Visit our corporate site . © Future US, Inc. Full 7th Floor, 130 West 42nd Street, New York, NY 10036.
- Click here - to use the wp menu builder
Gardening Business
- Backyard Gardening
- Balcony Gardening
- Container Gardening
- Indoor Gardening
- Kitchen Gardening
- Roof Gardening
- Terrace Gardening
- Aeroponic Gardening
- Aquaponic Gardening
- Hydroponic Gardening
- Vertical Gardening
Organic Gardening
- Community Gardening
- Greenhouse Gardening
- Polyhouse Gardening
- Shade Net Gardening
Urban Gardening
Home Gardening
Outdoor Gardening
Modern Gardening
Growing Mung Beans, Planting, Care, Harvesting Guide
Table of contents, about mung beans:, growing mung beans in the garden:, preparation of soil for the growth of mung bean:, plantation of mung bean seeds:, care and maintenance:, harvesting of mung bean:, growing mung beans – a step by step guide.
Growing of mung beans is a very easy method and one can easily adapt the steps to grow in their home garden. The seeds of mung bean are the ones which will be sprouted for using them in a fresh way or canned. These are rich in the content of proteins. They have almost 25 to 28% of the protein in them. They are also rich in the content of phosphorus, calcium and other types of vitamins. For the people who are residing in the regions where there is less amount of animal protein, mung beans are a very good source of protein content.
Mung beans belong to the family of legumes and they are almost related to cowpea and adzuki. These are the annuals which grow very well in the warmer climates. These will grow either upright or they will grow as vines too. The blossoms which are in the pale yellow color will come up as clusters of at least 15 at the top.
When the pods reach the stage of maturity, they will be fuzzy and at a length of 5 inches. Each pod will consist of a maximum of 15 seeds and the color of the pods vary between black to yellowish-brown. Seeds will change in color like brown, yellow, green and also black. Mung beans will also undergo self-pollination.
The growth of Mung beans has been taking place in India since ancient times. These are still grown in Africa, Southeast Asia, Australia, and South America. This mung bean has hot many types of names and they are as green gram, look dou, lutou, golden gram, chop suey bean, orud, moyashimamae.
In the United States, mung beans will be termed as Chickasaw peas. These days, a maximum of 20 million pounds of mung beans are being consumed every year in the United States and almost 3/4th of the beans which are produced are imported. Mung beans can be used as a dry bean, fresh or canned or even sprouted. These can also be used as a green manure crop and also as a cattle forage. The beans which are chosen for sprouting should always be of very good quality. Basically, the seeds which are large, green and shiny are chosen. The seeds which do not meet the standards of sprouting are used for the purpose of livestock.

You may also read Growing Japalpenos from Seeds .
- When you are growing mung beans, you will need to always use similar cultural practices which are used for growing green bush beans.
- But you will need to keep aside the pods and let them live on the bush for allowing the beans to get dried.
- Required climatic conditions for Mung beans: Mung beans are the crops which prefer warm climatic conditions and they will take at least three to four months to reach the stage of maturity. Mung beans are the ones which can be grown in outdoor locations or indoor locations. Before sowing seeds, you will need to start with the preparation of bed.
- Requires soil conditions for the growth of Mung bean: Mung beans are the ones love to grow in the soil which is fertile, loamy and sandy. The soil should be well-drained. The pH of the soil should be between 6 and 7.
Below are the Mung bean plant growth stages :
- The soil should be tilled to remove the weeds, clods and large rocks and the soil has to be amended with 2 inches of compost which is worked in.
- The seeds have to be planted when the soil is at a temperature of 18°C.
- The seeds have to be sown at a depth of one inch and at a distance of 2 inches from each other and when in rows, they have to be placed at a distance of 35 inches from each other.
- The area should be kept free from weeds must make sure that you are not at all disturbing the roots while cleaning the area for weeds. Proper care must be taken while removing the weeds.
- The mung bean plants have to be fertilized with the food which has less content of nitrogen.
- For instance, you can prefer a fertilizer with an N-P-K ratio of 5-10-10.
- The formation of beans will begin when the mung bean plant height of at least 18 inches and the pods will continue to become darker as they start maturing.
- Once the bean plants have reached the stage of maturity, the entire plant has to be pulled up and should be hung overhead in a shed or even a garage.
- A clean paper or fabric has to be placed below the bean plants to catch hold of any pods which have become dry and fall.
- The pods will not get matured all at a time, so make sure that you are harvesting the mung bean plant when a minimum of 60% of the pods are matured. The seeds have to be dried completely by placing them on a newspaper and spreading them to allow enough air for them to get dried. If you see any moisture which is left over at the time of storage, the beans get destroyed.

You may also be interested to read Growing Tomatoes from Seeds .
Storage of Mung beans:
The beans which are dried completely can be stored in a tight-fitting glass canister for many numbers of years. You can also go with freezing the seed as it is the best option and will also decrease the possibility of insect infestation.
Facts about Mung beans:
- Mung beans will take about 2-3 days to grow. You can see them growing rapidly on a daily basis.
- Mung beans are considered to be a very good option for experiments as the seeds of mung beans are small and they grow even in places which are compact. Growing mung beans experiment can be done to know the variations in soil, you can make use of various quantities of water, fertilizer, and sunlight. This is done for the observation of how factors like water, sunlight, and fertilizer will affect the growth of plants.
- Mung beans will take about 3-4 months to grow or reach the stage of maturity. Mung beans can be grown both in the indoor and outdoor locations. Before sowing the seed, you will need to prepare the bed.
- Mung beans are the plants which have deep roots and also love to live in warm and dry climates. So they will grow best when you water them three to five times deeply at the time of growing. If you see that the soil is moist at the plantation time, you can avoid first watering until 15 days after plantation.
- The best range of temperature for the growth of mung beans is between 28°C to 30°C. That means the crop is generally grown at the time of summer which would be warm and also dry. The plantation of seed can be done when the temperature is at least 18°C.
Keep gardening folks!.
Read: Watermelon Profits, Yield Per Acre .
The importance of achieving an even strike and even maturity cannot be over-emphasised. Taking extra care at planting can produce more uniform flowering, making insect management and harvesting more straightforward. Plan an appropriate herbicide strategy within the preceding crop that will avoid the threat of residue problems in mungbeans.
LEAVE A REPLY Cancel reply
Save my name and email in this browser for the next time I comment.
Strawberry Farming in Containers: Grow Fresh Berries Anywhere
Growing cayenne peppers from seed at home: a comprehensive guide, 9 cheap ways to fence your home garden, 10 mulching practices for terrace garden, the role of watering in preventing drying moringa pods, best liquid fertilizer for flowering plants, how to set up an efficient watering system for home..., how to mulch tulip bulbs: expert tips best tulip blooms, common problems with potted figs and how to solve them, how to prevent flower drops in pomegranate trees: effective tips, how to boost ridge gourd flowering and yield: a beginner’s..., effective pollination techniques for maximizing gourds yield, composting techniques for manure in home gardens, a step-by-step guide on propagation techniques for jasmine plants, how do i make my garden less cluttered: a beginners..., growing red currants at home for beginners, gardening techniques in planting vegetables, where to place indoor plants in your home, how to grow tomatoes organically at home: a comprehensive guide, organic gardening on a budget: low-cost methods and materials, vegetable gardening calendar in india – a full guide, growing betel leaf in pots – a full guide, growing tulsi in pots (holy basil), planting, care guide, growing green chillies in pots (mirchi) – a full guide, bottle gourd terrace gardening (louki) ideas, tips, vastu for planting trees at home – a full guide.
A Science Project for Growing Plants With Coffee Grounds or Soil
After coffee is brewed, the used grounds often end in the trash -- but you can add this "waste" to soil to improve plant growth. If you're skeptical about the efficacy of this trick, try a science project, ideal for middle school students, that compares plants grown in ordinary soil to plants with the coffee boost. You might discover more uses for those coffee grounds other than a morning jolt.
You might assume that plants just need a healthy dose of water to survive. According to Charles Sturt University, plants also require nitrogen for growth. Plants absorb nitrogen through their roots, and plants use the element to make chlorophyll. Without chlorophyll, plants couldn't undergo photosynthesis, a process needed to transform energy into food. According to horticulturist Linda Chalker-Scott of Washington State University, nitrogen-rich proteins comprise about 10 percent of coffee grounds. Also, the 11-to-1 carbon-to-nitrogen ratio found in coffee grounds is ideal for plant and soil health.
Advertisement
Article continues below this ad
More For You
Ideas for chemistry projects involving iron rusting, photosynthesis experiments for kids, science experiments on the formation of crystals with ammonia, how do i determine co2 levels by using titration, how to make a grassland biome in a box or bottle.
According to the Oregon State University Extension Service, many people use fertilizer, made from nitrogen compounds in the form of ammonium or nitrate, to enhance plant growth. In your experiment, you will essentially use coffee grounds in place of a chemical fertilizer. Because of the amount of nitrogen present in coffee grounds, you might hypothesize that plants cultivated in soil containing coffee grounds will grow faster and appear healthier than plants grown in plain soil.
Materials and Procedure
For this experiment, you will need potting soil, three identical flower pots, water, used coffee grounds, and plant seeds, such as mung beans or radishes. You will compare how the plants grow in three conditions: one with just water, one with coffee grounds sprinkled on top of the soil, and a third with coffee grounds mixed into the soil. Prepare one flower pot with enough soil to fill it, and fill a second pot mostly full of soil. In the second pot, sprinkle 1/4 to 1/2 cup of used coffee grounds on top of the soil. In a mixing bowl, mix 3 parts soil to 1 part used coffee grounds. Pour this mixture into the third flower pot. Plant seeds in each pot and water them every day for five days. After five days, measure the height of each plant and make observations about their overall appearance.
Based on similar experiments, you will likely find either the plant sprinkled with coffee grounds or the one with grounds mixed into the soil grew the fastest and healthiest. If you replicate this experiment, you might want to test the coffee ground-to-soil ratio to see if more or less coffee has an effect on plant growth. You could also test different types of plants to discover if coffee grounds help or hinder the growth of specific plants.
- Oregon State University Extension Service: Understanding Nitrogen Fertilizers
- Education: The Effect of Caffeine on Plant Growth
Cara Batema is a musician, teacher and writer who specializes in early childhood, special needs and psychology. Since 2010, Batema has been an active writer in the fields of education, parenting, science and health. She holds a bachelor's degree in music therapy and creative writing.
Mungbeans unmasked
New research in queensland aims to improve mungbean yields in an increasingly variable climate. it will also provide essential information about the key factors influencing plant growth and yields..
Mungbean ( Vigna radiata ) is a high-value summer legume crop, returning an average of $1100 per tonne to growers. As a legume, it has the ability to fix nitrogen and improve soil productivity, which makes it an attractive option for growers in Queensland and northern NSW.
It is a valuable export crop for Australia. The average annual production over the past five years has been 90,000 tonnes, according to the Australian Mungbean Association (AMA), and 90 per cent of the crop is exported.
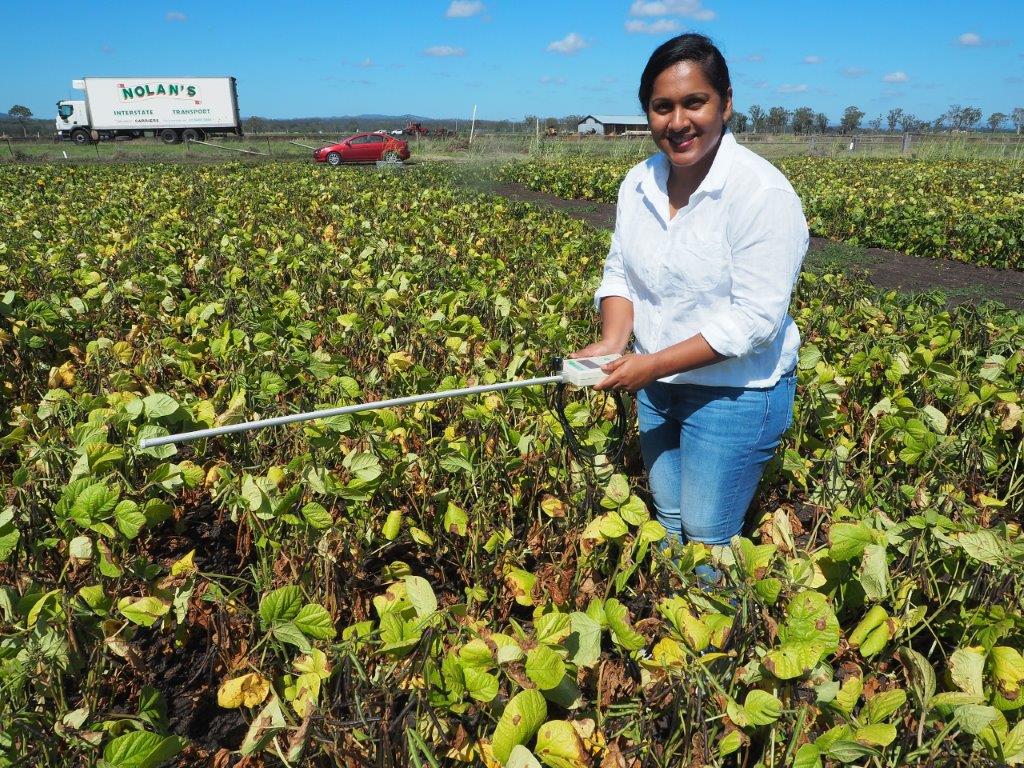
At the University of Queensland, Geetika Geetika is focused on identifying the traits that limit mungbean yields. As part of her PhD research for the Queensland Alliance of Agriculture and Food Innovation (QAAFI) Geetika aims to improve the overall understanding of crop physiology, improve the consistency of crop production and, ultimately, help lift Australia’s average yield from one to 1.5 tonnes/hectare.
Yields can range from bumper crops of up to three tonnes down to as little as 0.2 tonnes, depending on seasonal influences, such as the timing of extreme temperatures or lack of rain. Good yields to date have largely been reliant on good seasonal conditions.
Her research is part of a five-year GRDC collaboration, ‘Optimising Mungbean Yields’, which runs until 2023, with Associate Professor Rao (RCN) Rachaputi as her supervisor.
The PhD project spans the crop’s canopy development and phenology; vegetative biomass accumulation, canopy light capture and reproductive growth; and genotype differences in plant physiology. This broad scope reflects the shortfall in the current biological understanding of the plant’s lifecycle.
Geetika’s findings are expected to help direct plant breeding efforts and identify management strategies that growers can use to improve yields.
Mungbean development
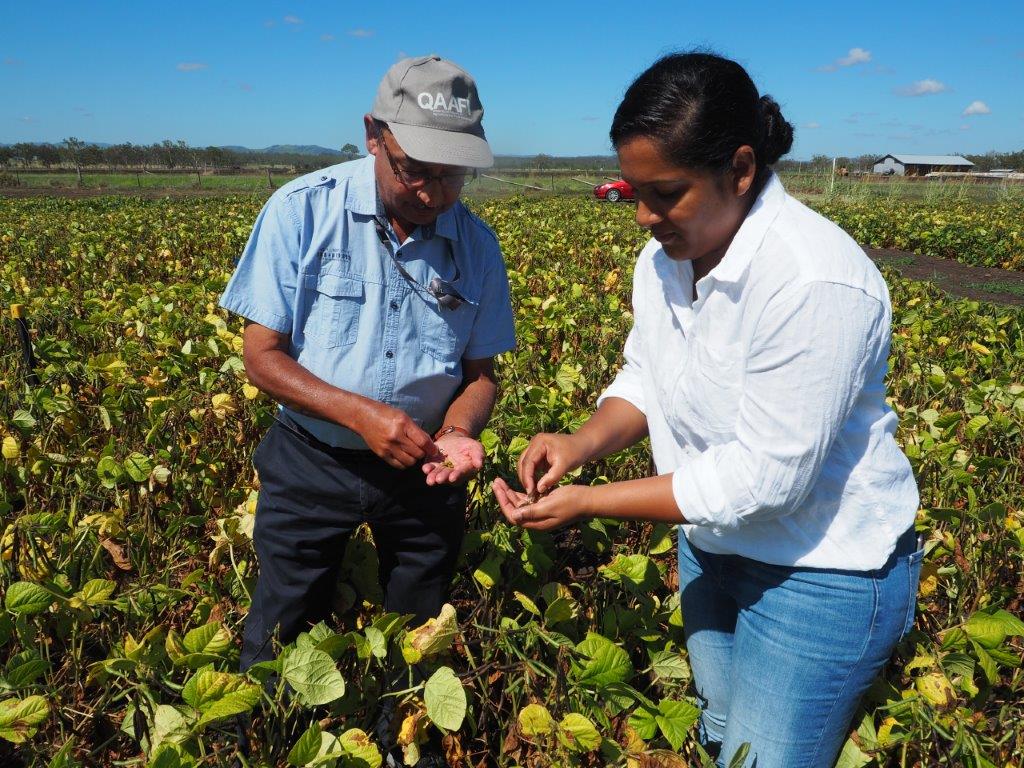
In experiments in the 2018–2019 summer, she examined the crop phenology and pod development of five mungbean cultivars and a variety from a related crop species known as black gram or mungo bean ( Vigna mungo ).
The mungbean cultivars were Berken, Celera II-AU, Jade-AU, Satin II, and Opal-AU. The black gram variety was Onyx-AU.
Preliminary findings from the trial have brought the crop’s critical developmental phases into sharp focus, helping identify the plant’s source-sink relationship – the movement of photosynthetic products from regions of supply (source), such as leaves, to regions of use or storage (sink), such as grain.
“Flowering and pod development influence the plant’s source-sink relationships,” Geetika says. She found that mungbeans tend to rapidly flower and pod, and stop producing leaves on the plant’s main stem during these reproductive growth stages.
This could be linked to the ‘determinate’ growth of mungbean – leaf production on the main stem stops once the plant achieves a genetically predetermined stage of development, she says.
“The last (trifoliate) leaf formed on the main stem of mungbean plants was smaller than the others, and the plant’s growing tip, or apical meristem, develops into a flower bud.”
Vegetative biomass
Geetika has also investigated how the accumulation of vegetative biomass might influence mungbean yields. Vegetative biomass was assessed based on the crop canopy’s ability to capture light.
Different types of crop canopies create different gradients of the light extinction coefficient and light use efficiency that shape vegetative growth. This growth determines how much light plants can receive and convert into biomass.
“Increased biomass production is linked to improved light capture in crops,” Geetika says.
Mungbean is typically sown on 0.5 to 1 metre row spacing using varying plant population densities. However, mungbeans sown on narrower row spacings tend to produce more vegetative biomass and have higher yield potential due to improved light capture.

Canopy density
Geetika tested the yield impacts of crop canopy density in paddock trials at the University of Queensland’s Gatton campus in 2019 and 2020.
Jade-AU and Satin II mungbean varieties were sown on narrow 0.5 metre row-spacings at a rate of 22 plants per square metre to promote high canopy density. These varieties were also sown on wide 1 metre row spacings at a relatively low rate of 12 plants/m 2 to promote low canopy density. A third experiment looked at the yield effects of a high plant population (33 plants/m 2 ) on both narrow and wide row spacings.
The trials found the Jade-AU variety had a slight yield advantage over Satin II, even though its crop canopy intercepted less light. Geetika says the higher yield appears to stem from Jade-AU’s higher radiation use efficiency, as opposed to its canopy light capture.
“This may assist it to more efficiently produce assimilates (photosynthetic products) for use by developing pods, resulting in higher yields,” she says.

Source-sink influence
Another strand of the PhD research is investigating how the source-sink relationship in mungbean plants drives crop yields.
She has established an experiment to explore whether yield is limited by assimilate production in leaves (source limitation), using shade cloth to reduce light on mungbean crops at different growth stages.
Geetika is also developing new equations, drawing on her experiment findings, to facilitate improved crop modelling and simulation. For instance, these equations will be used to simulate mungbean growth, development and yield using the Agricultural Production Systems sIMulator (APSIM).
Geetika PhD is funded by the Grains Research and Development Corporation and The University of Queensland and the Department of Agriculture and Fisheries Queensland.
Research contacts: Ms Geetika Geetika , PhD candidate, Centre for Crop Science, Queensland Alliance for Agriculture and Food Innovation (QAAFI), The University of Queensland, M. 0481 266 089 E. [email protected] or Associate Professor Rao (RCN) Rachaputi , Principal Research Fellow (Grain Legumes), QAAFI at UQ Gatton T. + 61 7 5351 5093 or M. 0427 600 737, E. [email protected]
Media contact : Carolyn Martin, QAAFI Communications, E. [email protected] M. 0439 399 886
High-resolution photos : credit (supplied @qaafi)
The Queensland Alliance for Agriculture and Food Innovation is a research institute at The University of Queensland supported by the Queensland Government via the Queensland Department of Agriculture and Fisheries.

Walking the trees: we traced how First Nations groups moved bunya pine and black bean trees

Science backs traditional knowledge of Kakadu plum health benefits

Growing talent to feed the world: a new ARC Training Centre in Predictive Breeding
- Winners announced at 6th Animal Science Poster Olympics 2021
- Critically endangered macadamia species becomes a plant supe...
Classroom Project: 10 Easy Growing Beans For A Science Experiment
reviewed by Truman Perkins
With the advent and revamp of the education system, the classroom has become the area of exploring new horizons. New and more engaging activities are provided to the students in schools to make them learn more about the environment that is waiting outside for them. Not only academic but creative forte is established through these activities.
One of these innovative activities is enlightening students about nature by a one on one interaction with it. Science experiments using plants are well-known.
However, the best part for students is to be able to get hands-on practice and interplay between the students and nature. A practical and entertaining way to accomplish this is to grow bean plants in the classroom.
Beans are perfect for growing indoors, and one can see them sprout from a seedling giving the children all the amusement and excitement they need.
The most natural experiment which can also be performed with preschoolers is growing beans in a bag. The best seeds for this experiment are Pinto beans, Mung beans, Lentils, and Lima beans.
- Pinto beans
- Lentils and Lima beans
- Snap Bush Green beans
- Yellow beans
- Pole beans, Yardlong beans, and Runner beans
- Recommendation
Easy Growing Beans

1. Pinto beans

They are one of the fastest-growing beans, which makes it even better for growing in a classroom. Pinto beans are one of the most widely consumed staple foods in Northern Mexico and the US.
It takes around 90 days for Pinto beans to grow. A zip back is first tied to nails onto the window facing the sun directly.
Dried Pinto beans are then placed inside the bag with a wet or damp paper towel. After some days, we will see the beans sprouting.
2. Mung bean:

They are also known as green gram or moong, or maash is widely used in Southeast Asian households. The fascinating part about Mung bean is that it can be grown in a bag indoors. We can grow Mung beans in a hemp sprouting bag after soaking the seeds and prepping the bag for germination.
After putting the seeds in a wet bag, rinse and drain the bag at least twice or thrice in one day. With each rinse cycle, look for spouting of the seeds.
3. Lentils and Lima beans

These can also be germinated in a bag in classrooms, and their progress will be a visual delight for the school children. The students can help participate in every step of the sprouting.
First of all, ask them to wet a paper towel. Then wrap some seeds in the middle of the damp cloth and cover the second time. Put the seeds wrapped in the towel in a transparent ziplock bag.
Now ask the children to find the right sunlight spot to place the container, facing the sunlight directly. Ask them to check on the beans every day to see sprouting and then harvest their efforts after about 60 days.
Also, Lima seeds are more abundant, which makes it easy for little hands to grasp them.
4. Snap Bush Green beans:

A bean that is best to grow for a science project is Snap Bush Green beans. They require warm climates. Seeds germinate in 4 to 10 days in a pot, which contains the right mix of soil and fertilizer.
After the seeds germinate, the students can take them home to plant in their gardens. This is a great way to help them care about nature, and they will feel as help in assisting mother nature.
5. Yellow beans:

Yellow beans are an excellent choice for doing science projects. The seeds germinate in less than two weeks. But an interesting experiment can be carried out with the children.

Divide the children into two groups. One responsible for bean seeds in sunlight and the other for darkness. Half the seeds are placed in a sunny spot while the other containers are covered with cardboard, so no light reaches them.
It is an excellent way of teaching young students that light plays a vital role in the germination of seeds and for overall plant growth.
6. Soybeans:

If the time is short, then Soybeans are the best variety to explain germination in a classroom. Small pots can be used for this in addition to bags, mix soil with fertilizer, and place the seeds in between.
Water thoroughly. The seeds germinate within 48 hours, and the radicle emerges from the seed. In the next 7 to 10 days, small cotyledons appear, which appear as leaves.
7. Fava beans:

Another variety of Shell beans that can be grown in classrooms and science projects is Fava beans.
First, prepare a pot with soil and fertilizer and then place the bean seeds 4 to 5 inches apart from each other about 1 inch deep. Water thoroughly.
Germination time is 7 to 14 days. The students can see the emerging radicle from the seeds. It is better to use transparent glass containers for easy visibility.
8. Pole beans, Yardlong beans, and Runner beans:

A fun and interactive experiment are to determine the germination rate of different seeds. We can take a transparent zip-lock bag. Make columns on the bag with a permanent marker.
Place a damp towel inside the container. Now ask the students to put different types of green beans inside the bag within each column, including Pole beans, Yardlong beans, and Runner beans.
Now place them in a spot with direct sunlight. After 5 to 7 days, check for germinating seeds. Ask the students to note which seeds sprout first, second, and third.
Conclusion:
These experiments provide the student's opportunity to learn by understanding and seeing the results instead of cramming. It also instills in them the sense of leadership, and they consider themselves equal participants in every classroom project.
After the process of germination starts, the seedlings can also be given to students to take to their homes and care for them further.
Recommendation:
10 High Oxygen Producing Aquarium Plants
Rice Water for Plants to Get Maximum Growth
How to Grow Leafy Vegetables in Pots at Home?
How to Attract Parrot to your Garden & Balcony?

About Truman Perkins
Comments for "Classroom Project: 10 Easy Growing Beans For A Science Experiment"
Check These Out
Get new FREE Gifts . Or latest free growing e-books from our latest works.
Disable Ad block to reveal all the links. Once done, hit a button below
To install StudyMoose App tap and then “Add to Home Screen”
Experiment Report: Mung Bean Sprout Growth
Save to my list
Remove from my list
In this experiment, we investigated the growth of mung bean sprouts in different environmental conditions, specifically in light and darkness. We hypothesized that mung bean sprouts grown in light would be taller than those grown in the dark. The experiment involved planting mung bean seeds in bottles filled with wet paper towel shreds and recording their growth over a week. Our observations and data analysis provided insights into how light affects the growth of these seedlings.
Introduction
The growth of plants, including mung bean sprouts, is influenced by various environmental factors, with light being a critical determinant.
In this experiment, we aimed to investigate the impact of light on the growth of mung bean sprouts. We hypothesized that exposure to light would result in taller sprouts compared to those grown in darkness.
Materials and Methods
The following materials were used in the experiment:
- Paper towels
- Mung bean seeds
The experimental procedure was as follows:
- Shred a large amount of paper towel into quarter-sized pieces.
- Fill each bottle with the paper towel shreds until they are about one-sixth of the way full.
- Slowly and carefully fill each bottle with water until each piece of paper towel is wet, ensuring they do not clump together.
- Place at least ten mung bean seeds in each bottle and cap the top.
- Place one bottle in an entirely dark environment and the other in a generally light environment.
- After a week, gather the two bottles and remove the mung bean sprouts from each bottle.
- Record the height of each mung bean sprout and calculate the average height of the sprouts that grew in the dark environment and the average height of the sprouts that grew in the light environment.
We hypothesized that the mung bean sprouts that grew in the light would be taller than the mung bean sprouts that grew in the dark.
Observations
- The mung bean sprouts that grew in the dark did not produce any leaves.
- The stems of the mung sprouts that grew in the dark environment were of a white/yellow color, while the stems of the mung bean sprouts that grew in the light environment were of a green color.
- The mung bean sprouts that grew in the dark were crisper in texture than the mung bean sprouts that grew in the light.
| Plant # | Height (cm) |
|---|---|
| 1 | 12 |
| 2 | 5.7 |
| 3 | 11.3 |
| 4 | 11.9 |
| 5 | 9.8 |
| 6 | 7.9 |
| 7 | 12.1 |
| 8 | 3.8 |
| 9 | 10.5 |
| 10 | 8 |
Average Height: 9.3 cm
| Height (cm) | Light | Dark |
|---|---|---|
| 8.3 | 8.6 | |
| 8.5 | 2 | 1.2 |
| 8.4 | 10.5 | |
| 6.3 | 2.1 | |
| 7.4 | 10.5 | |
| 8 | 21.3 | |
| 6.9 | 8.9 | |
| 4.3 | 13.3 |
Average Height (Light): 6.7 cm
Average Height (Dark): 9.0 cm
The data from the experiment disproves the hypothesis.
By clicking “Check Writers’ Offers”, you agree to our terms of service and privacy policy . We’ll occasionally send you promo and account related email
You won’t be charged yet!

Proficient in: Biology
“ Rhizman is absolutely amazing at what he does . I highly recommend him if you need an assignment done ”
Contrary to our initial expectation, the average height of the mung bean sprouts that grew in the dark environment was greater than the average height of those that grew in the light. The seedlings in the dark environment grew taller as they expended their energy to reach a light source. However, despite their increased height, the mung bean sprouts in the dark were significantly weaker compared to those in the light environment.
Possible sources of error include wetting the paper towels with alcohol instead of water and inadequate water volume in the bottles.
Recommendations
For future experiments, it is advisable to ensure accurate wetting of paper towels with water, as using alcohol may have affected the growth of seedlings. Additionally, maintaining consistent water levels in the bottles is crucial for valid comparisons.
Overall, this experiment provides valuable insights into the influence of light on plant growth and highlights the need for careful control of experimental variables.
Experiment Report: Mung Bean Sprout Growth. (2020, Jun 02). Retrieved from https://studymoose.com/document/mung-bean-lab-report-examining-effect-light-growth-new
"Experiment Report: Mung Bean Sprout Growth." StudyMoose , 2 Jun 2020, https://studymoose.com/document/mung-bean-lab-report-examining-effect-light-growth-new
StudyMoose. (2020). Experiment Report: Mung Bean Sprout Growth . [Online]. Available at: https://studymoose.com/document/mung-bean-lab-report-examining-effect-light-growth-new [Accessed: 18 Sep. 2024]
"Experiment Report: Mung Bean Sprout Growth." StudyMoose, Jun 02, 2020. Accessed September 18, 2024. https://studymoose.com/document/mung-bean-lab-report-examining-effect-light-growth-new
"Experiment Report: Mung Bean Sprout Growth," StudyMoose , 02-Jun-2020. [Online]. Available: https://studymoose.com/document/mung-bean-lab-report-examining-effect-light-growth-new. [Accessed: 18-Sep-2024]
StudyMoose. (2020). Experiment Report: Mung Bean Sprout Growth . [Online]. Available at: https://studymoose.com/document/mung-bean-lab-report-examining-effect-light-growth-new [Accessed: 18-Sep-2024]
- Exploring the Impact of Stress on Bean Plant Growth: A Comprehensive Laboratory Experiment and Analysis Pages: 3 (666 words)
- Plant Growth Experiment Report Pages: 3 (810 words)
- Bean Bag Isotope: Abundance and Atomic Mass Lab Pages: 4 (1088 words)
- Exploring the Impact of Soil pH on Bean Seed Germination: A Comprehensive Analysis Pages: 5 (1445 words)
- Experiment Report: Determining the Empirical Formula of Magnesium Oxide Pages: 5 (1220 words)
- Experiment Report: Isentropic Expansion of a Perfect Gas Pages: 4 (1124 words)
- Experiment Report: Stoichiometry of a Precipitation Reaction Pages: 4 (1105 words)
- Experiment Report: Determination of pKa of Acetic Acid Pages: 6 (1743 words)
- Experiment Report: Determination of ASA Content in Aspirin Pages: 8 (2104 words)
- Microbiology Experiment Report: Identification of Two Unknown Bacteria Pages: 4 (1188 words)

👋 Hi! I’m your smart assistant Amy!
Don’t know where to start? Type your requirements and I’ll connect you to an academic expert within 3 minutes.
The Imagination Tree
Creative play and learning for kids
Growing Beans on Cotton Balls
April 18, 2012 by Anna Ranson
We have been doing lots of indoor growing recently and planted some beans at the same time that we grew our cress letters last month. This is a really easy, visual way to teach children about root systems and is something I used to do with my school children each Spring time. Plus it’s very exciting to watch how FAST the plants grow!

All you need for this easy activity is a glass jar or bottle, some cotton wool balls/ wads and a bean!
First of all Cakie stuffed cotton wool balls into a glass jam jar. Then she simply stuck one bean on either side of the jar so that we could watch 2 growing at once. We used butter beans straight out of the packet that we bought in the dried beans and pulses section in the supermarket. (We used these same beans in our Baking Sensory tub!) Next, she watered it until the cotton wool was damp but not too wet, and placed the jar in the window.
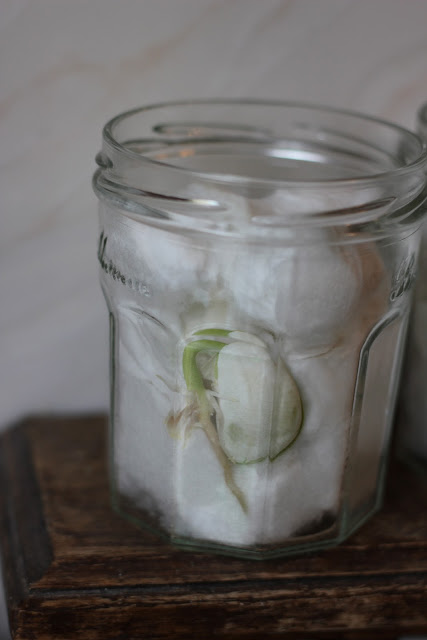
Within 2-3 days the bean started to sprout a small root, and 2-3 days later it grew these little tendrils.
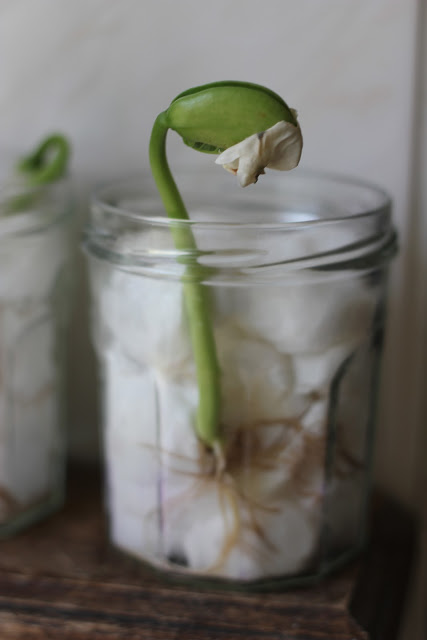
Another 4-5 days and the bean developed a large network of shoots coming off the main root, and a sturdy stem grew straight upwards and above the top of the cotton wool. It dropped the shrivelled husk of the bean skin and looked ready to open up!
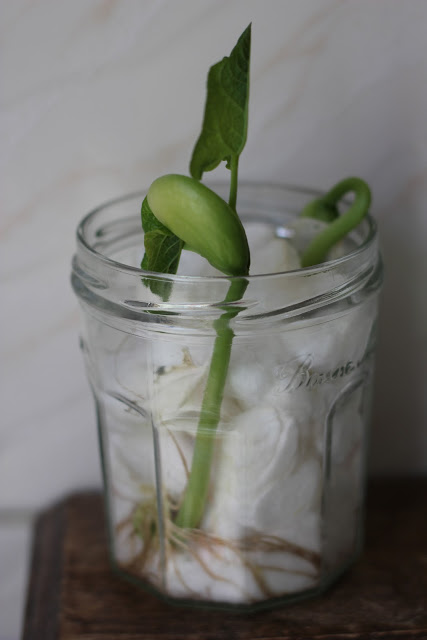
Just a day or so later and 2 big, dark green leaves began to unfurl. Cakie was very excited by this development!
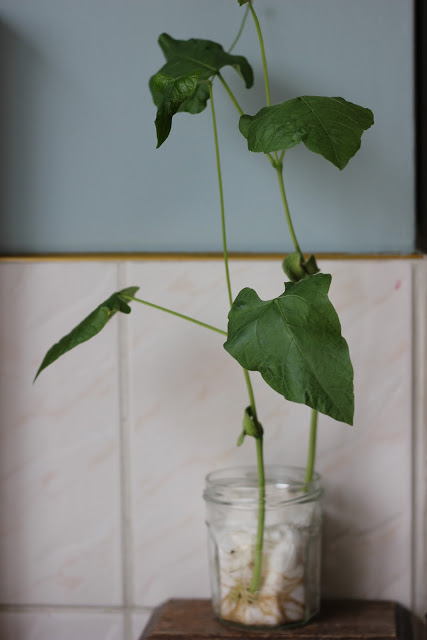
And finally, 4-5 days later the beans were growing very steadily, tall and spindly with large leaves seeking out more sunlight.
We carefully removed them from the jar and examined the complex network of roots that had, by this time, entangled themselves around the cotton wool balls at the bottom. We teased the roots off the cotton wool and replanted the beans into soil in pots in the garden. The girls watered them and are now watching their rapid growth outside with much excitement!
Extension Activities:
Older children could measure the beans each day and record their growth progress in a “bean diary.” They can draw a picture of what the plant looks like every 3-4 days, add a measurement and label the diagram with the parts of the plant as they develop. Alternatively, they could record using a digital camera and printing and sticking in their own photos.
Learning Links:
- knowledge and understanding of the world/ science: talk about what plants need to grow, examine roots and discuss how plants absorb water, talk about leaves and what they are for, discuss life-cycles and growth
- phse: talk about growing and life-cycles in relation to growing from a baby to a toddler to a child, look at photos over time and note changes
- maths: measure the growth of the bean and make comparisons, create a growth chart to track progress
- literacy: make a bean diary and chart the appearance of the bean on each day with diagrams and labels
Cakie: 3 years 6 months
Pop: 2 years
Do you remember doing this at school or at home when you were little?
April 18, 2012 at 3:55 pm
beautifully captures, this activity never gets tired, thanks for the reminder
April 18, 2012 at 4:34 pm
Wow that is really cool! Something I may have to try with my son. Thanks for sharing 🙂
April 18, 2012 at 9:10 pm
I don’t think I realized how fast they grow! This would be something that I could do with my toddler where we’d have a growing plant before he lost interest! 🙂
April 18, 2012 at 9:54 pm
Fantastic photos of this loved activity!
April 19, 2012 at 1:43 am
Great pictures. This is an activity that is always engaging! Renee
April 19, 2012 at 7:40 am
I didn’t realise they grew so fast, great idea for young children
April 19, 2012 at 8:46 am
This is great isn’t it we have some growing at the moment too!
April 19, 2012 at 2:10 pm
Do you need to use a special type of dried bean or will any old bean do?
April 19, 2012 at 5:47 pm
Wow this is impressive! I remember this from my primary school days, we used toilet tissue I think, sadly my tree never sprouted that well, lol.
April 19, 2012 at 9:56 pm
Fantastic post, I’m going to do this tomorrow with The Boy as we’ve been growing seeds but I’d like him to understand the root system and how the plant comes out of the seed.
April 28, 2012 at 2:14 pm
Can you use any bean? Like, for exampel.. uh.. macadamias? peanuts? or do they have to be really dry and all? (I live in sweden so it’s kinda hard for me to find those kind of beans..)
May 17, 2012 at 5:31 pm
Macadamias and Peanuts are not beans, they are nuts. You can use most dried beans though.
May 21, 2012 at 7:14 pm
Actually, a peanut isn’t a nut, it is a legume. You can do this with a raw peanut. Just remove from the shell.
April 28, 2012 at 3:17 pm
This comment has been removed by the author.
April 28, 2012 at 3:19 pm
Well done! I love that you list “Learning Links” explicitly at the end of your post! We are currently watching corn seeds germinate. We live in the midwest with corn around us everywhere. So we planted ours the same day the farmer planted his in the field. We are watching and comparing ours to the field next to our house. Then we’ll pick randomly select, and mark 5 field stalks to measure and observe throughout the summer and fall. I’ll be posting about his project soon. I’m a new follower of your blog, I LOVE it! 🙂
October 27, 2012 at 3:45 pm
Thank you Darci!
September 17, 2012 at 5:49 am
thank you so much for posting this idea, the method in planting the beans, the pictures, and the “Extension Activities”!!!! magnificent!! 😀
thank you so much!
September 23, 2012 at 11:00 am
First of all, thank you so much for making this wonderful blog with many different interesting activities. Please could you let me know what kind of bean you used in this picture? was it Mung Bean? but it is white and quite bigger than Mung Bean. Thank you once again!!!!!!!!!!!!!!!!!!!!!!!!!!1
October 27, 2012 at 3:44 pm
It’s a butter bean. I did write it in the post but I should edit and make it more obvious as a few people have asked! Thanks for sweet words about the blog!
October 26, 2012 at 7:21 am
what type of bean is this?
these were butter beans
October 27, 2012 at 7:24 pm
is it normal for the beans to start smelling?
October 28, 2012 at 12:21 am
yes it is. then they sprout
November 2, 2012 at 7:01 am
November 2, 2012 at 7:02 am
Do these attract fruit flies? Thanks. Lovely project.
December 27, 2012 at 6:35 am
Thank you for the good writeup. It in truth used to be a amusement account it. Glance complicated to far introduced agreeable from you! By the way, how could we be in contact? My web-site :: talkintalk.com
December 27, 2012 at 7:38 am
This is a topic that is near to my heart. .. Thank you! Exactly where are your contact details though? Also visit my web-site – http://www.libyawy.com/Royal8882/info/
December 27, 2012 at 8:33 am
You really make it seem really easy along with your presentation but I to find this topic to be really one thing that I believe I’d never understand. It seems too complicated and extremely broad for me. I am looking ahead for your subsequent publish, I will try to get the dangle of it! Have a look at my web blog : tsoy.crngames.com
December 27, 2012 at 11:23 am
Hi to every single one, it’s really a good for me to pay a visit this site, it includes useful Information. Also see my website :: http://cinsault.chem.hope.edu
December 27, 2012 at 11:39 am
Aw, this was a really good post. Taking a few minutes and actual effort to create a really good article… but what can I say… I procrastinate a lot and never manage to get anything done. Here is my website : http://intranet.sman4bna.sch.id/mediawiki/index.php?title=User:SalvadorWo
December 27, 2012 at 12:16 pm
Quality content is the main to be a focus for the people to go to see the site, that’s what this website is providing. Also visit my website :: fast cash loans 444
December 27, 2012 at 1:10 pm
Hi there this is somewhat of off topic but I was wanting to know if blogs use WYSIWYG editors or if you have to manually code with HTML. I’m starting a blog soon but have no coding know-how so I wanted to get guidance from someone with experience. Any help would be greatly appreciated! Also visit my web-site ; Quick Cash Loan
December 27, 2012 at 2:37 pm
I absolutely love your blog and find many of your post’s to be exactly what I’m looking for. Would you offer guest writers to write content for yourself?
I wouldn’t mind writing a post or elaborating on a few of the subjects you write regarding here. Again, awesome site! Here is my site : ShortTermLoan
December 27, 2012 at 3:43 pm
Incredible! This blog looks just like my old one! It’s on a entirely different topic but it has pretty much the same page layout and design. Superb choice of colors! Feel free to surf my website instantloans960
December 27, 2012 at 5:08 pm
Hi there it’s me, I am also visiting this web site regularly, this web page is genuinely fastidious and the visitors are genuinely sharing nice thoughts. my website > quick payday loan
December 27, 2012 at 9:23 pm
I used to be recommended this website by means of my cousin. I’m now not positive whether this submit is written by means of him as no one else recognise such exact approximately my problem. You’re amazing! Thank you! My page > http://kunst-am-wege.de/index.php?title=Benutzer:MichaelHam
December 29, 2012 at 12:21 am
I’ve learn several excellent stuff here. Definitely price bookmarking for revisiting. I surprise how much attempt you put to make such a excellent informative website. Also visit my page … fast payday Loans 360
January 4, 2013 at 4:03 pm
This website was… how do I say it? Relevant!! Finally I have found something which helped me. Thanks! My blog post – samedayloan118
January 4, 2013 at 6:03 pm
I feel this is among the such a lot vital info for me. And i’m satisfied studying your article. But wanna remark on some general things, The website style is wonderful, the articles is in reality excellent : D. Excellent process, cheers Feel free to visit my site : quick payday loans 720
January 4, 2013 at 6:06 pm
Having read this I thought it was rather enlightening.
I appreciate you taking the time and energy to put this content together. I once again find myself spending a lot of time both reading and posting comments. But so what, it was still worthwhile! Also see my page :: cashloan720
January 4, 2013 at 7:11 pm
If some one needs expert view about running a blog then i suggest him/her to go to see this webpage, Keep up the good job. Also visit my blog post – http://Www.Joraweb.Com
January 4, 2013 at 7:30 pm
Nice post. I was checking constantly this blog and I’m impressed! Extremely helpful information specially the last part 🙂 I care for such information much. I was looking for this particular information for a very long time. Thank you and good luck. My web blog ; Thinkstr.Com
January 4, 2013 at 8:47 pm
With havin so much content and articles do you ever run into any problems of plagorism or copyright violation? My website has a lot of unique content I’ve either written myself or outsourced but it seems a lot of it is popping it up all over the internet without my authorization. Do you know any ways to help protect against content from being stolen? I’d genuinely appreciate it. Stop by my website :: Topshelfd.com
I blog quite often and I genuinely appreciate your information. Your article has truly peaked my interest. I will bookmark your site and keep checking for new details about once per week. I subscribed to your Feed too. My web site – nachat24.Com
January 4, 2013 at 9:10 pm
continuously i used to read smaller posts which also clear their motive, and that is also happening with this paragraph which I am reading at this time. My homepage : http://Www.nokturnis.net/
March 16, 2013 at 3:51 am
I had a question about the cotton you used. Does it have to be cotton wool or could you use plain old cotton balls? Thank you!
March 24, 2013 at 1:05 am
Here is my web blog mygreencoffeeweightloss.net
Privacy Overview
COMMENTS
Gasping for Breath: Bottle Experiments with Mung Beans. Gasping for Breath: Bottle Experiments with Mung Beans. allowtransparancy. PLANT SCIENCE BULLETIN. » BOOKS NEEDING REVIEW » ANNOUNCEMENTS. BOTANY IN THE NEWS.
In this experiment, students will examine how the amount of carbon dioxide and light changes the growth of a mung bean's sprout. The equation of photosynthesis shows the relationships among carbon dioxide, light, and growth: 6 CO 2 + 12 H 2 O --- light ----> C 6 H 12 O 6 + 6 O 2 + 6 H 2 O. In this expression, C 6 H 12 O 6 represents simple ...
Directions. Fill the container about halfway with paper towels. Place several beans on the outside of the paper towels in the container so you can watch them grow. Spray the paper towels with water to dampen them. Place the container near a window or on a window ledge. Observe and watch the beans grow over the following days and weeks!
Mung Beans, Vigna radiata. Mung beans are legumes (members of the Fabaceae family), and are most commonly used in the UK for growing nutritious bean sprouts. Mung beans are annuals, growing up to about 1m in height. The first flowers appear seven to eight weeks after planting and the crop reaches maturity in 12 to 14 weeks.
Introduce the experiment. Discuss procedure. Prepare salt solutions. Distribute materials and prepare Petrie dishes. Add mung beans to Petrie dishes and store in cool location. OBSERVATION ...
What do plants need to grow? Plants are everywhere around us, but how do plants grow and what makes plants grow? There are many things plants need to grow su...
WHAT DO PLANTS NEED IN ORDER TO SURVIVE? This experiment shows the things that plants need in order to live. These are air, sunlight, space to grow, water an...
Grow mung bean seeds in tubs under different conditions (oxygen, water, light, and maybe other variables suggested by students) to find out what they need to germinate. ... Work in table groups to set up 3 experiments: 1. seeds on wet paper towel (get water and air and light) - crunch up a paper towel in the bottom of the tub, wet it, then lay ...
Welcome to Craftoona!Here's our first ever Science Experiment.Oona planted these mung beans and we observed it in 6 days.Enjoy watching!Please also support u...
ight!Procedure:I put the mung beans in the bowl of wat. , so they soak.I will take the mung beans out & put th. in the 8 cups.Then I put the paper towel in the cup & place the mung bean on the towel & put a wet towel on top o. the mung beans.Then I separate the cups and put 4 of the cups in the dark box & 4.
Rinse and drain the beans through the mesh lid approximately every 12 hours (or twice a day). Return them to their dark storage spot after each rinse session. [10] The beans should continue to grow in size and sprout thin white tails. 4. Give the sprouts a rinse once they've reached your desired length.
Design of Experiments, Factorial Design, Mung Bean Sprouts, Significant Factors . 1. Introduction The mung bean (Vigna radiata), alternatively known as monggo or munggo in the Philippines, is a small, green bean that belong to the legume family and commonly consumed and grown as a sprout called mung bean sprouts.Mung
Prior to sowing seed, prepare the bed. Mung beans like fertile, sandy, loam soil with excellent drainage and a pH of 6.2 to 7.2. Till the soil to remove weeds, large rocks, and clods and amend the soil with a couple of inches of compost worked in. Plant the seed when the soil has warmed to 65 degrees F. (18 C.).
Mung beans are considered to be a very good option for experiments as the seeds of mung beans are small and they grow even in places which are compact. Growing mung beans experiment can be done to know the variations in soil, you can make use of various quantities of water, fertilizer, and sunlight.
For this experiment, you will need potting soil, three identical flower pots, water, used coffee grounds, and plant seeds, such as mung beans or radishes. You will compare how the plants grow in three conditions: one with just water, one with coffee grounds sprinkled on top of the soil, and a third with coffee grounds mixed into the soil.
Wash in cold water until the water runs clear. After draining, place in a bowl, and immerse in water (about 2.5X the volume of beans should be adaquate). Soak overnight (10 to 12 hours). Drain, rinse the beans with water, then drain again. Put the beans in a jar or container, and cover the lid with a light cloth.
How to Sprout Mung Beans in 7 Steps. Written by MasterClass. Last updated: Jun 7, 2021 • 4 min read. For a crunchy and delicious addition to any stir fry, salad, or sandwich, you can grow mung bean sprouts at home using dried beans from your local grocery store and a couple of common household items.
The first step is to soak the dry beans so they absorb water to begin the germination process. Any beans that float will not be viable. Given a day of soaking, the beans will swell as they take in water. Mung beans more than double their weight, and nearly triple their volume. While the water level in the container doesn't change, the swelling ...
Most types of bean seeds are suitable for science experiments such as growing beans in a bag, testing germination rate and working out what factors affect bean seed growth. If you want quick results, go for fast sprouters like lima beans, pinto beans and mung beans.
In experiments in the 2018-2019 summer, she examined the crop phenology and pod development of five mungbean cultivars and a variety from a related crop species known as black gram or mungo bean (Vigna mungo). The mungbean cultivars were Berken, Celera II-AU, Jade-AU, Satin II, and Opal-AU. The black gram variety was Onyx-AU.
2. Mung bean: Mung bean: Mung Bean flower. They are also known as green gram or moong, or maash is widely used in Southeast Asian households. The fascinating part about Mung bean is that it can be grown in a bag indoors. We can grow Mung beans in a hemp sprouting bag after soaking the seeds and prepping the bag for germination.
Abstract. In this experiment, we investigated the growth of mung bean sprouts in different environmental conditions, specifically in light and darkness. We hypothesized that mung bean sprouts grown in light would be taller than those grown in the dark. The experiment involved planting mung bean seeds in bottles filled with wet paper towel ...
All you need for this easy activity is a glass jar or bottle, some cotton wool balls/ wads and a bean! First of all Cakie stuffed cotton wool balls into a glass jam jar. Then she simply stuck one bean on either side of the jar so that we could watch 2 growing at once. We used butter beans straight out of the packet that we bought in the dried ...