How to Give User Admin Rights in Windows 11: A Step-by-Step Guide
Giving someone admin rights in Windows 11 ensures they have full control over the computer, allowing them to install software, change system settings, and manage other user accounts. To complete this task, follow a simple set of steps that guides you through accessing and changing user account settings.

How to Give User Admin Rights in Windows 11
In the following steps, you will learn how to grant administrative privileges to a user account in Windows 11. This is useful if you want to empower another user to manage the machine or need to change permissions for specific tasks.
Step 1: Open the Settings Menu
Click on the Start menu and select "Settings."
This will open a window containing various options for personalizing and managing your Windows 11 experience.
Step 2: Go to Accounts
In the Settings window, select "Accounts" from the sidebar.
This section houses all the options related to user accounts, including family and other users.
Step 3: Select Family & Other Users
Under Accounts, click on "Family & other users."
This brings up a page where you can manage other users on your computer, including adding new users or modifying existing ones.
Step 4: Choose the User You Want to Modify
Find the user you want to grant admin rights to and click on their name.
This will expand a set of options for that user, including account type changes.
Step 5: Change Account Type
Click "Change account type" and select "Administrator" from the dropdown menu.
This step is crucial as it changes the user’s permissions from a standard user to an administrator.
Step 6: Confirm the Change
Click "OK" to apply the changes.
This finalizes the process, and the user now has administrative rights on the machine.
After completing these steps, the selected user will have full administrative rights, allowing them to install software, modify system settings, and manage other user accounts.
Tips for Giving Admin Rights in Windows 11
- Backup Important Data : Always back up important files before making significant changes to user accounts.
- Use Strong Passwords : Ensure the account receiving admin rights has a strong password to prevent unauthorized access.
- Monitor Admin Activity : Regularly check the activities of users with admin rights to ensure they are not making harmful changes.
- Create a Restore Point : Before granting admin rights, create a system restore point in case you need to revert changes.
- Limit Admin Accounts : Only give admin rights to users who truly need them to minimize security risks.
Frequently Asked Questions
What is an administrator account.
An administrator account has full control over the computer, allowing the user to install software, change settings, and manage other accounts.
Do I need admin rights for installing software?
Yes, admin rights are typically required to install software and make significant changes to the system.
Can I remove admin rights later?
Absolutely. You can follow the same steps to downgrade the user from an administrator to a standard account.
Is it safe to have multiple admin accounts?
While possible, having multiple admin accounts can be risky. It’s best to limit the number of admin accounts to maintain security.
What if I forget the admin password?
If you forget the admin password, you can use another admin account to reset it or use Windows recovery tools.
Summary of Steps
- Open the Settings Menu
- Go to Accounts
- Select Family & Other Users
- Choose the User You Want to Modify
- Change Account Type
- Confirm the Change
Giving user admin rights in Windows 11 is a straightforward process but should be done with caution. By following the steps outlined, you can easily grant administrative privileges to a user, allowing them full control over the system. Remember to follow best practices like using strong passwords and monitoring admin activity to keep your system secure.
If you found this guide helpful, consider exploring other Windows 11 features to make the most out of your system. Happy computing!

Matt Jacobs has been working as an IT consultant for small businesses since receiving his Master’s degree in 2003. While he still does some consulting work, his primary focus now is on creating technology support content for SupportYourTech.com.
His work can be found on many websites and focuses on topics such as Microsoft Office, Apple devices, Android devices, Photoshop, and more.
Share this:
- Click to share on Twitter (Opens in new window)
- Click to share on Facebook (Opens in new window)
Related Posts
- How to Delete Administrator Account in Windows 11: A Step-by-Step Guide
- How to Get Permission from Administrator in Windows 11: A Step-by-Step Guide
- How to Install Software Without Admin Rights on Windows 11: A Guide
- How to Make My Account Administrator in Windows 11: A Step-by-Step Guide
- How to Get Administrator Privileges on Windows 11: A Step-by-Step Guide
- How to Run as Administrator Windows 11: Step-by-Step Guide
- SharePoint Admin Center on Windows 11: A Guide to Navigating
- How to Grant Administrator Permission in Windows 11: A Step-by-Step Guide
- How to Make Myself an Administrator on Windows 11: A Step-by-Step Guide
- How to Change Local Administrator Name in Windows 11: A Step-by-Step Guide
- How to Manage Administrator Passwords on Windows 11: A Guide
- How to Create a New User in Windows 11: Step-by-Step Guide
- How to Delete Outlook Account on iPhone 13
- How to Create Guest Account Windows 11: Step-by-Step Guide for Beginners
- How to Run Program as Administrator Windows 11: A Step-by-Step Guide
- How to Remove Work Account from Windows 11: A Step-by-Step Guide
- How to Switch Between Email Accounts on the iPhone: A Step-by-Step Guide
- How to Enable User Mode in Windows 11: A Step-by-Step Guide
- How to Add Another User on Windows 11: A Step-by-Step Guide
- How to Remove Email Account from Windows 11: A Step-by-Step Guide
Get Our Free Newsletter
How-to guides and tech deals
You may opt out at any time. Read our Privacy Policy
How to manage user account settings on Windows 11
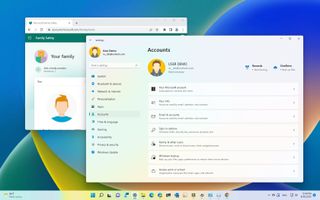
Here are the steps to add, change, and remove accounts on Windows 11.
View account details
- Add more email accounts
- Change sign-in options
- Control account sync settings
- Connect to organization
- Add multiple accounts
- Delete accounts
On Windows 11 , the "Accounts" page in the Settings app allows you to review and customize many aspects of your account. You can determine the account type, switch from a Microsoft to a local account, change how you sign in, and enable many features to make the experience more secure and easier to use.
In addition, when you need to share a device with other people, you can create an account for each person so that each has a personal space they can customize, apps with their own profile, and a different area to store files.
Furthermore, if you must let a young person use a computer, you can also create a special child account type that provides parental control to monitor and protect them from content that may not be appropriate for their age.
This guide will teach you the steps to manage user accounts on your computer running the latest version of Windows 11.
How to view account details on Windows 11
On Windows 11, the "Your info" settings page includes details about your account, such as the type of account and the Microsoft account associated with the current profile. It also houses the settings to switch from a Microsoft to a local account or vice versa and the option to change the picture profile.
To view the account information on Windows 11, use these steps:
Get the Windows Central Newsletter
All the latest news, reviews, and guides for Windows and Xbox diehards.
- Open Settings .
- Click on Accounts .
- Click the Your info page on the right side.
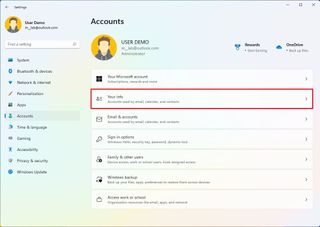
- Confirm your account details, including account type (Administrator or Standard) and whether you have a local or Microsoft account.
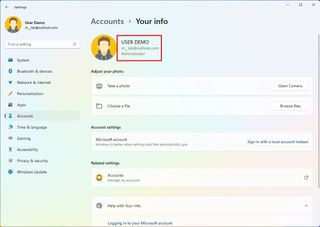
- Quick note: If the page reads "Local account" under your name, there's a link to a Microsoft account. You have a Microsoft account configuration if your email address appears on this page.
- (Optional) Under the "Related settings" section, click the "Accounts" option to access the account online to change billing details, family and security settings, and other settings.
Once you complete the steps, the "Your info" page will give various pieces of information about the account.
In the "Accounts" section, you're also going to find the "Your Microsoft account" page, but it only includes details about your Microsoft 365 subscription.
Change to local account
If you have a Microsoft account and you prefer a local account, you can use these steps to switch:
- Under the "Account settings" section, click the "Sign in with a local account instead" option.
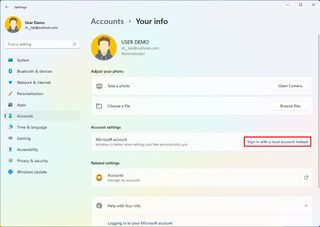
- Continue with the on-screen directions.
- If you have a Microsoft account, click the "Sign in with a local account instead" option to switch to a local account.
- Continue with the on-screen directions.
After you complete the steps, the account will no longer be associated with a Microsoft account.
You can also use the instructions outlined above to switch to a Microsoft account if you have a local account.
Change account picture
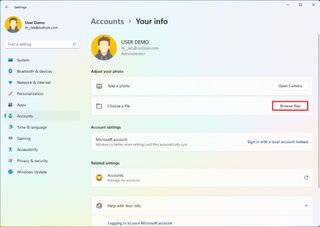
To change the account picture on Windows 11, use these steps:
- Click the Browse files button in the "Choose a file" setting.
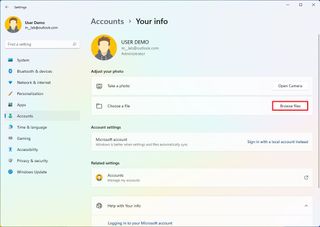
- Quick tip: You can also use the Camera option to take a picture and set it as the new profile photo.
- Select a new image for the account.
- Click the Choose Picture button.
Once you complete the steps, the picture will apply to the account.
How to link additional emails to an account on Windows 11
You can also add other email accounts in advance, so you don't have to enter the information on other apps (such as Mail & Calendar) and services.
Add accounts for apps
To add additional email accounts on Windows 11, use these steps:
- Click the Email & accounts page on the right side.
- Under the "Accounts used by email, calendar, and contacts" section, click the Add an account button.
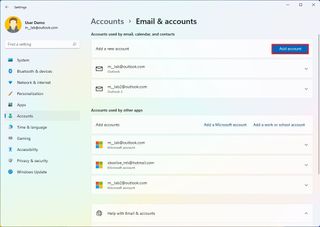
- Quick note: If you want to add another Microsoft account, the system will list it under the "Accounts used by other apps" section.
- Select the service provider (such as Outlook, Google, or iCloud).
After you complete the steps, the accounts will be available to set up other apps and services.
Add accounts for work
To add work accounts for apps on Windows 11, use these steps:
- Under the "Accounts used by other apps" section, click the "Add a Microsoft account" or "Add a work or school" account.
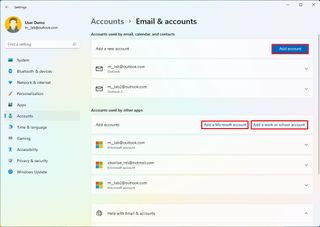
- Select the correct service.
Once you complete the steps, the account will be added, giving you quick access to work applications, such as OneDrive for Business.
How to change sign-in options on Windows 11
Windows 11 also includes the "Sign-in options" page that includes the different ways you can customize the preferences to sign into your account. For example, on this page, you can configure Windows Hello, change your local account password, and enable other features like Dynamic lock.
Change account password
If you use Windows 11 with a Microsoft account, you can only change the password online by changing your Hotmail, Live, or Outlook password. You can change the password through the Sign-in options page if you have a local account.
To change the account password on Windows 11, use these steps:
- Click the Sign-in options page on the right side.
- Under the "Ways to sign in" section, click the Password setting.
- Click the Change button.
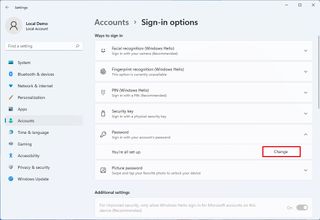
- Confirm the current password.
- Confirm the new password.
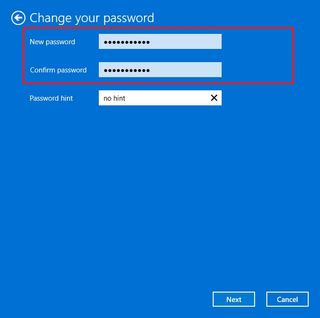
- Quick note: You can't re-use a previous password. You must enter a new password.
- Click the Next button.
- Continue with the on-screen directions (if applicable).
After you complete the steps, you can sign out and sign back in to start using the new password.
Configure or change Windows Hello authentication
On Windows 11, you have multiple ways to configure Windows Hello. You can set up facial or fingerprint recognition if you have the hardware that supports the feature. You can use a physical security key (usually used in organizations). And the most common form of authentication is the PIN option since it doesn't require special hardware and is more secure than a traditional password.
Usually, Windows 11 will prompt you to create a PIN during the initial setup, but if you are still using a password, you can use these steps to set up a Windows Hello PIN:
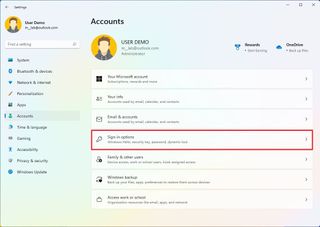
- Under the "Ways to sign in" section, click the PIN (Windows Hello) setting.
- Click the Set up button.
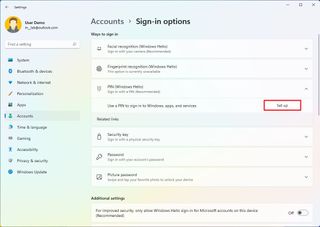
- Confirm your current password (if applicable).
- Click the OK button.
- Create a new numeric PIN that you will remember.
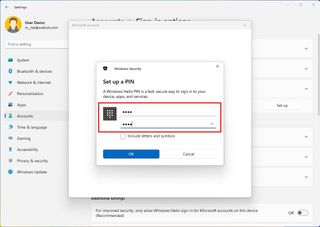
- (Optional) Under the "Additional settings" section, turn on the "For improved security, only allow Windows Hello sign-in for Microsoft accounts on this device" toggle switch.
- Quick note: This feature will turn on Windows Hello for all authentications across Windows 11, so you are never asked for your account password.
Once you complete the steps, you can start using the PIN to sign in instead of a password.
Change current PIN
If you already have a PIN, you will only find the option to change or remove it.
To change the current account PIN, use these steps:
- Under the "Ways to sign in" section, click the PIN (Windows Hello) setting.
- Click the Change PIN button.
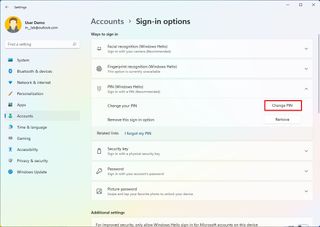
- Confirm the current PIN.
- Create a new PIN.
- Confirm the new PIN.
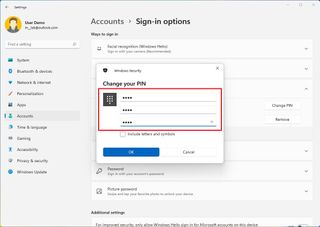
- (Optional) Under the "Additional settings" section, turn on the "For improved security, only allow Windows Hello sign-in for Microsoft accounts on this device" toggle switch.
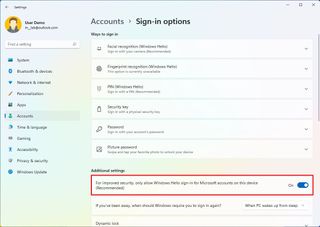
- Quick note: This feature will turn on Windows Hello for all authentications across Windows 11, so you are never asked for your account password. However, if enabled, you won't be able to remove the PIN.
After you complete the steps, the Windows Hello information will change to the new PIN.
Enable sign-in upon waking up
As part of the account settings, you can decide whether the system should prompt you for a password upon waking the device or after some time you have been away from your desk.
To require a sign-in after waking up or specific time period, use these steps:
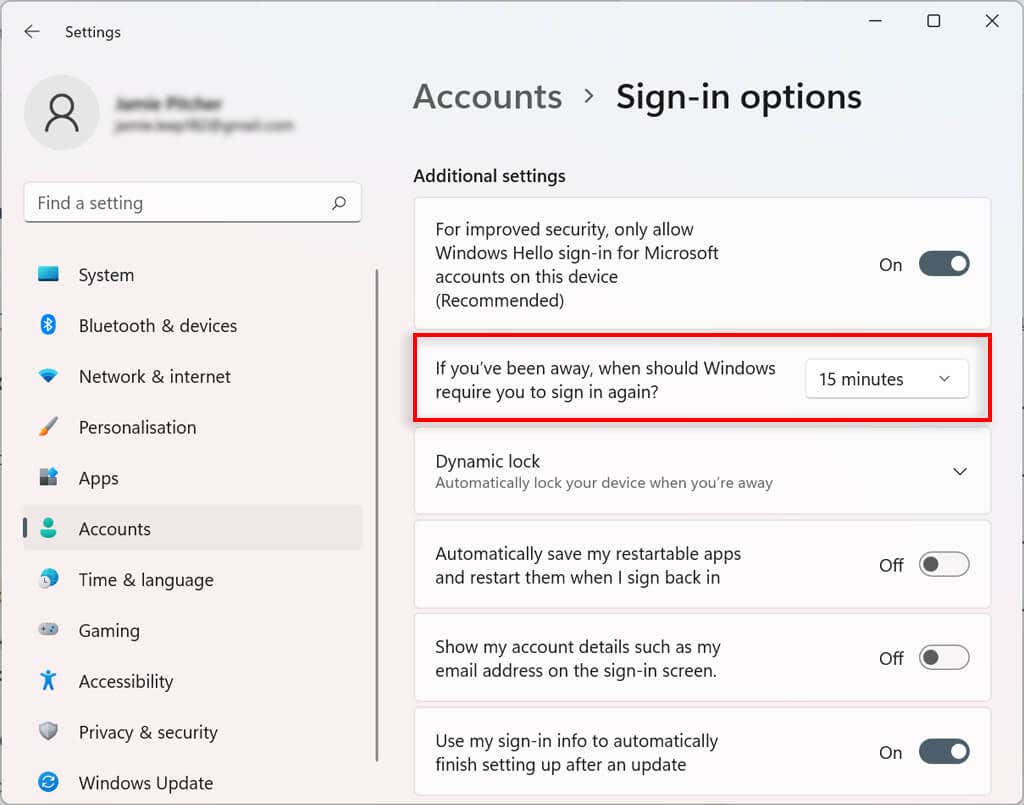
- Under the "Additional settings" section, use the "If you've been away, when should Windows require you to sign in again?" setting to automatically select how long the system should wait before locking the account.
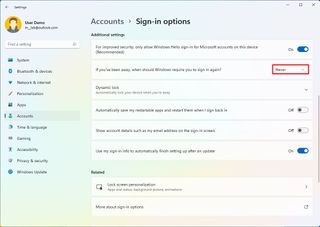
This setting replaces the "Require sign-in" option that lets you decide whether Windows 11 should ask you to sign in when the device wakes up from sleep mode. If you want to disable the option, select the Never option.
Enable Dynamic lock
"Dynamic lock" is a feature that locks your device when you step away from the room automatically. The feature uses proximity technology, meaning you'll need to connect a Bluetooth device like a phone or wearable before you can configure it. Once enabled, if you step away from the computer after 30 seconds, Windows 11 will lock the profile automatically.
To enable Dynamic lock, use these steps:
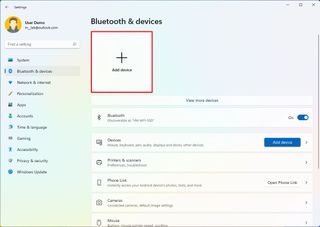
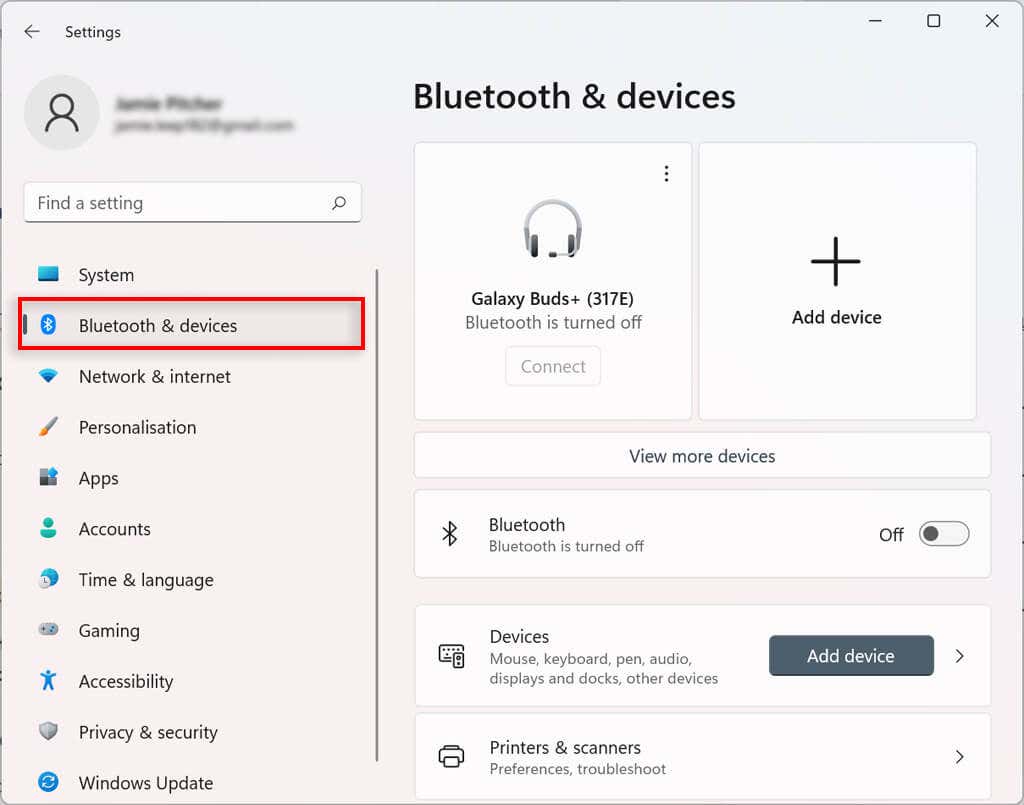
- Click on Bluetooth & devices .
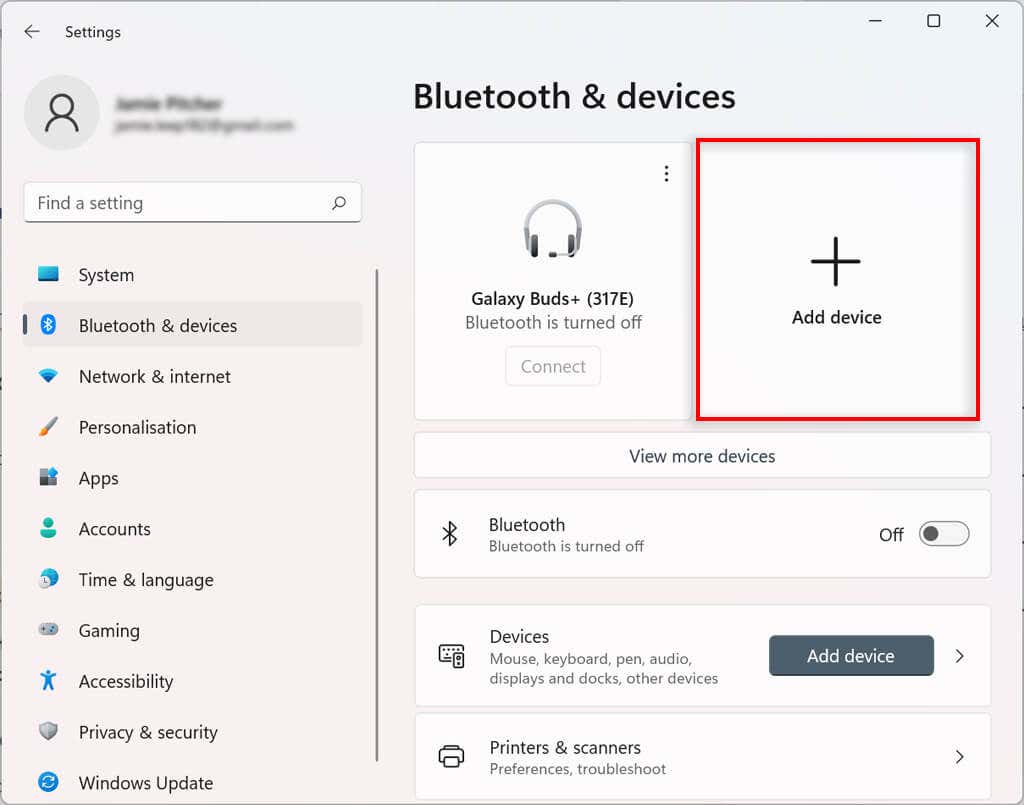
- Click on Add device button.
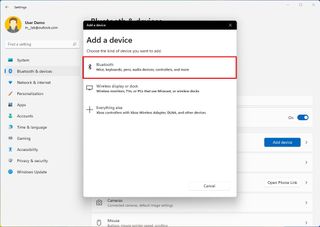
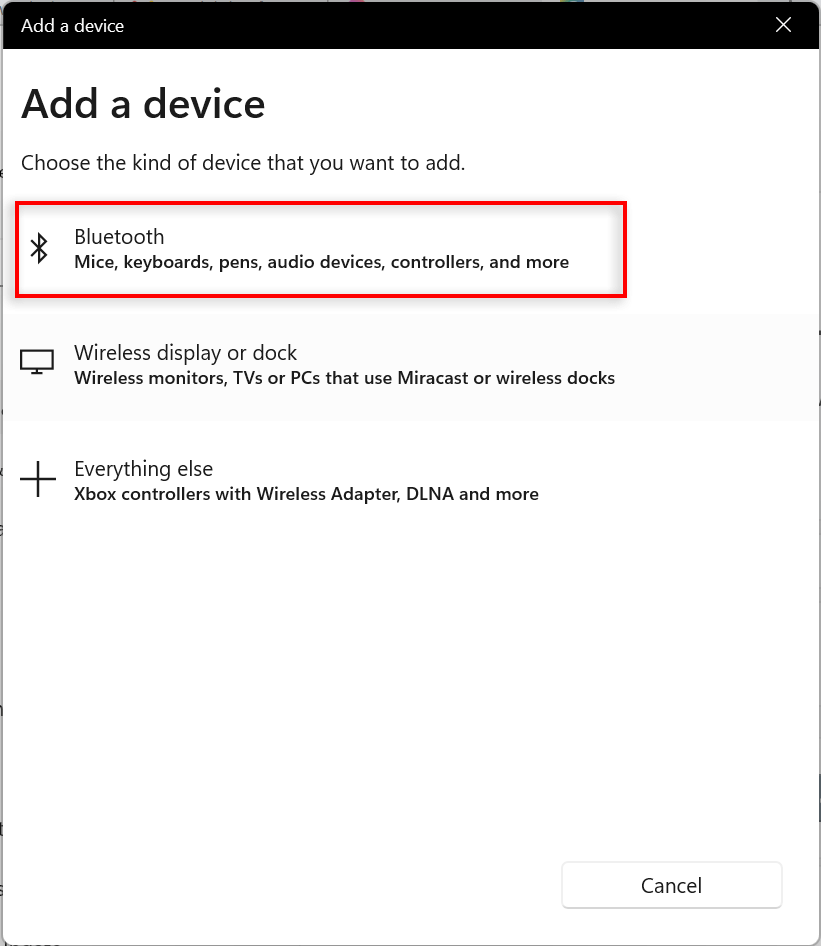
- Click on Bluetooth .
- Turn on Bluetooth on the device you want to pair.
- Select the device from the list.
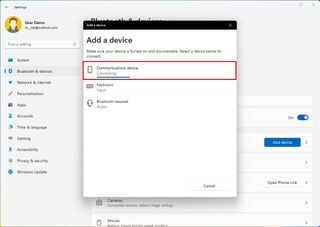
- Continue with the on-screen directions to complete the pairing.
- Click the Sign-in options page on the right side.
- Under the "Additional settings" section, click the Dynamic lock setting.
- Check the "Allow Windows to automatically lock the device when you're away" option.
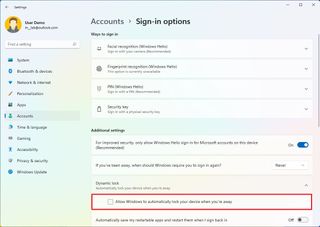
Once you complete the steps, you can step away from the desk with the Bluetooth device, and then after 30 seconds, when you return, the computer should be locked.
Stop restarting apps on startup
Some apps are able to restart automatically at startup if you don't close them before turning off the computer. If you don't like this behavior, you can disable the feature.
To prevent apps from restarting at startup, use these steps:
- Under the "Additional settings" section, turn off the "Automatically save my restartable apps and restart when I sign back in" toggle switch.
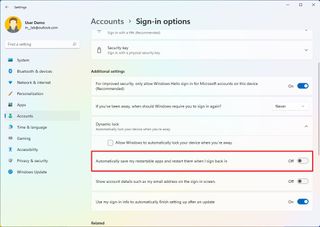
After you complete the steps, apps will no longer restart automatically on startup.
How to control account sync settings on Windows 11
On Windows 11, Microsoft is referring to the sync settings as the new "Windows Backup" feature. On this page, you can choose what folders are backed up in the cloud using OneDrive . You can decide whether the system should remember your apps so you can restore them on another installation. And you can control the settings you want to sync across devices associated with the same Microsoft account.
To control the sync settings on Windows 11, use the steps:
- Click the Windows backup page on the right side.
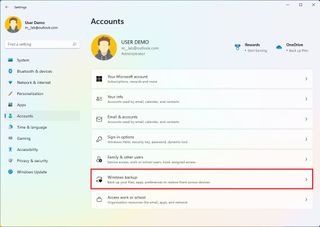
- Click the Set up syncing button for the "OneDrive folder syncing" setting.
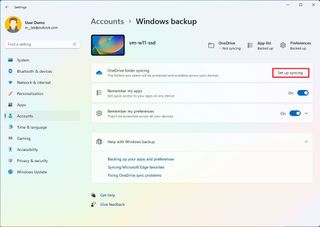
- Select the folders (Desktop, Documents, or Pictures) to upload and back up on the cloud. (You must have enough space to enable this feature.)
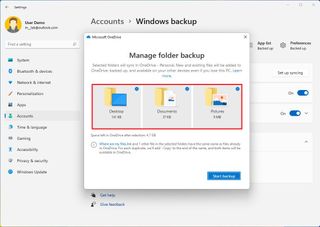
- Click the Start backup button.
- (Optional) Turn on the "Remember my apps" toggle switch if you want the system to remember the Microsoft Store app on your computer so that you can restore them later on another computer.
- Turn on the "Remember my preferences" toggle switch to allow your settings to sync across devices.
- Click the "Remember my preferences" setting.
- Check the settings you want to sync across devices, including passwords, language preferences, and other Windows settings.
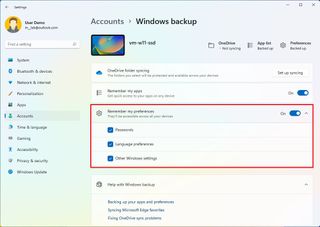
Once you complete the steps, the settings and files will sync to the cloud and across devices, depending on your configuration.
How to connect account to an organization on Windows 11
The "Access work or school" page has the settings to connect to an organization to access shared resources, such as network resources, apps, and emails. If you are part of an organization, your network administrator will provide the information.
To connect a device to the network, use these steps:
- Click the Access work or school page on the right side.
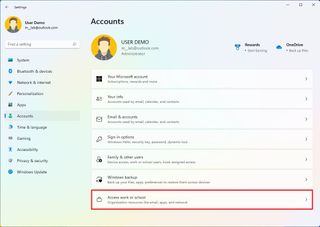
- Click the Connect button.
- Confirm your work or school account.
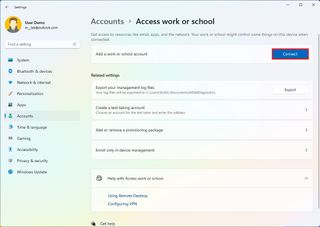
- Quick note: You can also select the option to join an Azure Active Direction or local Active Directory domain from this page.
After you complete the steps, you will have access to the organization's resources as configured by the network administrator.
How to add multiple accounts on Windows 11
Although most computers are set up for single users, Windows 11 allows you to share the device with multiple people through the "Family & other people" page, which includes the settings to add, remove, and manage multiple user accounts.
Add family members
On the page, under the "Your family" section, you can manage family members to allow each person to have their desktop, settings, apps, and a place to store files separately from everyone else.
You can have two family account types, including "Child" and "Adult," and each account type provides different features.
Create a child account
A Child account offers a controlled environment with features to keep young members safe while using apps, playing games, and browsing the internet. If you choose to create a child account, the person can use the device, personalize the desktop, work with apps, create files, and safely browse the web with Microsoft Edge.
Also, when using this account type, the organizer can control their activities, enforce limits on apps and games, control screen time, and more using the Microsoft family dashboard online.
To create a child account on Windows 11, use these steps:
- Click the Family & other users page on the right side.
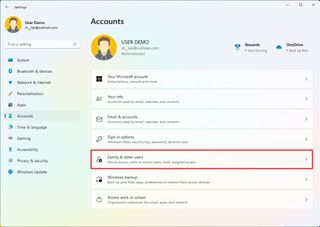
- Click the Add account in the "Add a family member" setting.
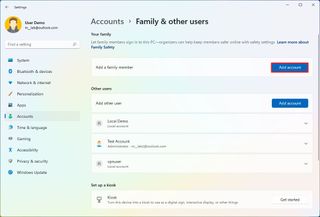
- Confirm the email address of the young person you want to add.
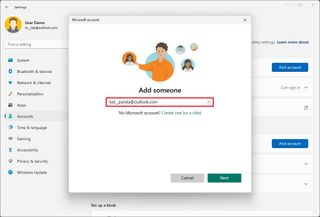
- Quick note: If the young person doesn't have an account, choose the "Create one for a child" option and continue with the on-screen directions.
- Click the Next button.
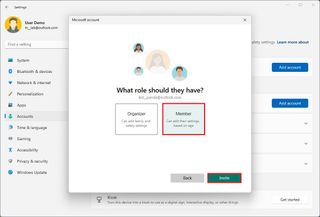
- Select the Member option.
- Click the Invite button.
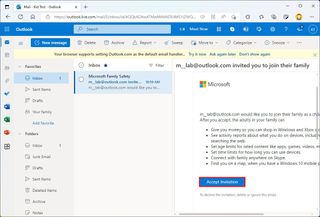
- Open the invitation email in the child's account online.
- Click the Accept Invitation button.
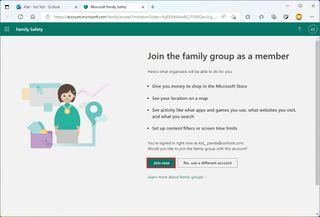
- Click the Join now button.
- Sign out of the main account.
- Select the child account from the Lock screen.
- Sign in with the child's Microsoft account credentials.
- Click the Skip for now option (if applicable).
- Create a PIN for the account.
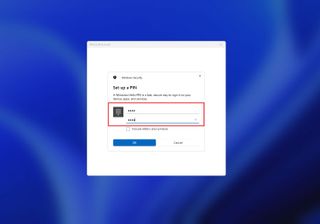
- Click the OK button.
- Continue with the on-screen directions to finish the setup.
Once you complete the steps, Windows 11 will create the account, and the user will be able to sign in immediately.
Create an adult account
When using the family settings, an adult account is the same as a traditional local account, but members can also control child accounts.
To add a new member to the family group on Windows 11, use these steps:
- Click the Add account in the "Add a family member" setting.
- Confirm the family member's email address.
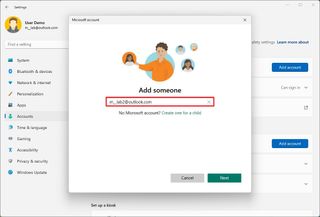
- Click the Next button.
- Select the Organizer option.
- Click the Invite button.
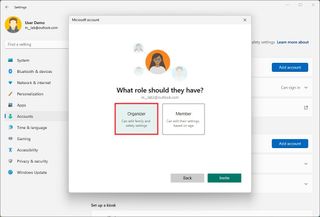
After you complete the steps, the account will be created, but the new member will need to accept the email invitation before they can use the device and manage parental control settings for child accounts.
Add non-family member
On Windows 11, you can also create accounts for other people not necessarily part of your family. Using these settings, you can create a Microsoft or traditional local account.
Create a Microsoft account
Using a Microsoft account is recommended because it's easier to configure, the user can choose to sync their settings across devices, and password recovery is straightforward.
To create a profile with a Microsoft account, use these steps:
- Under the "Other users" section, click the Add account button for the "Add other user" setting.
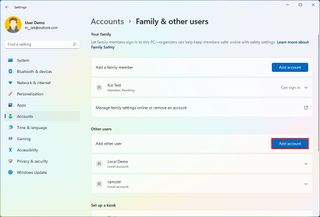
- Confirm the email address or phone number of the new user.
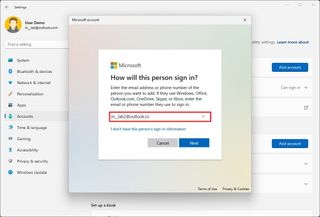
- Quick note: If the user doesn't have a Microsoft account, choose the "I don't have this person's sign-in information" option to create an account and continue with the on-screen directions.
- Click the Finish button.
Once you complete the steps, the person should be able to sign in and start using the device.
Create a local account
On Windows 11, you can still create a local account without needing a Microsoft account, also called an offline account.
To create a local account on Windows 11, use these steps:
- Click the "I don't have this person's sign-in information" option.
- Click the "Add a user without a Microsoft account" option.
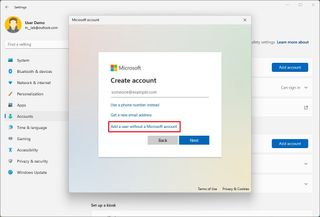
- Confirm the username.
- Create a password for the account.
- Complete the security questions to enable the reset option if you forget the password.
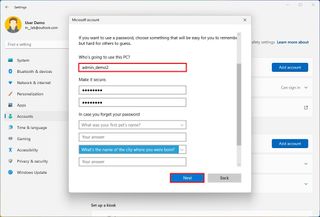
After you complete the steps, the user can log in and start using the standard local account on your Windows 11 computer.
Furthermore, the "Family & other users" page also includes an option to set up a kiosk account . This feature is usually reserved for network administrators to turn a computer into a digital sign or interactive display or turn it into a device that only runs a specific application.
Change account type
As standard user account is the recommended type for most users, but if you want to change the type to administrator .
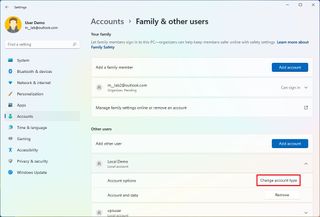
To change a user account type on Windows 11, use these steps:
- Click the Family & other users page on the right side.
- Under the "Other users" section, select the account to update.
- Click the Change account type button.
- Select the Administrator account type.
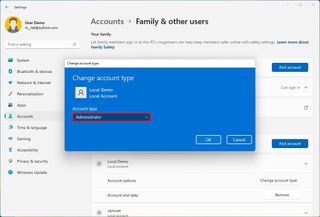
Once you complete the steps, the new account type will dictate the user's access privileges.
How to delete account on Windows 11
On Windows 11, when you no longer need an account, you can delete the profile and data, but the steps can differ depending on the account type.
Remove family account
To delete a family member account on Windows 11, use these steps:
- Under the "Your family" section, click the "Manage family settings online" option.
- Sign in with your credentials (if applicable).
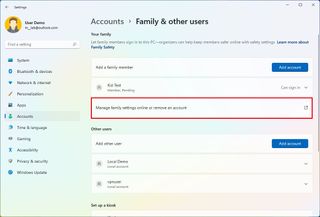
- Under the "Your family" section, click the (three-dotted) menu button in the right corner of the user account and select the "Remove from family group" option.
- Click the Remove button.
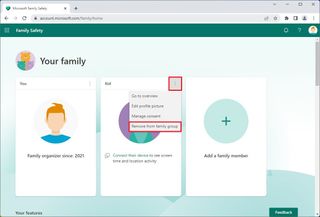
- Quick note: If you are trying to remove a child account, you may first need to choose the "Manage consent" option and remove the consent before you can remove the account from the family group.
Once you complete the steps, the account and files will be deleted from the computer.
Remove non-family account
To delete a local account on Windows 11, use these steps:
- Under the "Other users" section, select the user account and click the Remove button.
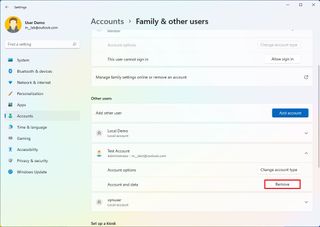
- Click the "Delete account and data" button.
After you complete the steps, the profile and files will be deleted from the device.
More resources
For more helpful articles, coverage, and answers to common questions about Windows 10 and Windows 11, visit the following resources:
- Windows 11 on Windows Central — All you need to know
- Windows 10 on Windows Central — All you need to know
Mauro Huculak has been a Windows How-To Expert contributor for WindowsCentral.com for nearly a decade and has over 15 years of experience writing comprehensive guides. He also has an IT background and has achieved different professional certifications from Microsoft, Cisco, VMware, and CompTIA. He has been recognized as a Microsoft MVP for many years.
- 2 Qualcomm scores BIG win against Arm, can continue to sell Snapdragon X chips for PCs
- 3 OpenAI launches next-gen reasoning models with "incredible" coding capabilities
- 4 Qualcomm CEO brazenly thought Nuvia chip deal could save $1.4 billion in fees to Arm
- 5 Xbox has a new "VP of next-gen" and they'll be at CES alongside Lenovo ... but what could it mean for Xbox's future?
How to Give User Admin Rights in Windows 11: A Step-by-Step Guide
December 19, 2024
Michael Collins
Setting up user admin rights in Windows 11 allows you to control who has access to certain features and settings on your computer. To give someone admin rights, you’ll need to access the User Accounts settings and change the account type to ‘Administrator.’ This quick change ensures that the user can make necessary changes and updates to the system. It’s a straightforward process, but it’s important to be cautious about who gets these permissions, as they’ll have significant control over the device.
How to Give User Admin Rights in Windows 11
In this section, we’ll walk you through the steps to change a user’s account type in Windows 11, granting them administrative privileges. These instructions will ensure that selected users can perform advanced tasks and manage system settings.
Step 1: Open Settings
To kick things off, click on the Start menu and select ‘Settings.’
Opening the ‘Settings’ menu is your gateway to accessing various features and configurations on your Windows 11 computer. You can also press the Windows key + I to open it directly, which is a handy shortcut to remember.
Step 2: Go to Accounts
Next, in the Settings window, find and click on ‘Accounts.’
Under the ‘Accounts’ section, you can manage all user-related settings. This includes adding or removing accounts, and importantly, changing the account type to give someone admin rights.
Step 3: Access Family & Other Users
Scroll down and select ‘Family & other users’ from the Accounts menu.
This section is where you can see all the different users who have access to your computer. You can manage permissions and set up new accounts if needed.
Step 4: Select The User
Find the user you want to grant admin rights to, and click on their name.
It’s crucial to ensure you’re giving admin rights to the correct person. Double-check the username to avoid any mistakes when making these changes.
Step 5: Change Account Type
Click on ‘Change account type’ and select ‘Administrator’ from the dropdown menu, then hit ‘OK.’
Changing the account type will give the user the ability to manage system settings, install software, and perform other administrative tasks. Once you hit ‘OK,’ the changes take effect immediately.
After you complete these steps, the selected user will have administrative privileges. This means they can install applications, change security settings, and manage other user accounts. Make sure they understand the responsibilities that come with these new permissions.
Tips for Giving User Admin Rights in Windows 11
- Understand the Risks: Be aware that giving someone admin rights can potentially expose your system to risks if the user is not careful.
- Use Strong Passwords: Encourage users with admin rights to use strong, unique passwords to protect their accounts.
- Regularly Review Permissions: Periodically check who has admin rights and revoke them if necessary.
- Educate Users: Make sure users with admin rights know how to use their privileges responsibly.
- Limit Admins: Try to keep the number of admin accounts to a minimum to reduce the risk of unauthorized changes.
Frequently Asked Questions
Why should i limit admin accounts.
Having too many admin accounts increases the risk of unauthorized changes or security breaches. Fewer admins mean tighter control.
Can an admin account perform all tasks on Windows 11?
Yes, an admin account can install software, manage other accounts, and change system settings, among other tasks.
How do I know if my account is an administrator?
Go to ‘Settings,’ then ‘Accounts,’ and check your account details to see if it’s listed as ‘Administrator.’
Can I change an admin account back to a standard user?
Yes, follow the same steps and select ‘Standard user’ instead of ‘Administrator’ to downgrade the account.
What happens if I forget the admin password?
You’ll need to reset the password using recovery options or another admin account, as admin access is needed to change passwords.
- Open Settings
- Go to Accounts
- Access Family & Other Users
- Select The User
- Change Account Type
Granting user admin rights in Windows 11 is a task that carries significant responsibility. It’s like giving someone the keys to your car; they need to know how to drive it without causing harm. By following these steps, you can ensure that only trusted individuals have the power to make changes to your system. Remember, with great power comes great responsibility.
Make sure to educate users on the importance of cybersecurity and the potential consequences of misusing admin privileges. For further reading, consider looking into Microsoft’s official documentation on account management for additional insights and tips.
Whether you’re a parent setting up a family PC or a small business owner managing a team, being mindful of who has admin rights will keep your digital environment secure and efficient. Now that you’re equipped with this knowledge, go forth and manage your Windows 11 user accounts wisely!
Related posts:
- How to Check If I Have Admin Rights in Windows 11: A Step-by-Step Guide
- How to Change Admin Account on Windows 11: A Step-by-Step Guide
- How to Make Yourself Admin on Windows 11: A Simple Step-by-Step Guide
- How to Reset Administrator Password in Windows 11 Without Admin Rights
- How to Switch Administrator on Windows 11: A Step-by-Step Guide
- How to Remove Administrator Account Windows 11: A Quick Guide
- How to Get Rid of Administrator on Windows 11: A Step-by-Step Guide
- How to Give Myself Administrator Privileges in Windows 11: A Step-by-Step Guide
- How to Make an Account Administrator Windows 11: Step-by-Step Guide
- How to Enable Administrator Account in Windows 11: A Step-by-Step Guide
- How to Install Software Without Admin Rights Windows 11: A Step-by-Step Guide
- How to Login as Administrator in Windows 11 Without Password: A Guide

Bring your desktop to life with daily backgrounds! Try the free Bing Wallpaper app! - Get it now 🌅🏞️🌄
December 20, 2024
Bring your desktop to life with daily backgrounds!
Try the free Bing Wallpaper app! - Get it now 🌅🏞️🌄
Windows 11 Top Contributors: neilpzz - Kapil Arya MVP - Ramesh Srinivasan - _AW_ - Reza Ameri ✅
December 13, 2024
Windows 11 Top Contributors:
neilpzz - Kapil Arya MVP - Ramesh Srinivasan - _AW_ - Reza Ameri ✅
- Search the community and support articles
- Search Community member
Ask a new question
Local users and groups not showing in computer management window 11
Local users and groups not showing in computer management windows 11.
I was following steps to remove a hacked in admin guest I found in command prompt. My manager broke into my apt and allowed her tech to do whatever it took to get her access to my network for free services. This is the latest finding of her cyber crimes. The tech had my laptop password from a previous job with his Nerds group in Sebastopol. Please HELP!
- Subscribe to RSS feed
Report abuse
Reported content has been submitted
Replies (1)
- Microsoft Agent |
Dear Ahnahita ,
Hello! Welcome to the Microsoft Community. I'm glad to be able to help you. If I don't understand your question, please let me know immediately.
I understand that someone with your computer password entered your computer without your consent, and then it seems that a user was created. At present, you should need to open local users and groups to view and operate it. But local users and groups cannot be found in your PC. I understand the trouble this problem has caused you, and I will try my best to help you solve it.
1. Check the Windows version
Windows 11 Home Edition: There is no local users and groups feature in Windows 11 Home Edition. It is only available in Professional, Enterprise, and Education editions. You can try to install it in Home Edition:
Add local users and groups through Microsoft Management Console (MMC):
On the desktop, press WIN + R to open the Run window.
In the Run window, enter the "mmc" command and press Enter.
In the opened MMC window, click the "File" menu and select "Add/Remove Snap-in".
In the pop-up window, select "Local Users and Groups" and click the "Add" button.
Select "Local Computer" and click "OK". In this way, you can see local users and groups in Computer Management.
2. Access Local Users and Groups through Computer Management
If you are using a compatible edition (Pro, Enterprise, or Education) and still don't see it:
-Right-click the Start menu and select Computer Management.
-In the left sidebar, try to expand Local Users and Groups. If it doesn't appear, continue with the next steps.
3. Group Policy Editor (for Pro or higher)
If you are using a higher edition but still want to manage users through the GUI:
-Press Win + R, type gpedit.msc, and press Enter.
-Navigate to Computer Configuration > Windows Settings > Security Settings > Local Policies > User Rights Assignment.
By following these steps, you should be able to determine why Local Users and Groups is not appearing in Computer Management and take appropriate action. If you are using Windows 11 Home, consider upgrading to Pro to access this feature.
Hope these steps can help you. If you have any questions, please let me know in time.
Best Wishes
Pyke.D | Microsoft Community Support Specialist
Was this reply helpful? Yes No
Sorry this didn't help.
Great! Thanks for your feedback.
How satisfied are you with this reply?
Thanks for your feedback, it helps us improve the site.
Thanks for your feedback.
Question Info
- Accounts, profiles, and login
- Norsk Bokmål
- Ελληνικά
- Русский
- עברית
- العربية
- ไทย
- 한국어
- 中文(简体)
- 中文(繁體)
- 日本語
How to Give User Admin Rights in Windows 11: A Step-by-Step Guide
Giving User Admin Rights in Windows 11
Granting someone admin rights in Windows 11 is pretty straightforward. You just need to access the settings, navigate to the accounts section, and change the user’s account type to administrator. This process ensures that the user will have the necessary permissions to make system-wide changes. Let’s dive into the step-by-step guide to make this happen.
Step-by-Step Tutorial for Giving User Admin Rights in Windows 11
In this section, you’ll learn how to give a user administrative privileges in Windows 11. This involves changing the user’s account type, allowing them to manage system settings and install software.
Step 1: Open Settings
The first step is opening the Windows Settings menu.
You can do this quickly by pressing the Windows key + I on your keyboard. This handy shortcut saves you from hunting through menus.
Step 2: Go to Accounts
Next, navigate to the Accounts section within the Settings menu.
Click on "Accounts" from the left-hand menu. This is where you’ll find all the settings related to user accounts and permissions.

Step 3: Select Family & Other Users
Now, click on "Family & other users."
This option will show you a list of all the users on your PC. It’s where you manage both family members and other users.
Step 4: Choose the User
Select the user you want to give admin rights to.
Click on the user’s name and then click on "Change account type." This will open a new menu where you can adjust their permissions.
Step 5: Change Account Type
In the new menu, switch the account type to Administrator.
Use the drop-down menu to change the account type from "Standard User" to "Administrator." Then click "OK" to save your changes.
After completing these steps, the user will have administrative privileges. They can now make changes to system settings, install applications, and more.
Tips for Giving User Admin Rights in Windows 11
- Use Admin Privileges Sparingly : Only grant admin rights to trusted users, as they will have the power to make significant changes.
- Create Restore Points : Before making any major changes, create a system restore point just in case something goes wrong.
- Use Strong Passwords : Ensure that any account with admin rights has a strong, unique password to prevent unauthorized access.
- Monitor Activity : Keep an eye on the activities of users with admin rights to catch any potential issues early.
- Understand the Risks : Be aware that admin users can install any software, which may include potentially harmful programs.
Frequently Asked Questions
What are the risks of giving someone admin rights.
Admin users can make significant system changes, including installing harmful software. Always ensure you trust the person you’re giving these permissions to.
How can I remove admin rights from a user?
Follow the same steps but change the account type back to "Standard User."
Can I give myself admin rights if I’m not already an admin?
You’ll need to ask an existing admin on the PC to change your account type to Administrator.
What happens if I accidentally give admin rights to the wrong user?
You can quickly revert the changes by following the steps and changing the account type back to "Standard User."
Are admin rights necessary for installing software?
While not always required, many software installations do need administrative permissions to complete.
- Open Settings.
- Go to Accounts.
- Select Family & Other Users.
- Choose the User.
- Change Account Type to Administrator.
Granting admin rights in Windows 11 is a simple yet powerful task that can greatly enhance a user’s control over their system. By following the straightforward steps outlined above, you can enable administrative privileges for any user on your PC. Always be cautious and ensure that admin rights are given only to trusted individuals, as these permissions allow for substantial system changes.
For further reading, consider exploring Microsoft’s official documentation on user account management. It’s also beneficial to stay informed about the latest updates and security practices to keep your system safe and efficient. If you found this guide helpful, share it with someone who might need to know how to give user admin rights in Windows 11. Happy computing!

Kermit Matthews is a freelance writer based in Philadelphia, Pennsylvania with more than a decade of experience writing technology guides. He has a Bachelor’s and Master’s degree in Computer Science and has spent much of his professional career in IT management.
He specializes in writing content about iPhones, Android devices, Microsoft Office, and many other popular applications and devices.
Read his full bio here .
Share this:
- Click to share on Twitter (Opens in new window)
- Click to share on Facebook (Opens in new window)
- Click to email a link to a friend (Opens in new window)
- Click to share on LinkedIn (Opens in new window)
- Click to share on Reddit (Opens in new window)
- Click to share on Pinterest (Opens in new window)
- Click to share on Tumblr (Opens in new window)
Related posts:
- How to Check if I Have Admin Rights on Windows 11: A Simple Guide
- How to Make User Admin Windows 11: A Step-by-Step Guide
- How to Enable Administrator Account in Windows 11: Step-by-Step Guide
- How to Remove Microsoft Administrator Account from Windows 11: Step-by-Step Guide
- Changing Admin Name on Mac: A Step-by-Step Guide
- How to Remove Administrator Account in Windows 11: A Step-by-Step Guide
- How to Remove Administrator on Windows 11: A Step-by-Step Guide
- How to Change Administrator Account in Windows 11: A Step-by-Step Guide
- How to Run as Administrator Windows 11: Step-by-Step Guide for Users
- How to Make an Account Administrator in Windows 11: A Step-by-Step Guide
- How to Get Rid of Administrator on Windows 11: A Comprehensive Guide
- How to Get Administrator Privileges on Windows 11: A Step-by-Step Guide
- How to Remove Microsoft Account from Windows 11 Administrator Easily
- How to Install Software Without Admin Rights on Windows 11 Safely
- How to Delete User Profile Windows 11: A Step-by-Step Guide
- How to Create Guest Account Windows 11: Step-by-Step Guide
- How to Remove Local Account from Windows 11: A Step-by-Step Guide
- How to Change User Folder Name in Windows 11: A Step-by-Step Guide
- How to Remove Microsoft Account from Windows 11: A Step-by-Step Guide
- How to Create a New User Account in Windows 10 Without a Microsoft Account

How to Manage User Account Settings in Windows 11
Make your UX just the way you want it
Windows 11 provides many new computer management tools, allowing users to customize their accounts to best fit their needs. For example, you can easily adjust the account type, personalize features, and optimize your PC’s security settings.
In this tutorial, we’ll explain how to manage your user account settings on the Windows 11 operating system.
How to Add Accounts on Windows 11
Windows 11 allows you to easily share the device with multiple people while maintaining your own settings and keeping your personal files private. All you need to do is add an account.
How to Add a Microsoft Account
- In the Start menu, open the Settings app.
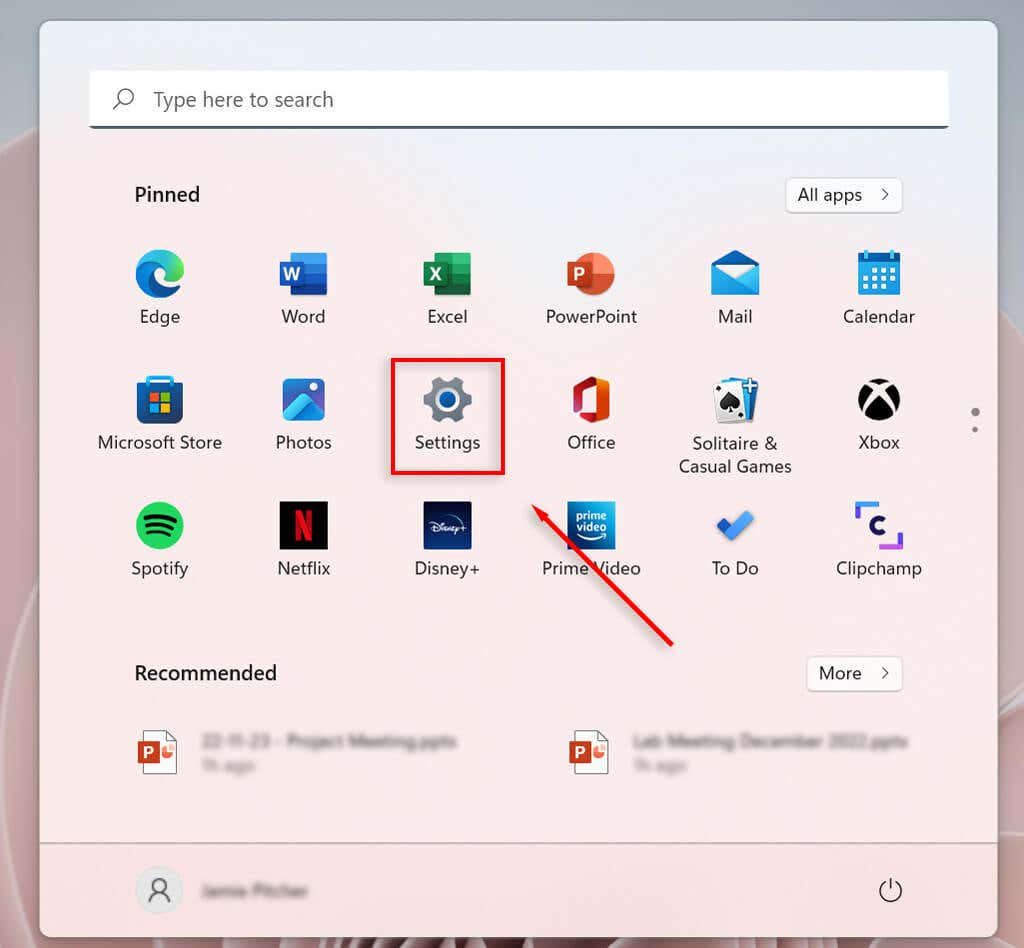
- Select Accounts .
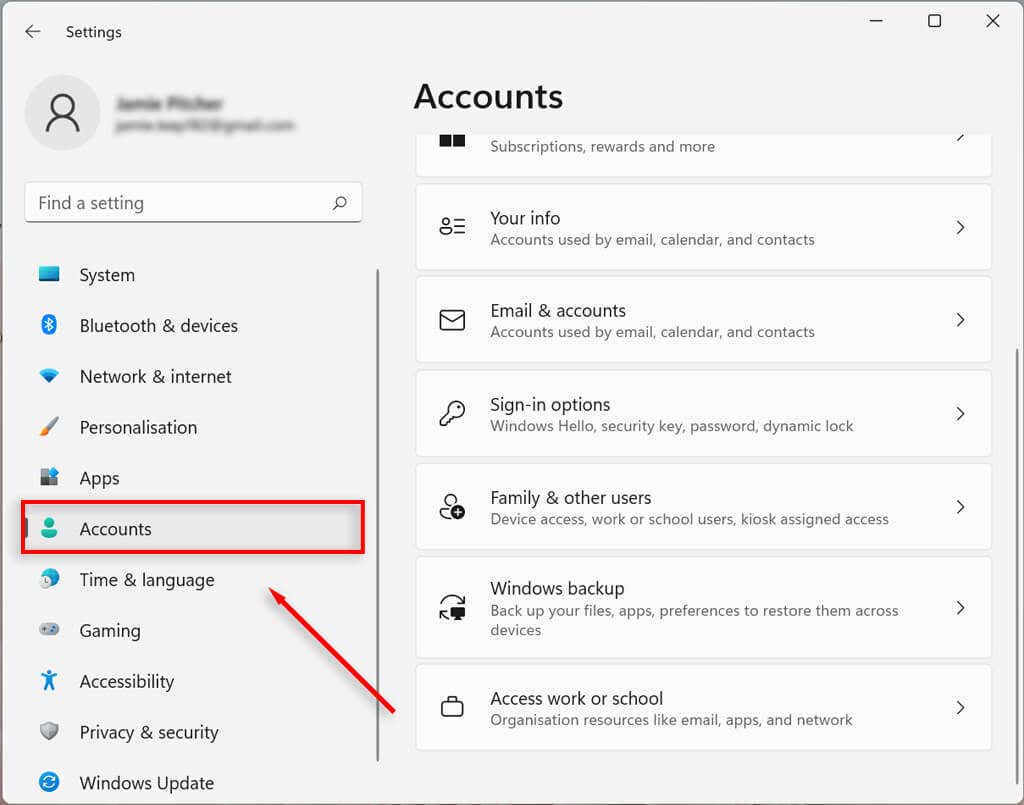
- Choose Family & other users (This may show up as “Family”).
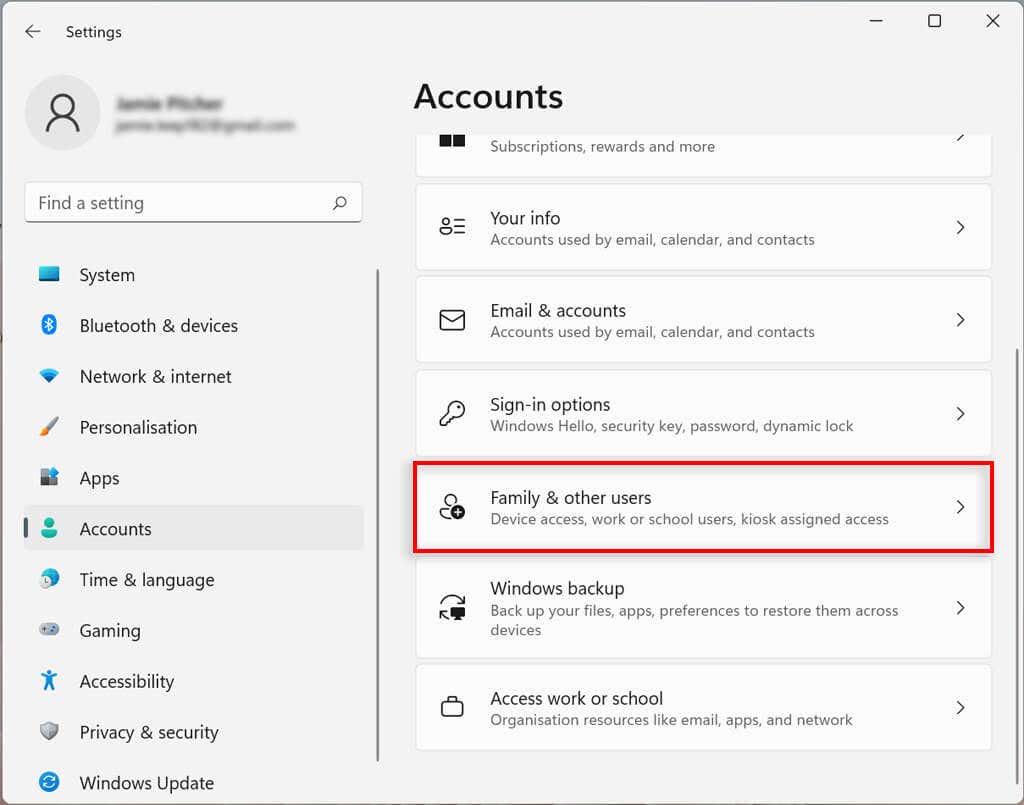
- Under the Other users section, select Add account .
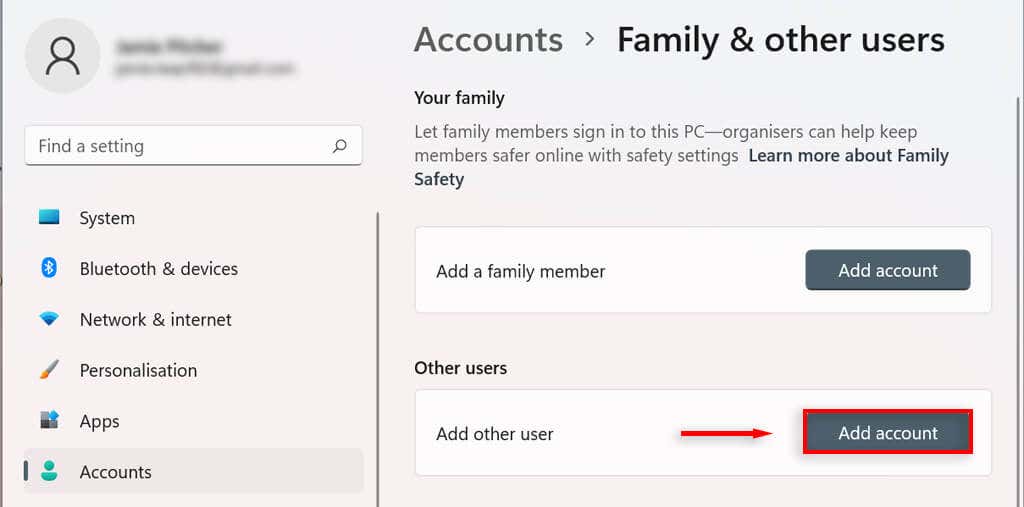
- Enter the email address or phone number of the new user and select Next .
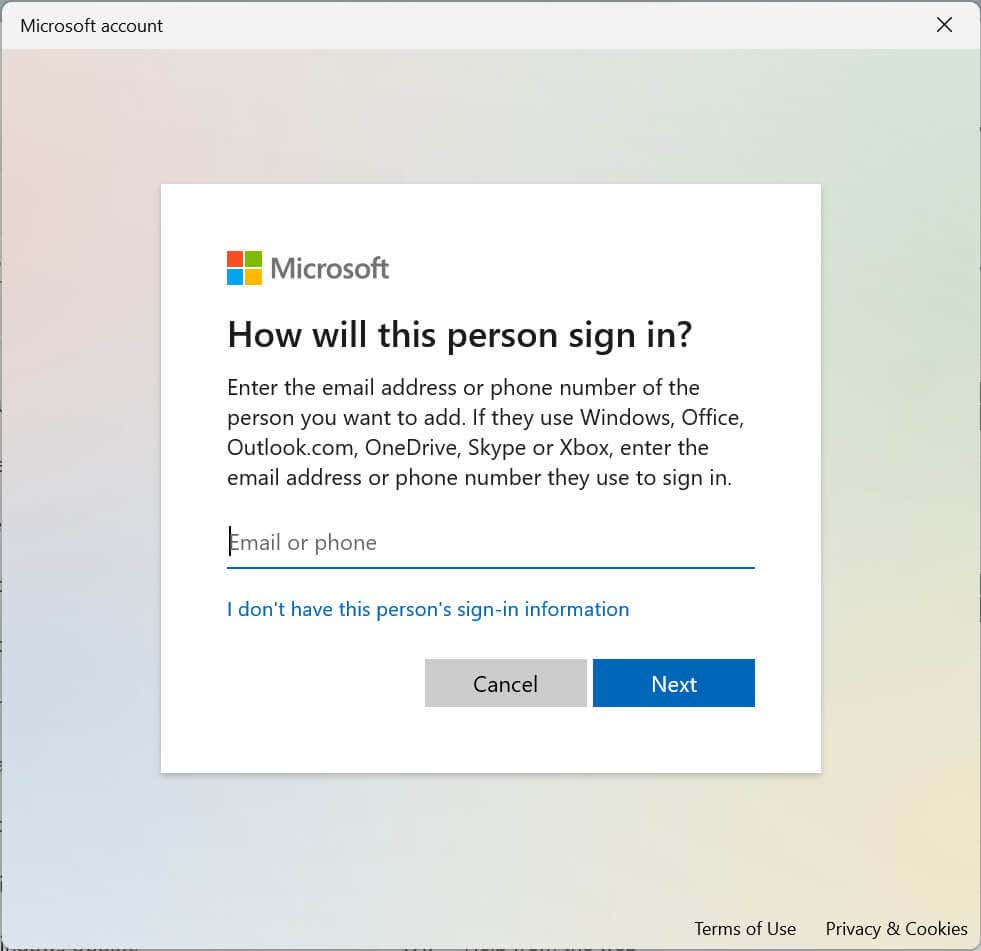
- Select Finish .
How to Create a Local Account
You can create a local or offline account without needing a Microsoft account. This account can only be accessed on the computer it was created on.
- Open Settings .
- Choose Family & other users .
- Under Other users, next to Add other user select Add account .
- In the new dialog box, choose I don’t have this person’s sign-in information .
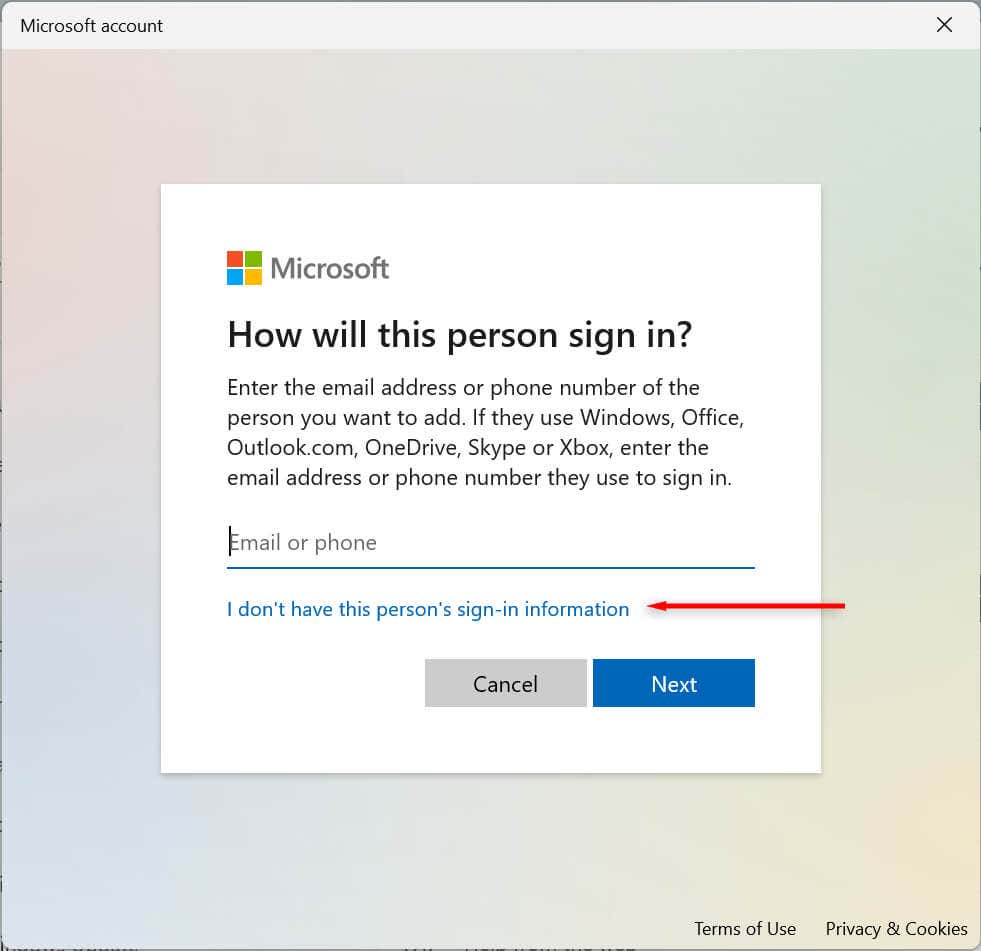
- Select Add a user without a Microsoft account .
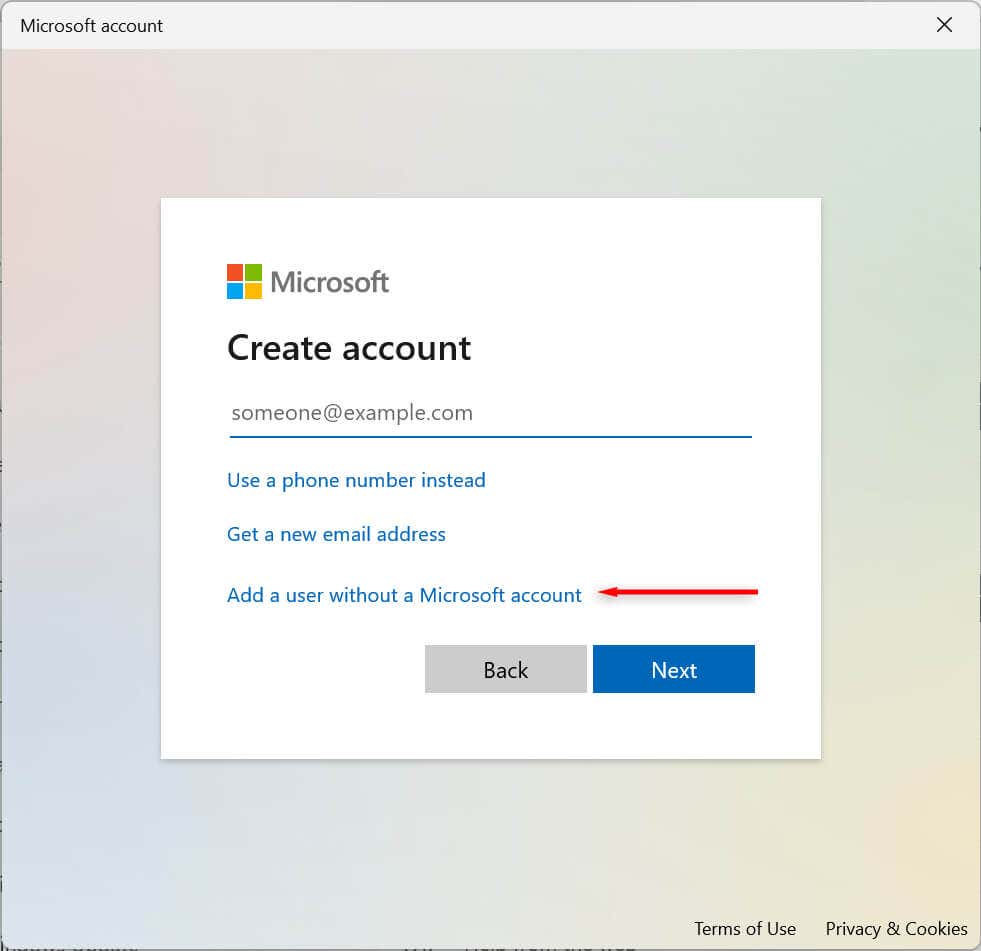
- Enter the account name, create a password for the account, and fill in the security questions. Then, choose Next .
How to Add a Family Member Account
You can also manage your family members, allowing each person to have their own desktop, settings, apps, and personal files. There are two family account types: Child and Adult.
A Child account offers a controlled environment. The child can use the device as normal, but the organizer sets their permissions and activities, enforces limits on apps and games, limits screen time, and tracks user activity .
An Adult account is the same as a traditional local account, but enables control over Child accounts.
To add a family member account:
- Choose Accounts .
- Select Family & other users .
- Next to Add a family member , select Add account .
- Confirm the email address of the person you want to add.
- Choose Next .
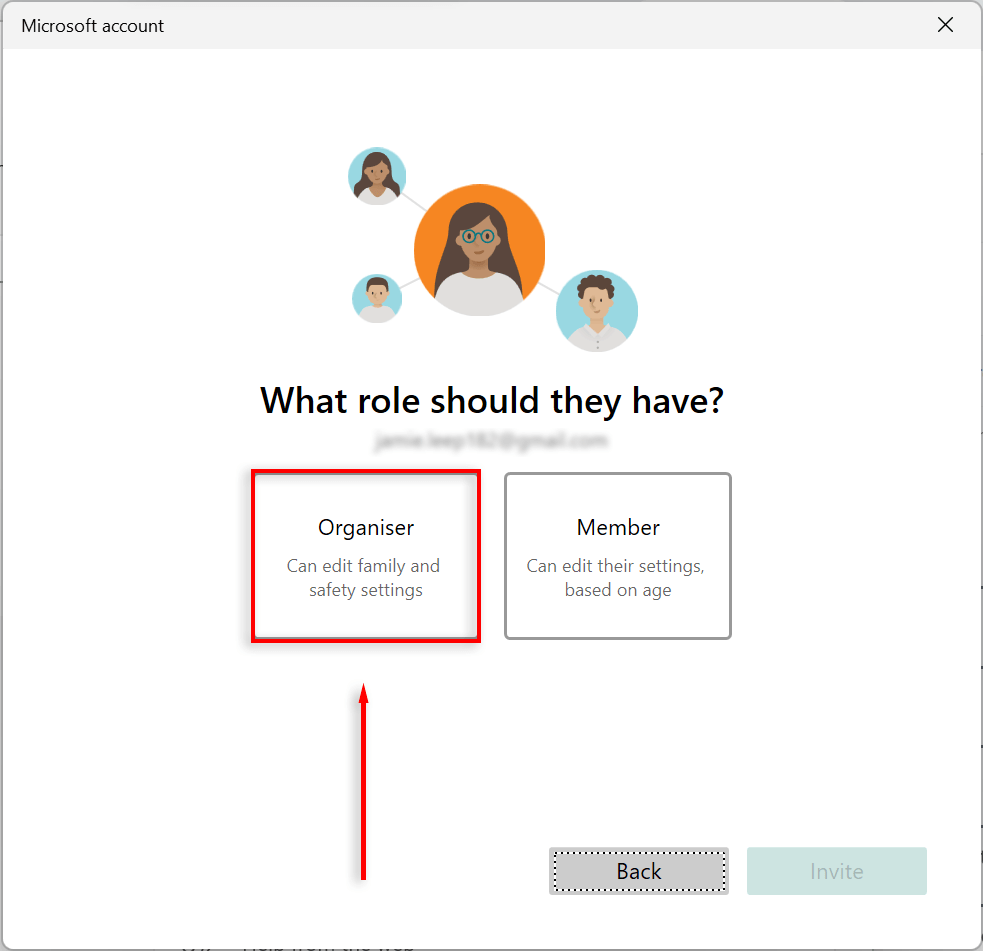
- Select the Member option to add a child account, and select Organizer to add an adult one. Then, Press the Invite button.
- Open the invitation email you received and press Accept Invitation then Join now . This may not be necessary.
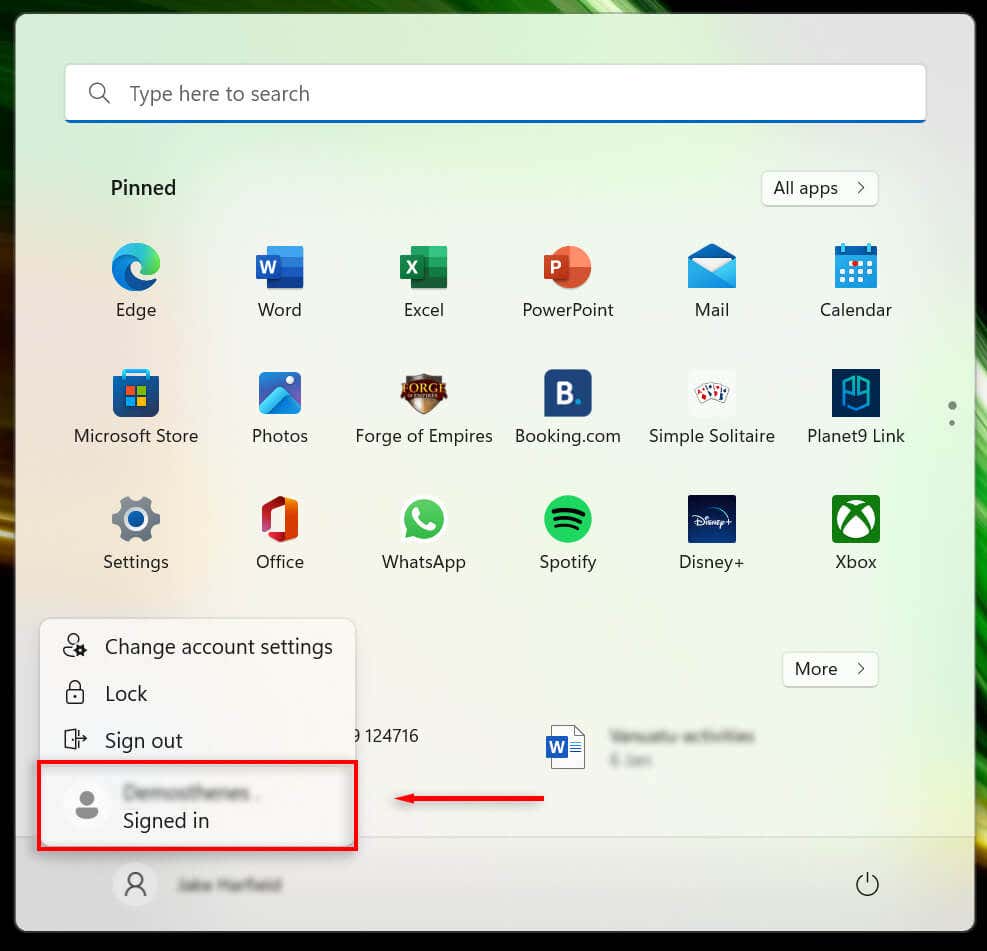
- Press the Start Menu , click your user icon , and select the added family account to sign out of your current account.
- Sign in with the family account’s Microsoft account credentials and let the PC set up your new user account. This may take some time.
- Select the Skip for now option or set up your account as desired. Create a PIN if you’d like one. Finally, select OK .
Note: There’re many ways to add accounts in Windows 11, including by using the netplwiz tool and Command Prompt. See our tutorial on creating local users and groups to explore these options.
How to View Account Details
Windows 11 lets you view and customize your account details. To see your account details:
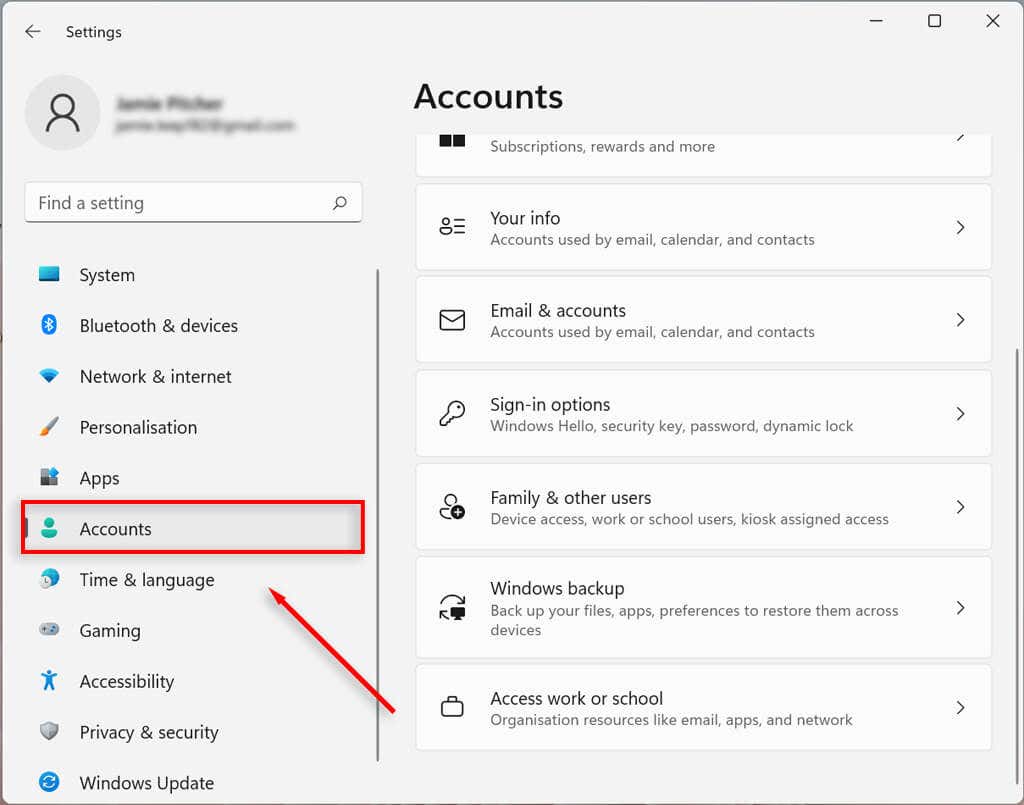
- Select Your Info .
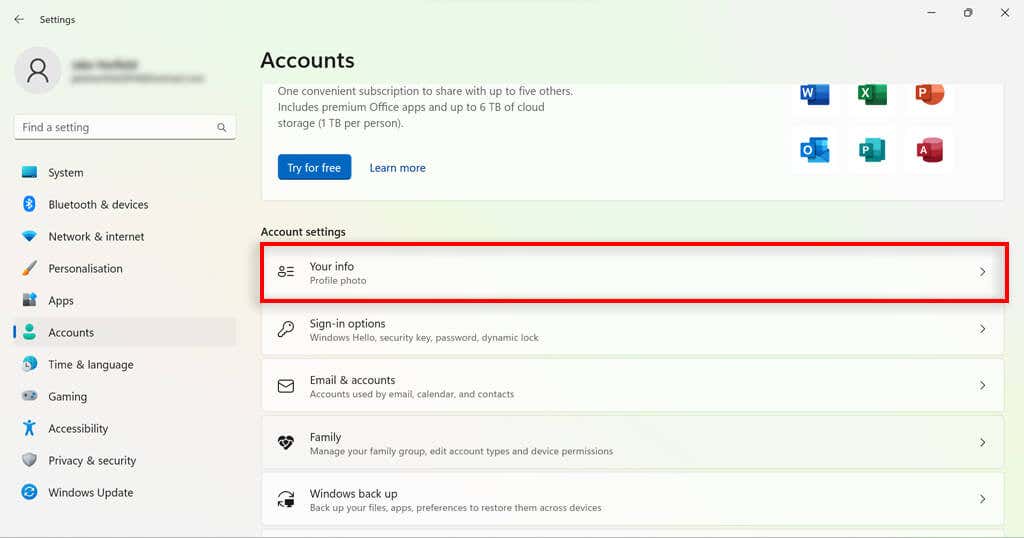
- Confirm your account details.
How to Change User Account Type on Windows 11
Windows 11 allows you to change standard user accounts to administrator accounts and vice versa.
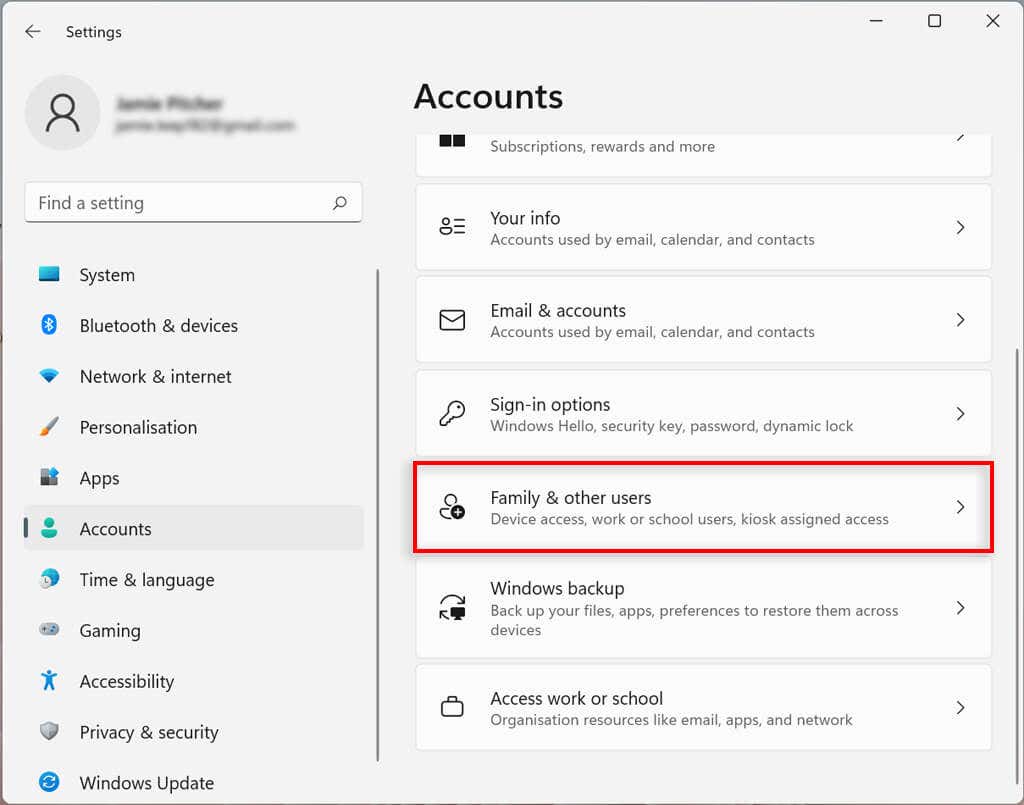
- Under Other users , select the account you would like to change and select Change account type .
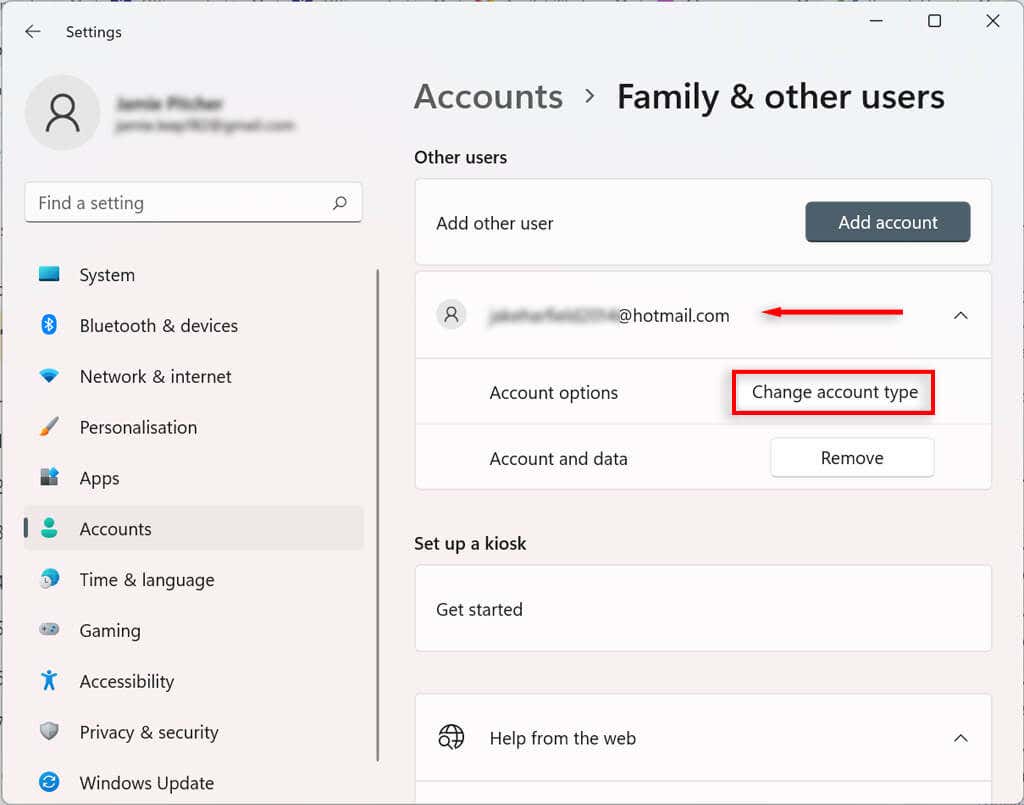
- Select the account type you’d like.
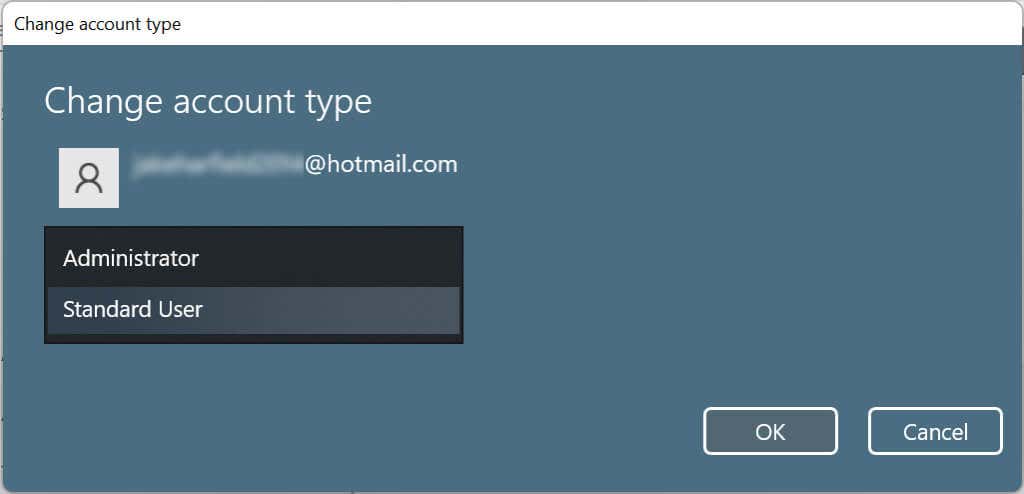
Once you complete the steps, the new account type will dictate the user’s access permissions.
How To Delete an Account On Windows 11
If you no longer need an account, you can easily delete it and all related data.
How to Delete a Family Account
- Under Other Users , select the user you want to delete and select Remove . You may need to sign in to confirm your decision.
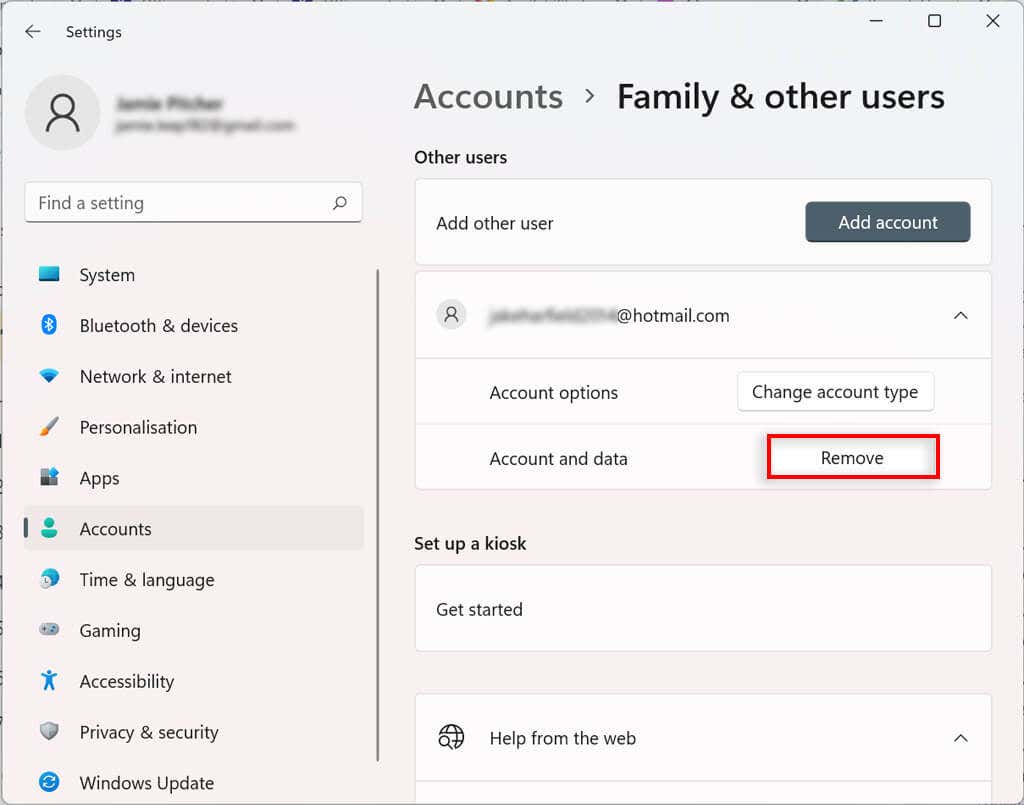
- Select Remove .
How to Link Additional Emails to Mail, Calendar, and Contacts Apps to a Windows 11 User Account
You can add other email accounts to your Windows 11 user account. This way, you can automatically link the information on other apps, such as Mail, Calendar, and contacts, without having to add your details separately.
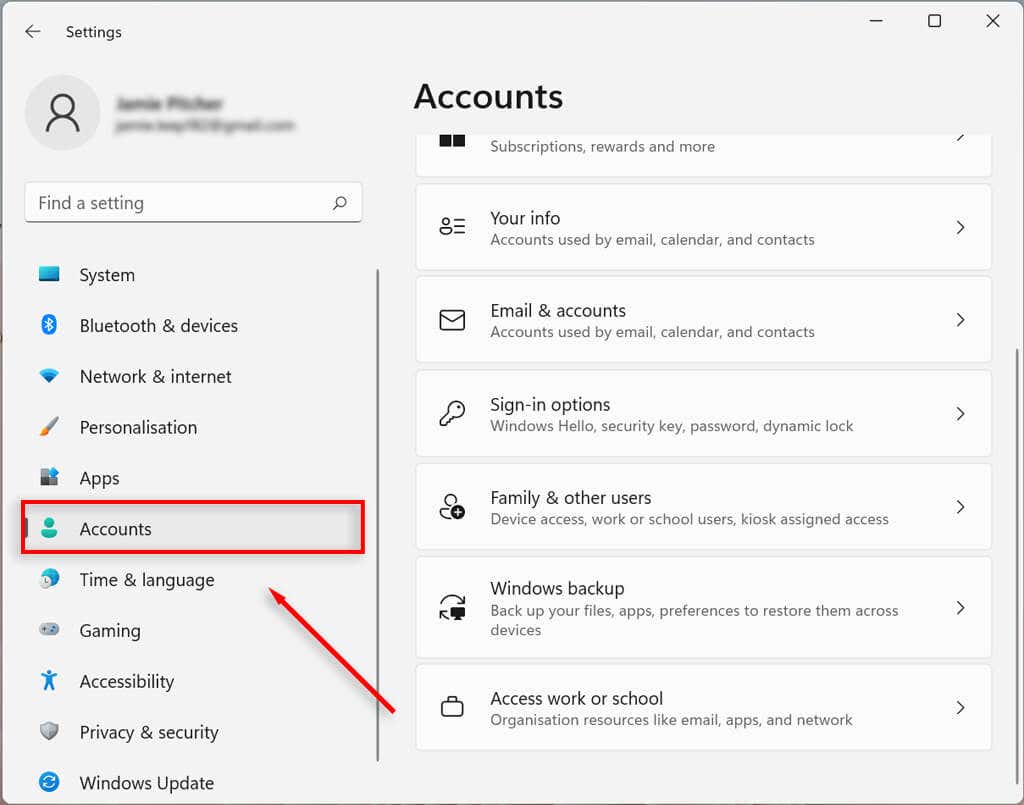
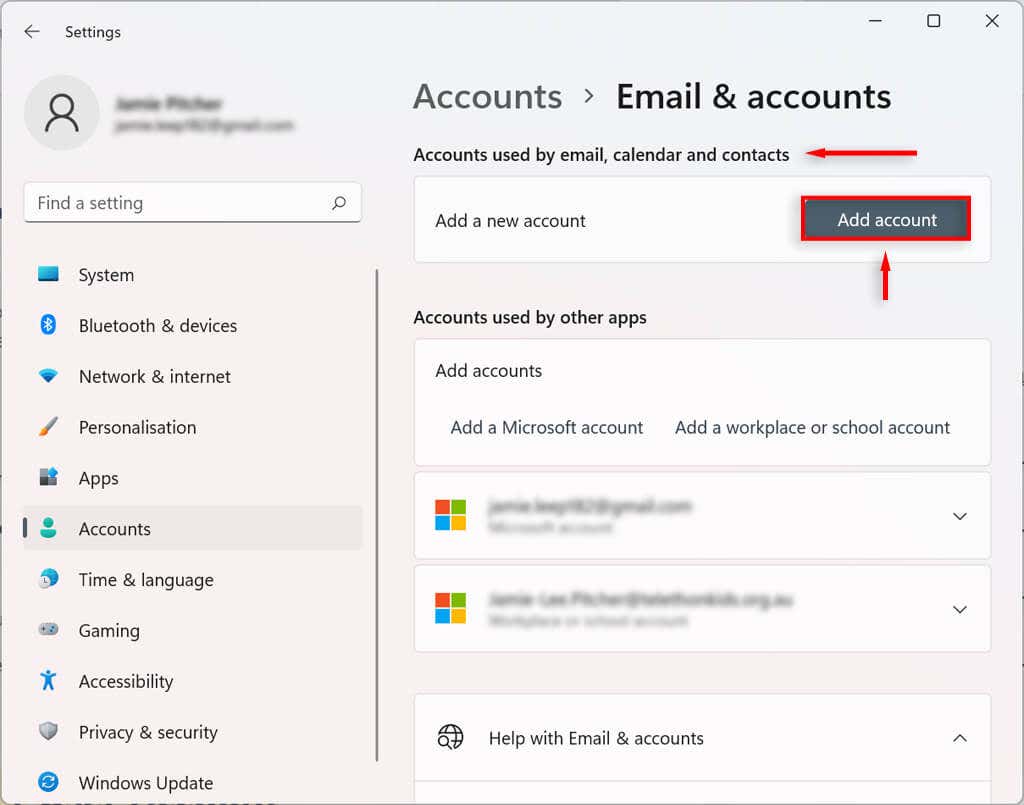
- Choose Email & accounts .
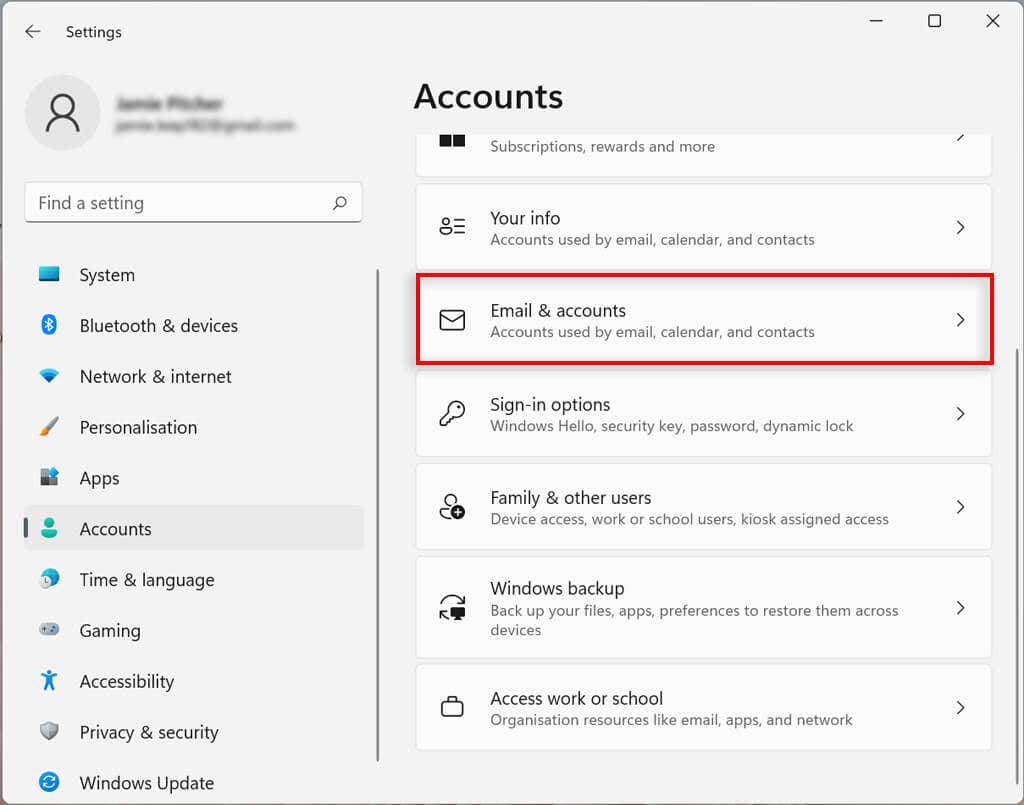
- Under Accounts used by email, calendar, and contacts , select Add an account .
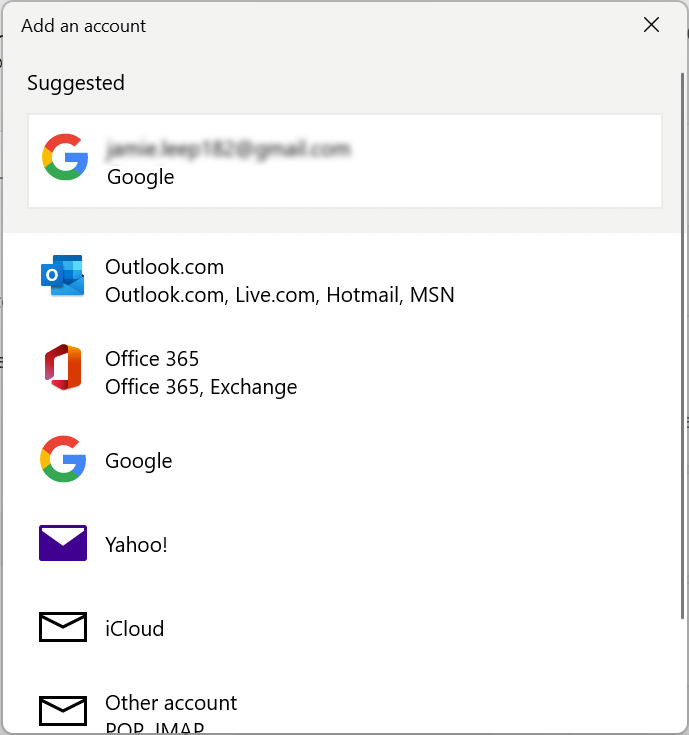
- Select the email service provider (such as Outlook, Google, or iCloud).
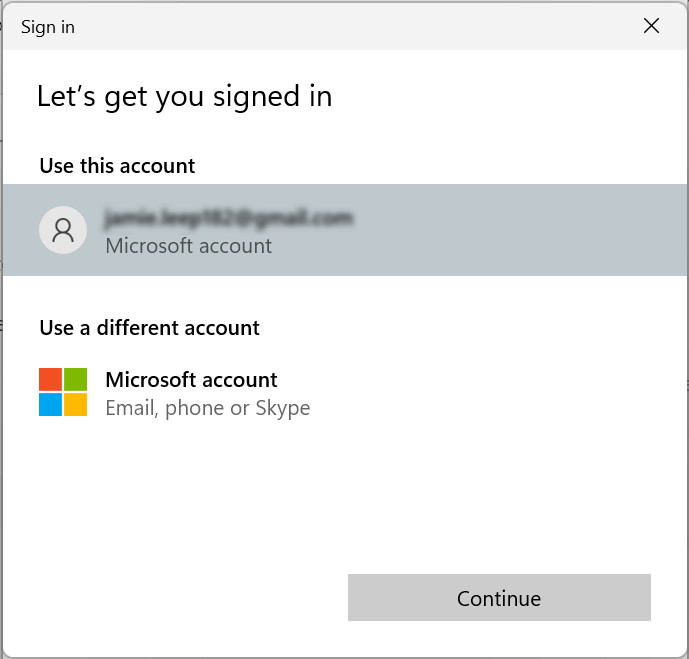
- Select the account you would like to add the email to and click Continue .
How to Link a Workplace or School Account to a Windows 11 User Account
You can also add workplace and school accounts to your Windows 11 user account. This will allow you to use apps such as OneDrive.
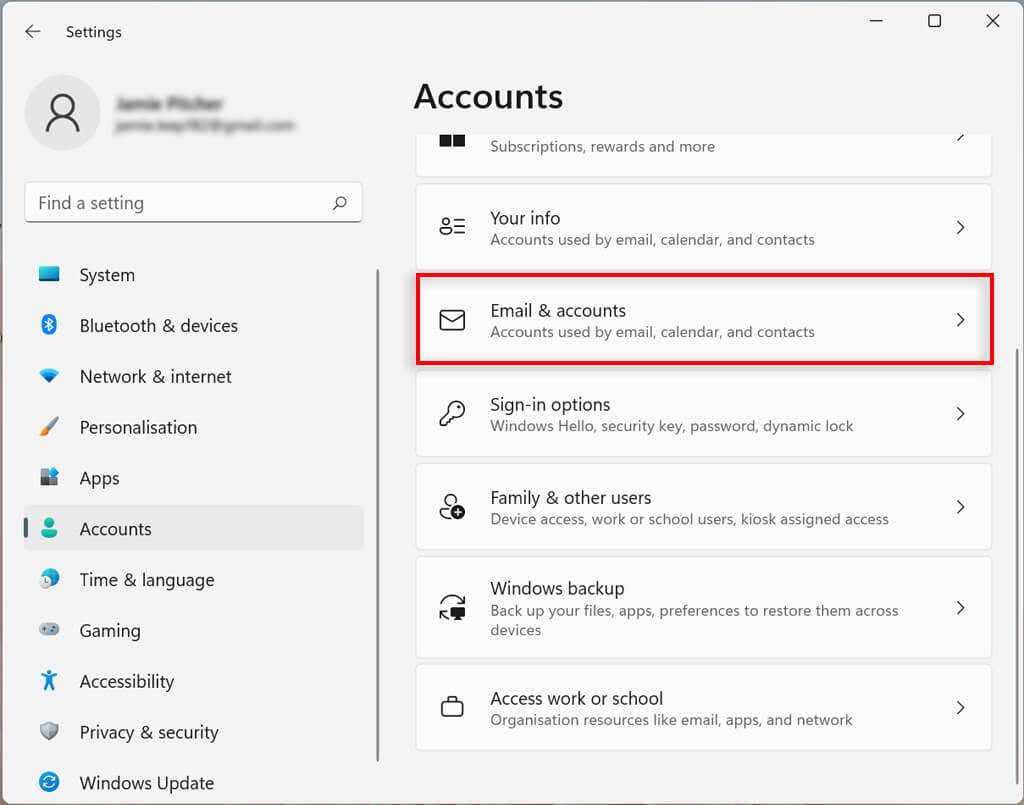
- Under Accounts used by other apps , select Add a workplace or school account .
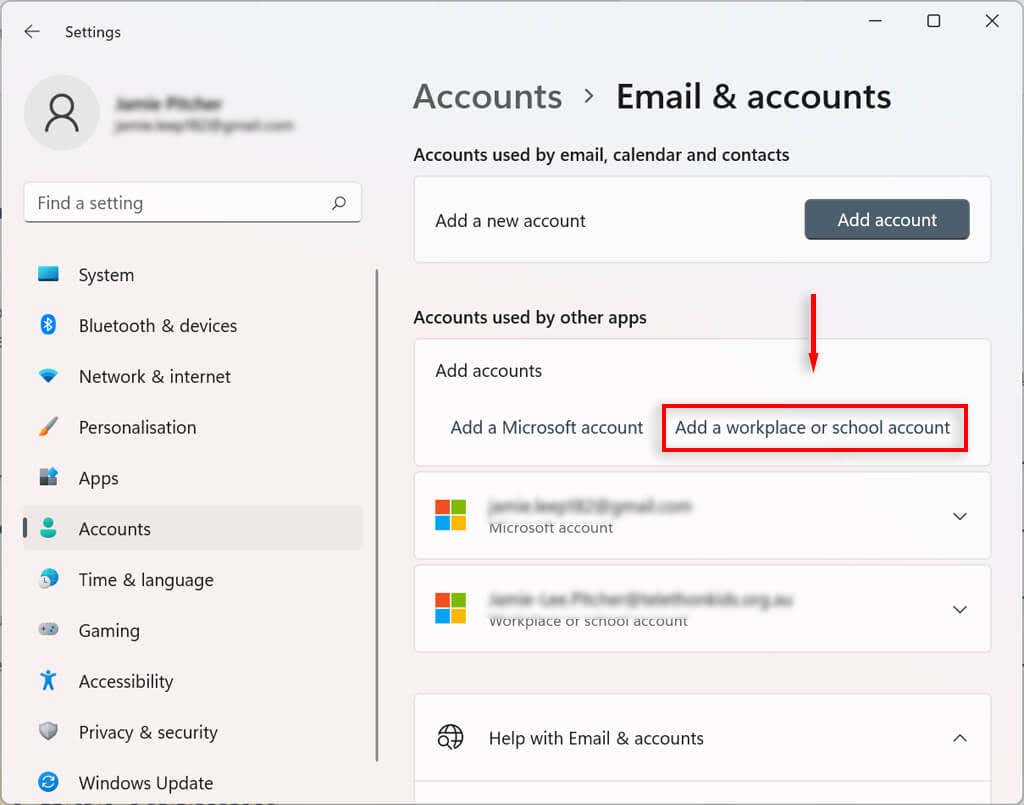
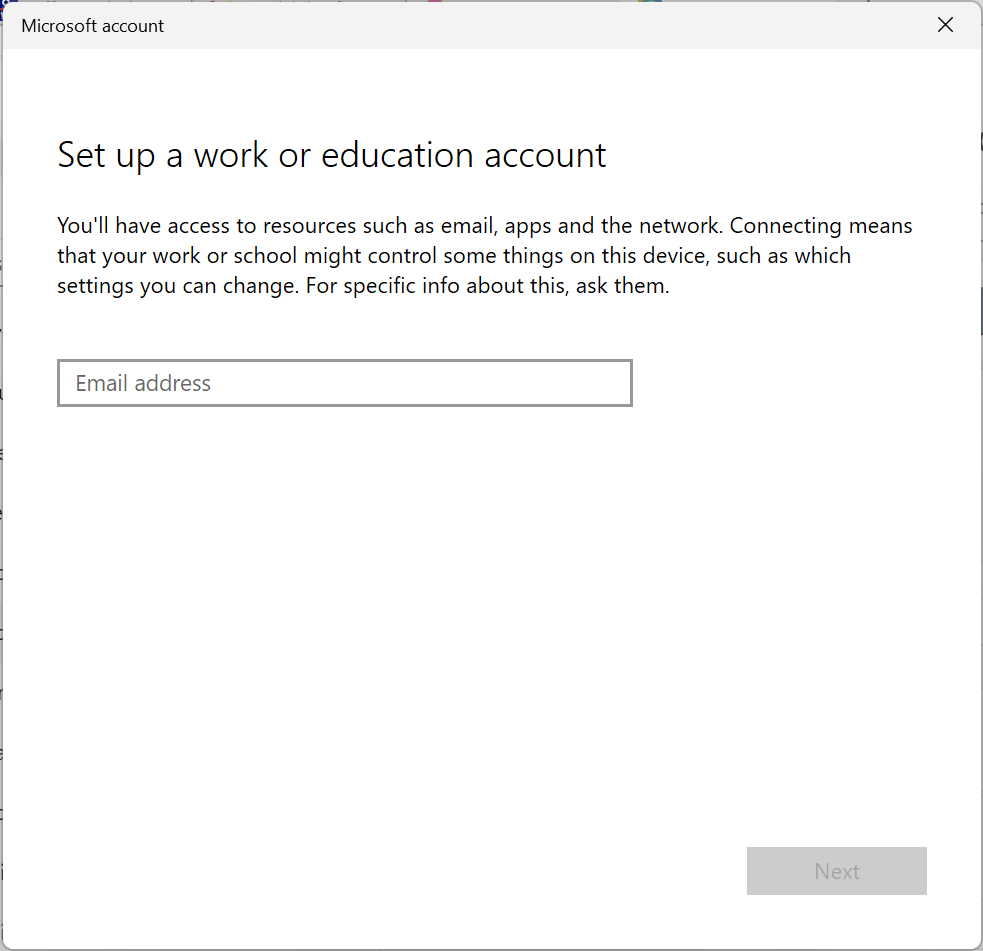
- Enter the email address for the relevant account and sign in.
How to Change Sign-In Options on Windows 11
Windows 11 allows you to customize your sign-in preferences making use of Windows Hello. Windows Hello is a more personal way to access your devices via a PIN, fingerprint, or facial recognition. You can also enable sign-in with a physical key.
Configure or Change Windows Hello Authentication Sign-In Method
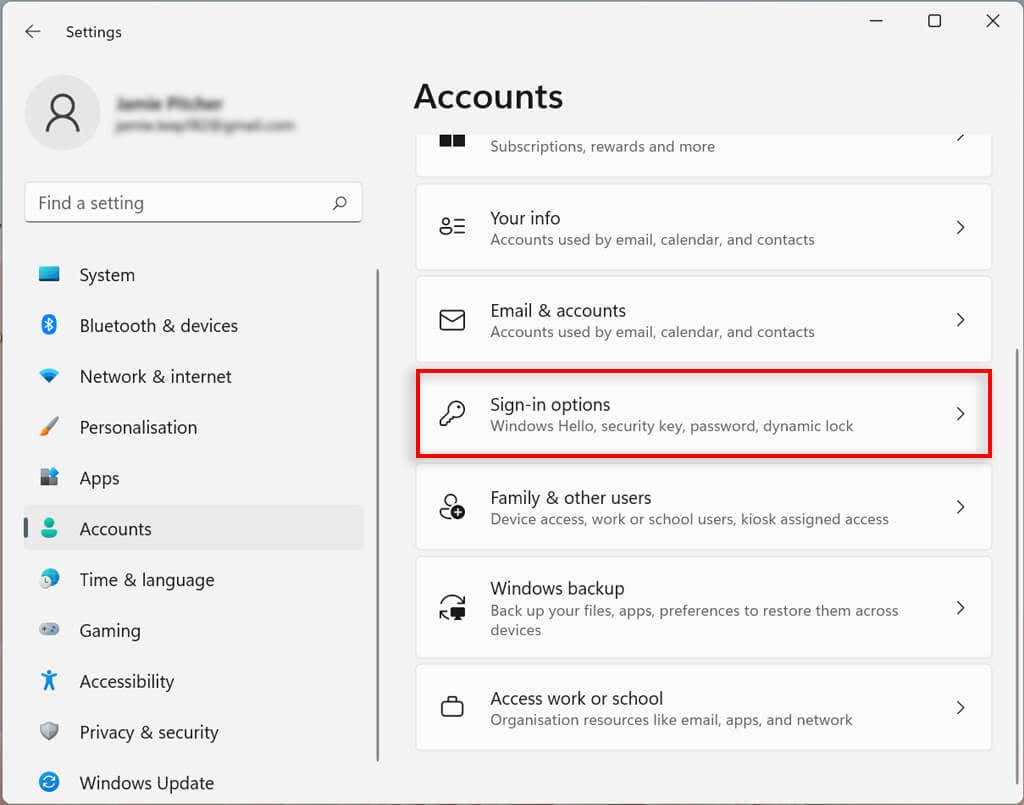
- Choose Sign-in options .
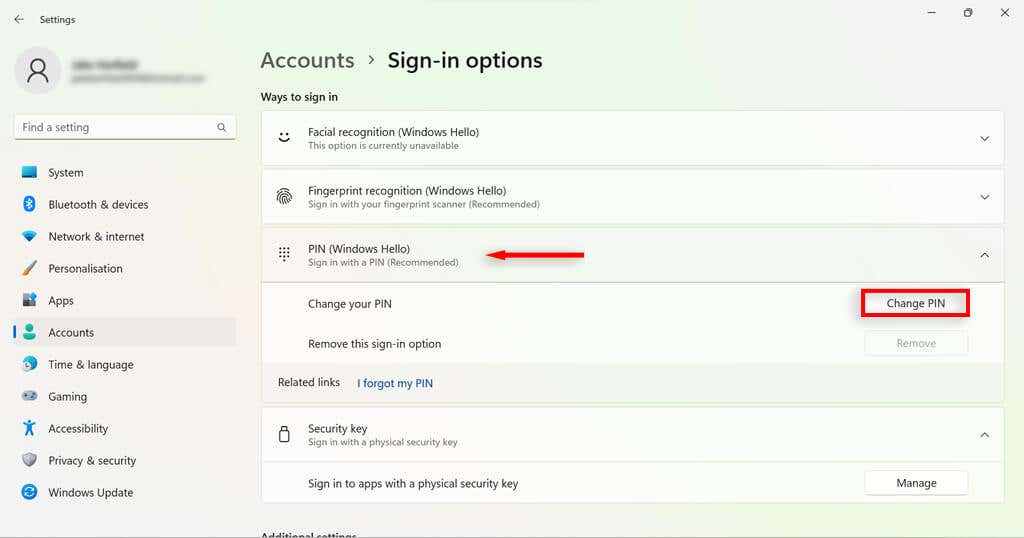
- Under Ways to sign in , select your desired way to sign in.
- Press Set up or Change .
- Confirm your account password (whether it’s a PIN or biometrics).
- Choose OK .
- Proceed through the on-screen instructions to set up your new sign-in options.
Enable Sign-In Upon Waking Up in Windows 11
Using this setting, you can decide whether your PC will prompt you for a password upon waking up or after a set amount of time.
- Open Windows Settings .
- Under Additional settings , select the drop-down box next to If you’ve been away, when should Windows require you to sign in again?
- Select the time you would like.
Enable Dynamic Lock in Windows 11
The dynamic lock feature automatically secures your device when you step away from the room. It uses Bluetooth proximity technology, so you will need to link a Bluetooth device like a phone or smart watch before you can configure it.
- Select Bluetooth & devices .
- Press the Add device button.
- Select Bluetooth . Turn on Bluetooth on the device you want to pair and select the device from the list and pair it to your computer.
- Head back to the Settings app and choose Accounts .
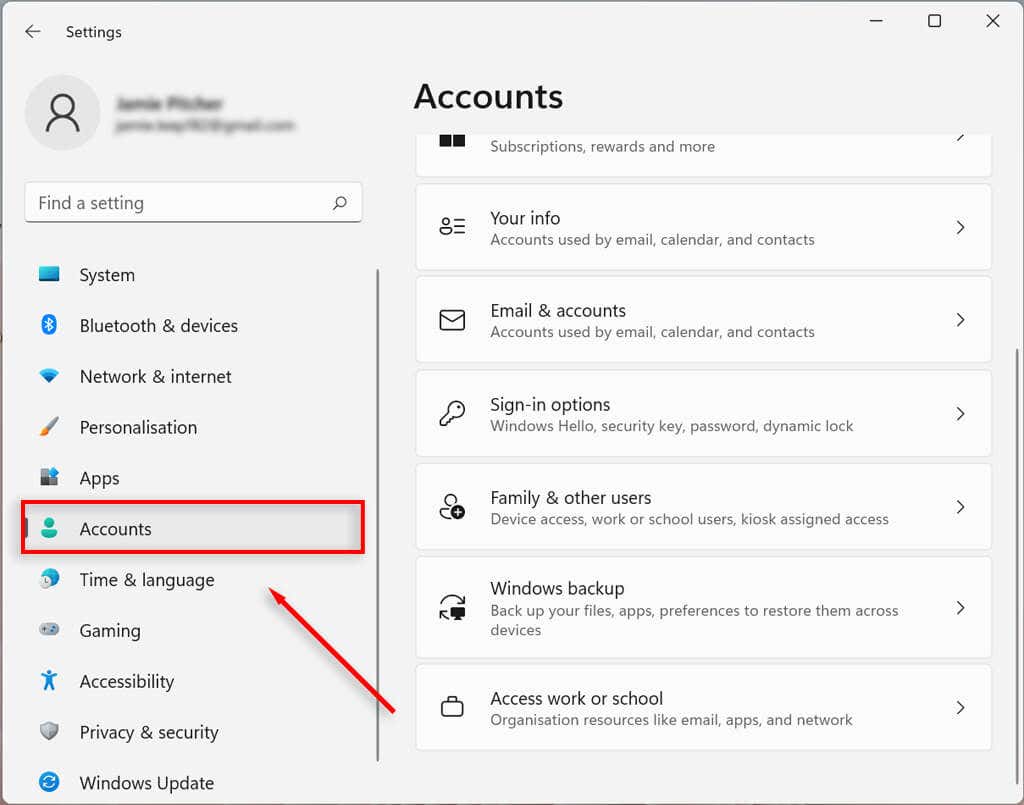
- Select Sign-in options .
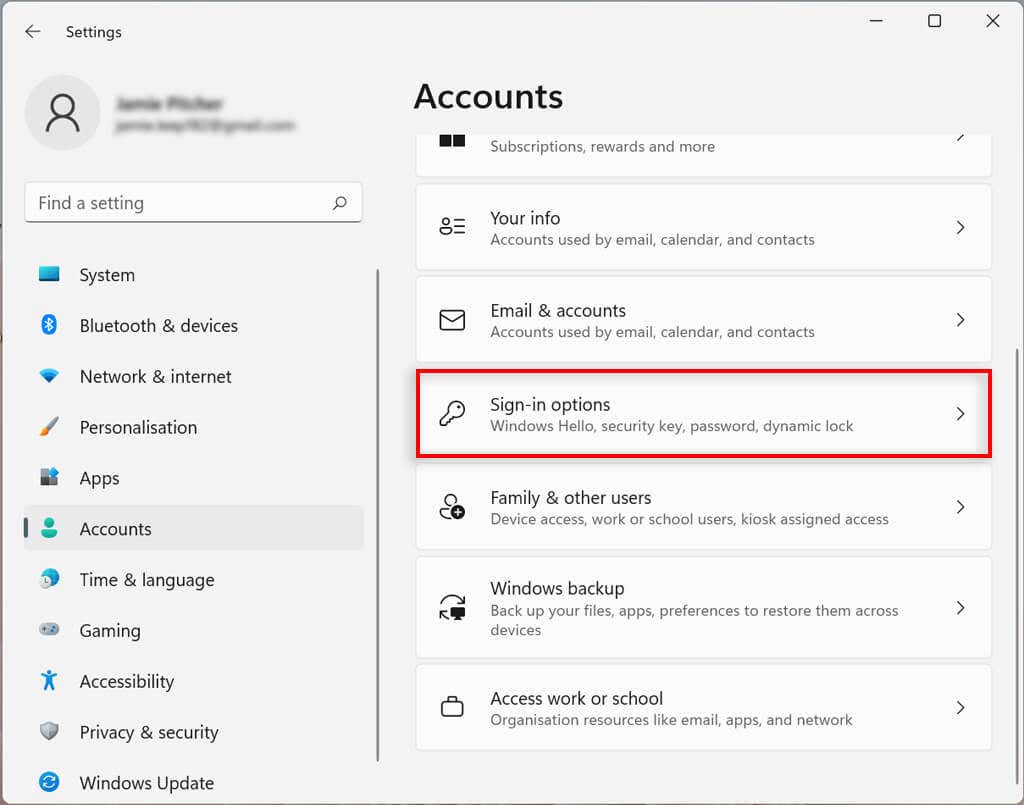
- Under the Additional settings , select Dynamic lock and check the box next to Allow Windows to automatically lock the device when you’re away .
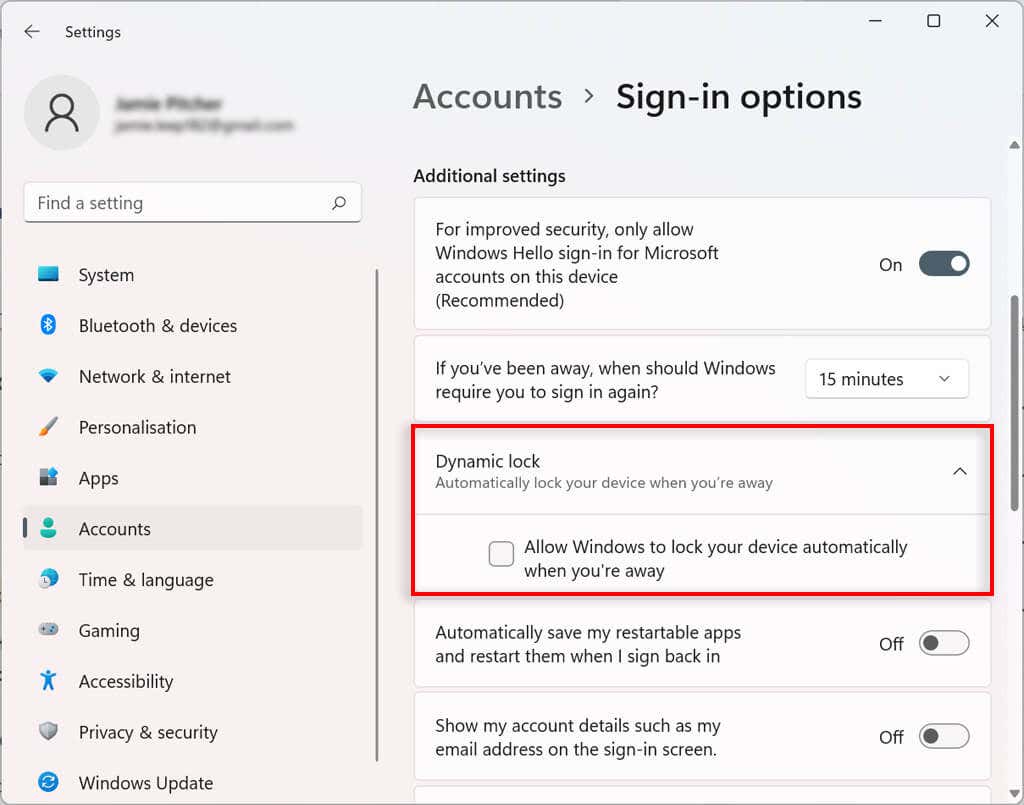
Now when you step away from the computer with the linked Bluetooth device for more than 30 seconds, your computer will lock.
Stop Restarting Apps on Startup
Some apps open automatically at startup if they weren’t closed before shutdown. You can disable this feature by following these steps:
- Click the Sign-in options page on the right side.
- Under Additional settings turn off the toggle next to Automatically save my restartable apps and restart when I sign back in .
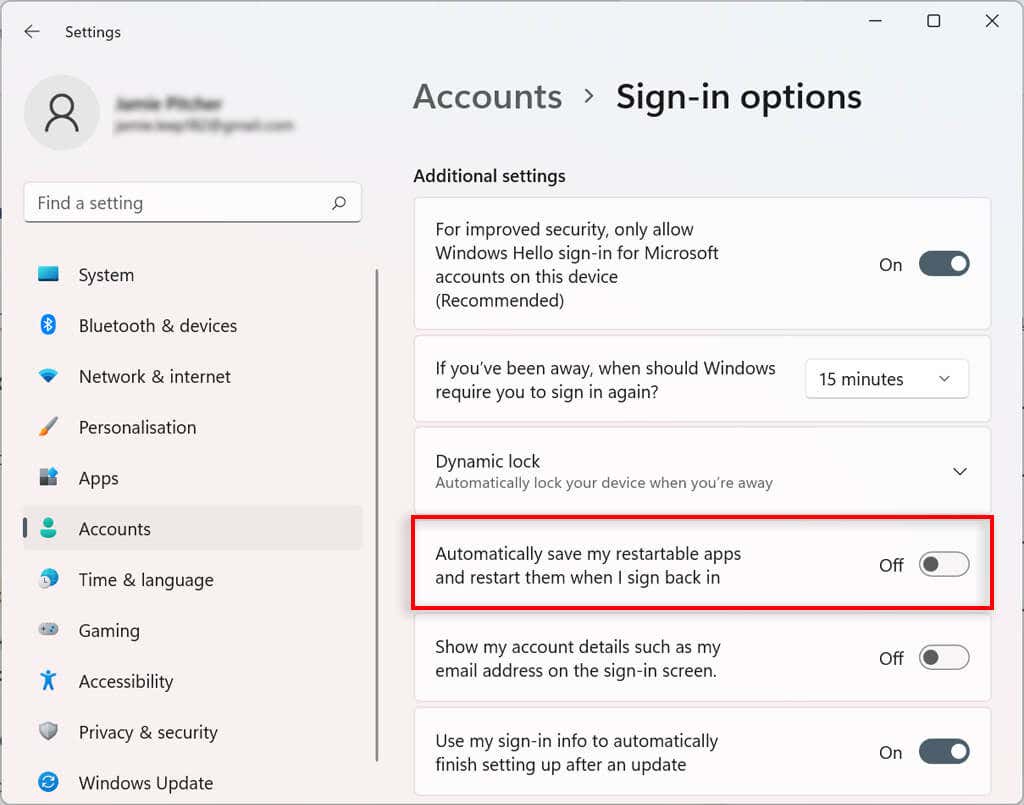
Now apps will no longer restart automatically on startup.
How to Control Account Sync Settings on Windows 11
You can determine how your account settings sync in Windows 11. This configures which folders are backed up in OneDrive. You can also decide whether the system will remember your apps and settings across devices with the same Microsoft account.
- Choose Windows backup .
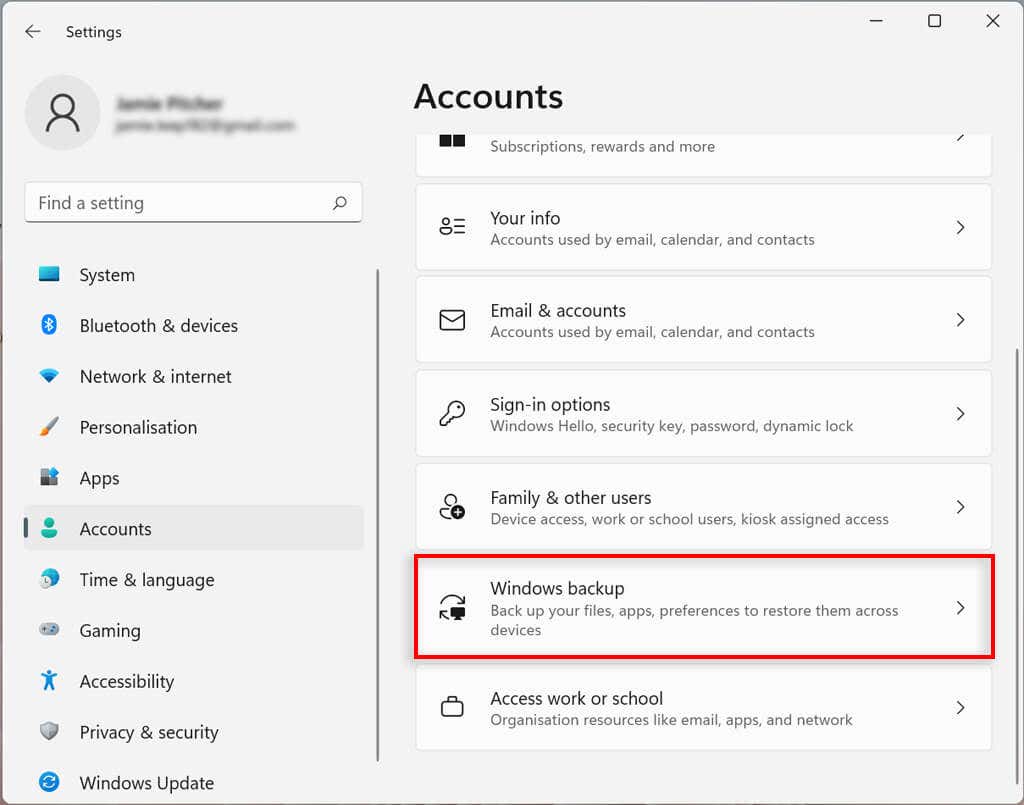
- Next to OneDrive folder syncing, select Set up syncing . This might appear as “Manage sync settings”.
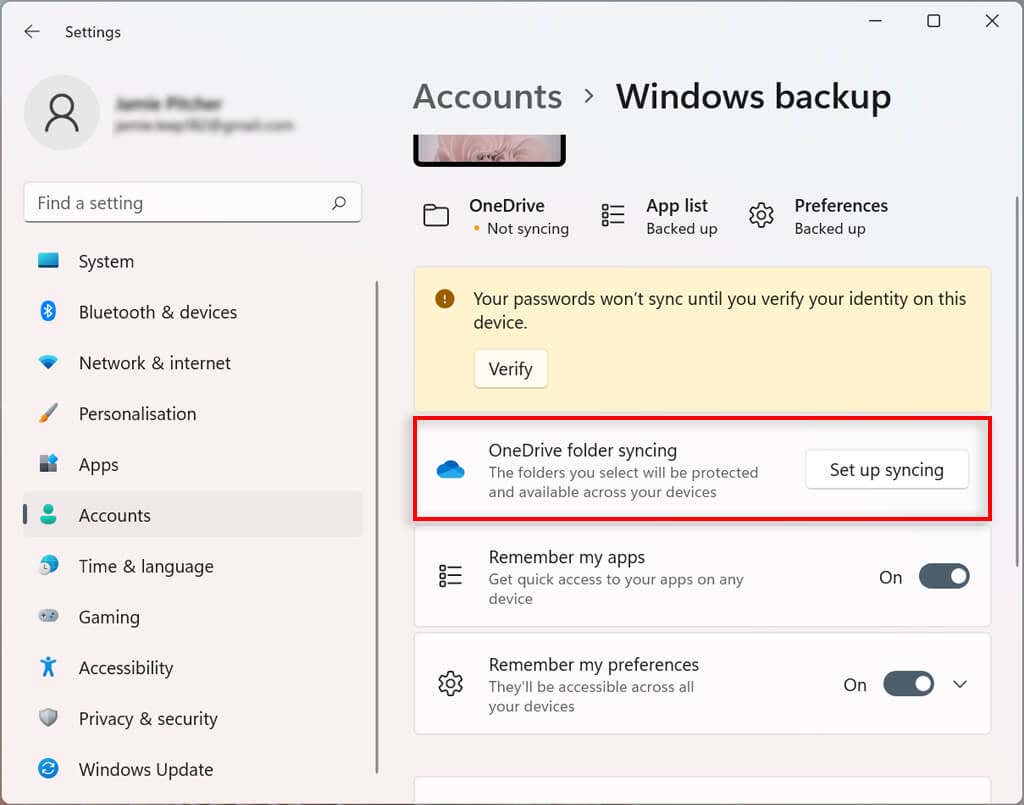
- Select the folders to upload and back up on the cloud.
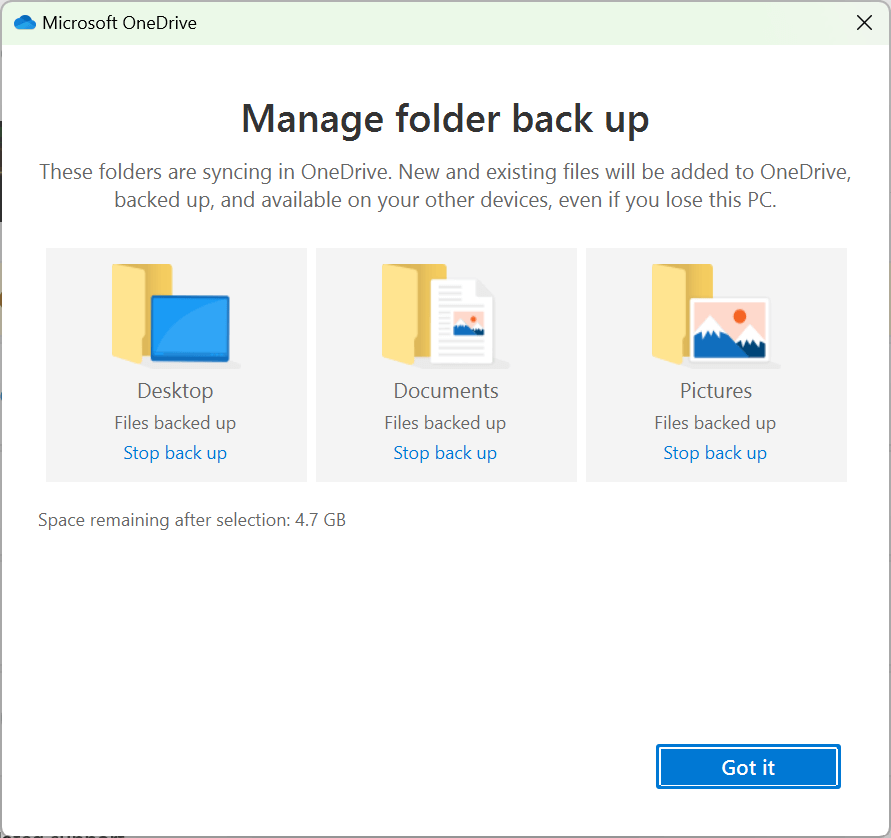
- The backup will start automatically. If not, select Start backup .
- (Optional) You can toggle on Remember my apps , Remember my preferences , and Remember my preferences to sync your Microsoft apps, preferences, and settings between devices.
How to Connect an Organization to Your Windows 11 Account
You can connect an organization to your account to access shared resources, such as network resources, apps, and emails.
- Right-click the Start Menu and select Settings .
- Choose Access work or school .
- Press Connect .
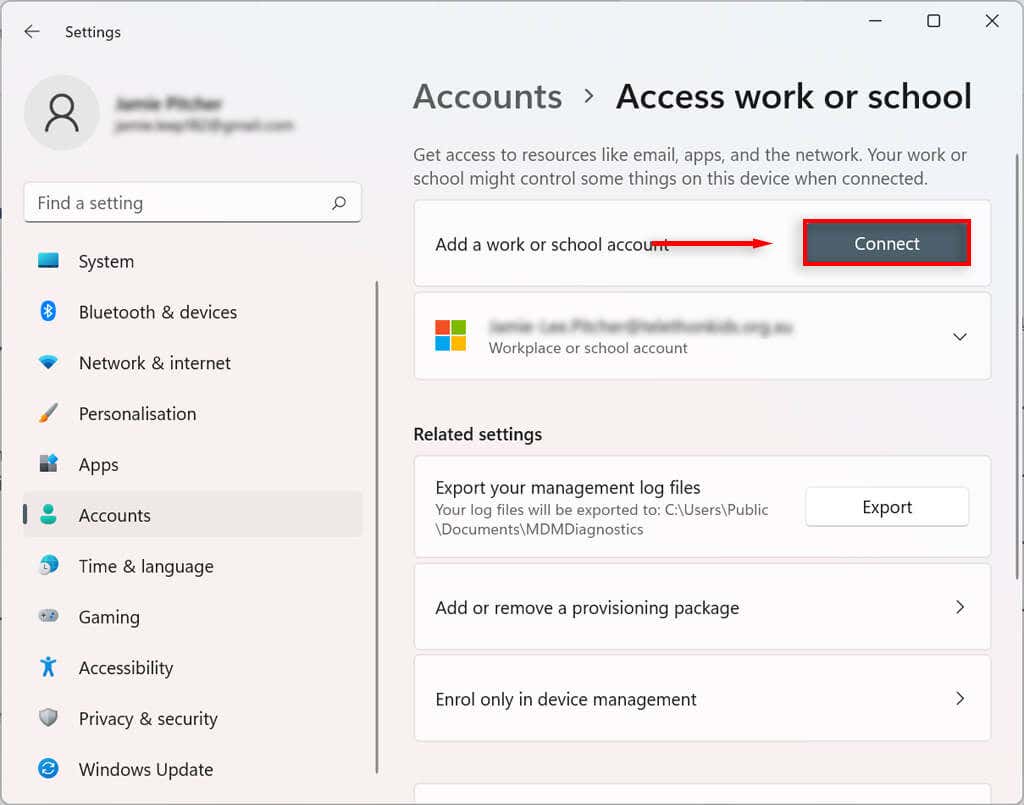
- Confirm your work or school account.
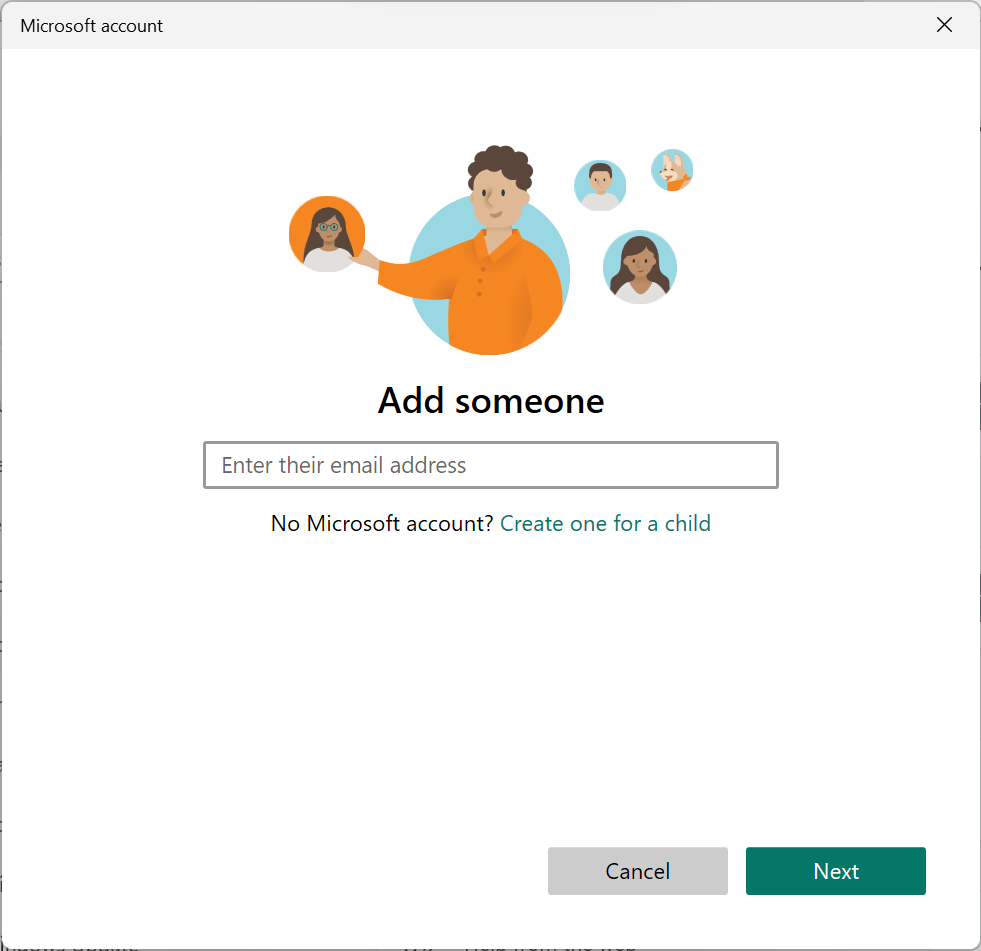
- Select Next .
Endless Customization
Although Windows 10 had some customization features, the newest version of Windows has taken local user account control to the next level. Hopefully, with this tutorial, you’ve been able to make your Windows 11 account exactly the way you’d like it.
Jake Harfield is an Australian freelance writer whose passion is finding out how different technologies work. He has written for several online publications, focusing on explaining what he has learned to help others with their tech problems. He’s an avid hiker and birder, and in his spare time you’ll find him in the Aussie bush listening to the birdsong. Read Jake's Full Bio
Read More Posts:

Leave a Reply
Your email address will not be published. Required fields are marked *
This browser is no longer supported.
Upgrade to Microsoft Edge to take advantage of the latest features, security updates, and technical support.
User Rights Assignment
- 1 contributor
- Windows 10
Provides an overview and links to information about the User Rights Assignment security policy settings user rights that are available in Windows. User rights govern the methods by which a user can log on to a system. User rights are applied at the local device level, and they allow users to perform tasks on a device or in a domain. User rights include logon rights and permissions. Logon rights control who is authorized to log on to a device and how they can log on. User rights permissions control access to computer and domain resources, and they can override permissions that have been set on specific objects. User rights are managed in Group Policy under the User Rights Assignment item.
Each user right has a constant name and a Group Policy name associated with it. The constant names are used when referring to the user right in log events. You can configure the user rights assignment settings in the following location within the Group Policy Management Console (GPMC) under Computer Configuration\Windows Settings\Security Settings\Local Policies\User Rights Assignment , or on the local device by using the Local Group Policy Editor (gpedit.msc).
For information about setting security policies, see Configure security policy settings .
The following table links to each security policy setting and provides the constant name for each. Setting descriptions contain reference information, best practices for configuring the policy setting, default values, differences between operating system versions, and considerations for policy management and security.
Related topics
- Security policy settings reference
Additional resources
Understanding Group Policies: User Rights Assignment Policies

No Comments Be the first to comment
How to Get Administrator Privileges on Windows 11: A Step-by-Step Guide
Getting administrator privileges on Windows 11 allows you to have full control over your computer, including installing software, changing system settings, and managing other user accounts. This process involves accessing the user account settings and upgrading your current account to an administrator account.
How to Get Administrator Privileges on Windows 11
By following these steps, you will learn how to assign administrator privileges to a user account on Windows 11. This will enable the user to perform various tasks that require elevated permissions.
Step 1: Open the Settings App
First, open the Settings app by pressing Windows + I on your keyboard.
The Settings app is like the control panel of Windows 11. It’s where you can adjust most of your system settings. By opening it, you are beginning the process of navigating to your account settings.
Step 2: Go to the Accounts Section
Next, click on “Accounts” in the left-hand menu.
The Accounts section is where you manage user accounts and their permissions. It’s essential to access this section to change account types.
Step 3: Access Family & Other Users
After that, click on “Family & other users.”
This option allows you to see all the user accounts on your computer. You will need to find the account you want to grant administrator privileges to here.
Step 4: Select the User Account
Then, click on the user account you want to change and select “Change account type.”
Selecting the account opens up options to modify its type. This is the crucial step where you will change the account type.
Step 5: Change Account Type
In the account type menu, select “Administrator” and click “OK.”
Choosing “Administrator” will upgrade the account, giving it full control over the system. Make sure to confirm by clicking “OK.”
After you complete these steps, the selected user account will have administrator privileges on your Windows 11 system. This account can now make significant changes to the computer, including installing or removing programs and changing system settings.
Tips for Getting Administrator Privileges on Windows 11
- Use a Strong Password : Ensure the administrator account has a strong password to prevent unauthorized access.
- Keep Software Updated : Regularly update your software to protect against security vulnerabilities.
- Create a Backup Account : Have a secondary administrator account in case you lose access to the primary one.
- Be Cautious with Permissions : Only grant administrator privileges to trusted users to avoid potential security risks.
- Regularly Review Accounts : Periodically check the accounts on your system to ensure no unauthorized changes have been made.
Frequently Asked Questions
Can i change the account type back to a standard user.
Yes, you can change an administrator account back to a standard user by following the same steps and selecting “Standard User” instead of “Administrator.”
What if I don’t see the “Change account type” option?
Ensure you are logged in as an administrator. Only administrator accounts can change other user account types.
How do I know if I have administrator privileges?
Go to the Accounts section in Settings and check your account type. If it says “Administrator,” you have the privileges.
Can I have multiple administrator accounts?
Yes, you can have multiple administrator accounts on Windows 11. Just follow the same steps to grant administrator privileges to each account.
What should I do if I forget my administrator password?
You can reset it using another administrator account on the system or use a password recovery tool.
- Open the Settings App
- Go to the Accounts Section
- Access Family & Other Users
- Select the User Account
- Change Account Type
Getting administrator privileges on Windows 11 is an essential skill for effectively managing and customizing your computer. By following the steps outlined in this guide, you can easily upgrade a user account to an administrator, granting it full access to your system’s features and settings. Remember to use this power wisely, as administrator accounts have the ability to make significant changes, which can impact the overall health and security of your system.
For further reading, consider looking into advanced Windows 11 management tools and security practices. These additional resources can help you maximize the potential of your administrator account while keeping your system safe from potential threats. So, go ahead and take control of your Windows 11 experience!

Matthew Burleigh has been writing tech tutorials since 2008. His writing has appeared on dozens of different websites and been read over 50 million times.
After receiving his Bachelor’s and Master’s degrees in Computer Science he spent several years working in IT management for small businesses. However, he now works full time writing content online and creating websites.
His main writing topics include iPhones, Microsoft Office, Google Apps, Android, and Photoshop, but he has also written about many other tech topics as well.
Read his full bio here.
Share this:
Join our free newsletter.
Featured guides and deals
You may opt out at any time. Read our Privacy Policy
Related posts:
- How to Change Administrator on Windows 10: A Step-by-Step Guide
- How to Enable Administrator Account in Windows 10 Using CMD: A Step-by-Step Guide
- How to Remove Administrator Account in Windows 11: A Step-by-Step Guide
- How to Unlock Administrator Account in Windows 10 Using CMD: A Guide
- How to Make a User an Administrator in Windows 10: A Step-by-Step Guide
- How to Delete Email Account on iPhone
- How to Make All Columns the Same Width in Excel 2013
- Changing Administrator Account Settings in Windows 11: A Step-by-Step Guide
- How to Run as Administrator Windows 11: A Complete Step-by-Step Guide
- How to Log Out of Mail on iPhone
- How to Change Administrator Account in Windows 11: A Step-by-Step Guide
- How to Remove Microsoft Administrator Account from Windows 11 Safely
- How to Remove Outlook Account from iPhone 13
- How to Change Administrator Name on Windows 10: A Step-by-Step Guide
- How to Find Administrator Password Windows 10 Using Command Prompt Easily
- Roku 2 (4210R) vs Roku 3 (4230R)
- How to Remove an Administrator Account from Windows 10: A Step-by-Step Guide
- iPhone 14 – How to Delete a Google Account
- How to Reset Windows 10 Password Without Logging In Without Disk: A Guide

IMAGES
COMMENTS
May 28, 2024 · Giving someone admin rights in Windows 11 ensures they have full control over the computer, allowing them to install software, change system settings, and manage other user accounts. To complete this task, follow a simple set of steps that guides you through accessing and changing user account settings.
Sep 6, 2022 · Learn how to add, change, and remove accounts on Windows 11, and customize your sign-in options, email accounts, and account picture. This guide also covers how to switch from a Microsoft to a local account or vice versa.
5 days ago · Tips for Giving User Admin Rights in Windows 11 Understand the Risks: Be aware that giving someone admin rights can potentially expose your system to risks if the user is not careful. Use Strong Passwords: Encourage users with admin rights to use strong, unique passwords to protect their accounts.
Oct 7, 2024 · -Navigate to Computer Configuration > Windows Settings > Security Settings > Local Policies > User Rights Assignment. By following these steps, you should be able to determine why Local Users and Groups is not appearing in Computer Management and take appropriate action.
Jun 10, 2024 · Giving User Admin Rights in Windows 11. Granting someone admin rights in Windows 11 is pretty straightforward. You just need to access the settings, navigate to the accounts section, and change the user’s account type to administrator. This process ensures that the user will have the necessary permissions to make system-wide changes.
Aug 27, 2024 · Verify User Account Control (UAC): Ensure UAC settings allow you to make changes by checking under Control Panel > User Accounts > Change User Account Control settings. Backup Important Data : Before making significant account changes, always back up important data to avoid loss.
Jan 30, 2023 · Windows 11 provides many new computer management tools, allowing users to customize their accounts to best fit their needs. For example, you can easily adjust the account type, personalize features, and optimize your PC’s security settings. In this tutorial, we’ll explain how to manage your user account settings on the Windows 11 operating system. How
Dec 16, 2021 · Learn about the user rights that govern the methods by which a user can log on to a system in Windows 10 and Windows 11. Find the Group Policy settings, constant names, and descriptions for each user right.
Feb 27, 2024 · Logon rights control who is authorized to log on to a device and how they can log on. User rights permissions control access to computer and domain resources, and they can override permissions that have been set on specific objects. User rights are managed in Group Policy under the User Rights Assignment item.
Jun 4, 2024 · By following these steps, you will learn how to assign administrator privileges to a user account on Windows 11. This will enable the user to perform various tasks that require elevated permissions. Step 1: Open the Settings App. First, open the Settings app by pressing Windows + I on your keyboard. The Settings app is like the control panel of ...